Atomic Scope Azure resources VNet Integration
- 22 Aug 2023
- 14 Minutes to read
- Print
- DarkLight
- Download PDF
Atomic Scope Azure resources VNet Integration
- Updated on 22 Aug 2023
- 14 Minutes to read
- Print
- DarkLight
- Download PDF
Article summary
Did you find this summary helpful?
Thank you for your feedback!
Requirement
Atomic Scope supports hybrid integration tracking. To make this available, the user must deploy the Atomic Scope tracking resource group from the Atomic Scope portal. The function app in the tracking resource group connects with your logic apps through connectors and track the logic app flow.
But this tracking function app & other resources in Azure tracking group are currently publicly accessible. Because of this, anyone with the function app's HTTP URI can trigger the function app without any authentication or authorization which leads to privacy issue.
So to avoid these kind of exploits, you can move Atomic Scope resources under your VNet. So it can't be accessed publicly and only can be accessed from the VNet's scope.
Note:
Even though the Atomic Scope function app is in a public scope, the function app won't execute the business logic without any mandatory headers.
Prerequistes
This article assumes that you have an Azure VNet and that you use Standard logic apps or Premium Function Apps for your integration scenario. These logic apps/function apps should be mapped under that VNet and should use an HTTP action with the Atomic Scope function app URI to track the flow in Atomic Scope.
Note:
- Only standard logic apps or Premium function apps can integrate with the secured Atomic Scope function app.
- Adding Atomic Scope connectors in Standard logic app is not possible, since Atomic Scope uses a custom connector. Still, you can use HTTP actions with the Atomic Scope function app URI to track your logic app. Here is the configuration article.
Architecture
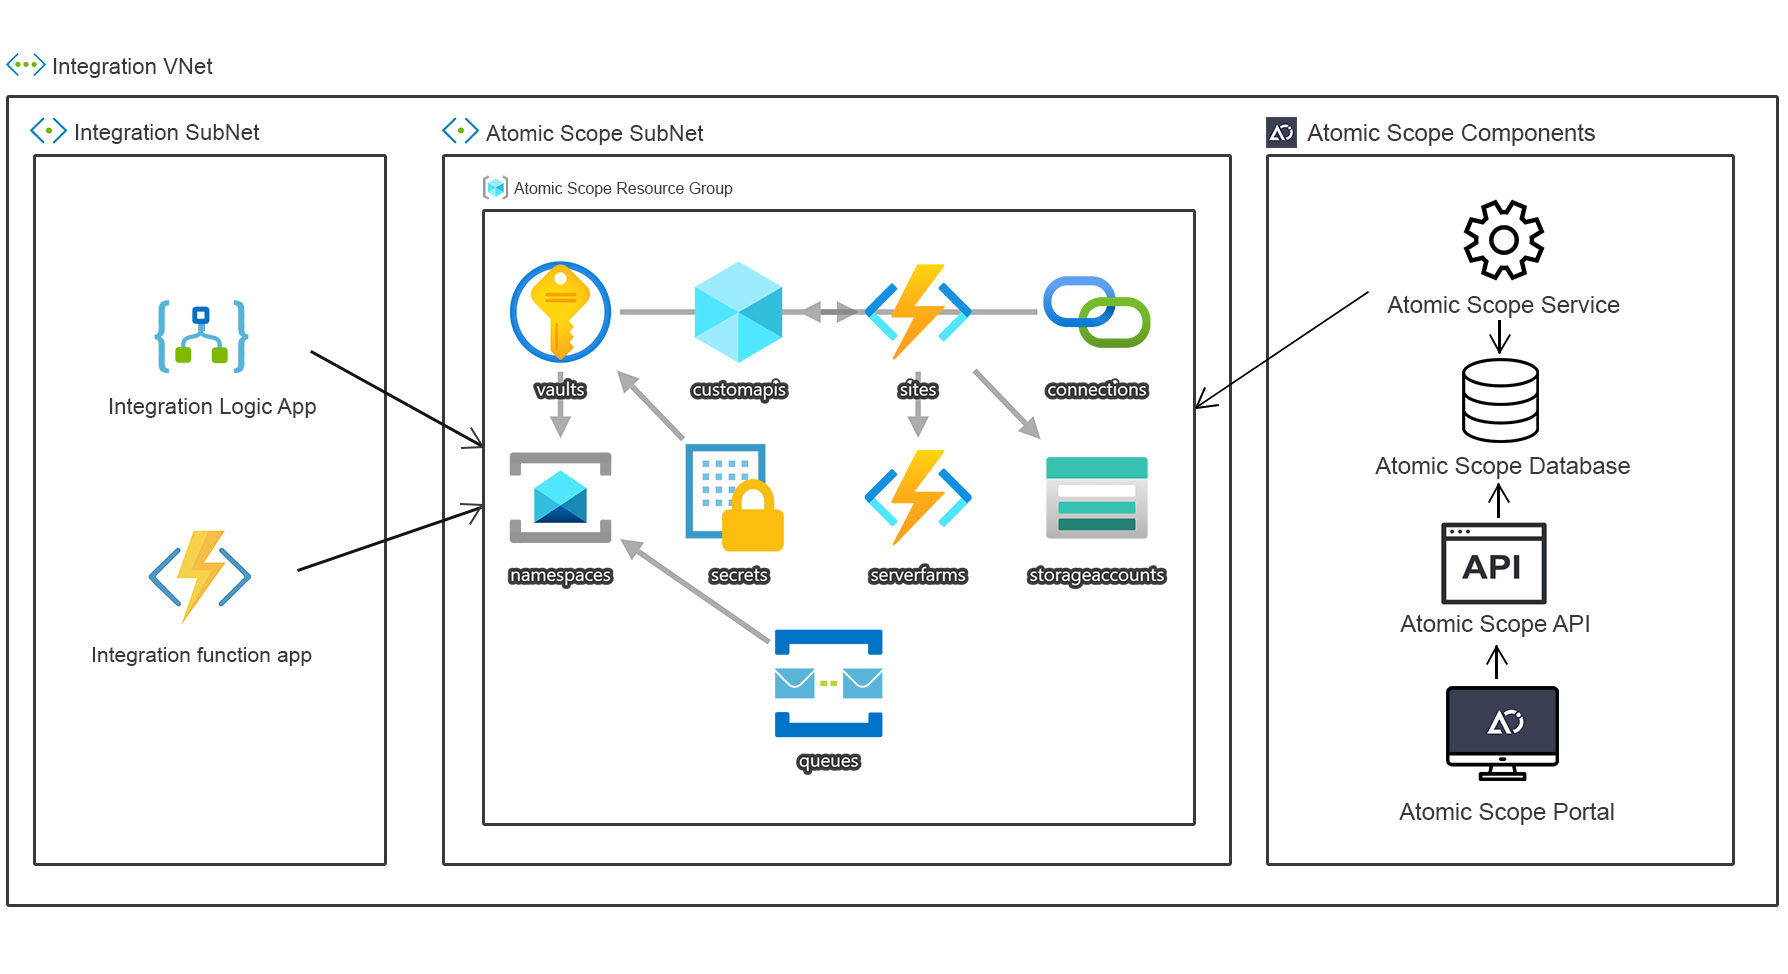
Atomic Scope Azure resources
Atomic Scope deploys the Atomic Scope Azure resource group in Azure to track your Azure integration resources like Logic apps, Function app and Service Bus.
The Atomic Scope tracking resource group contains the below mentioned resources,
- Function App
- App Service plan (Consumption)
- Service Bus Namespace (Standard)
- Storage Account (v1)
- Key Vault
- API Connection
- Logic App Custom Connector
Note:
If you've selected Azure samples option while deploying the Azure resources, an another Atomic Scope sample Azure resource group will be deployed and that will also have the same resources including some sample logic apps.
Configuring Atomic Scope Azure resources VNet Integration
To secure Atomic Scope Azure resources under a VNet, we have to create a dedicated Atomic Scope subnet & move all the AtomicScope resources under your Integration VNet.
This configuration procedure includes five steps,
- Create a dedicated Atomic Scope subnet in your VNet
- Integrate Atomic Scope Function app with VNet
- Integrate Atomic Scope ServiceBus with VNet
- Integrate Atomic Scope Storage Account with VNet
- Integrate Atomic Scope KeyVault with VNet
Note:
- Integrating the Atomic Scope API connection and the Atomic Scope Logic App custom connector to a VNet is not possible, as both those resources don't have Azure networking options
- Even if those resources are not moved under a VNet, it will work seamlessly with Atomic Scope secured resources
Let us see each steps briefly,
1. Create a dedicated Atomic Scope subnet in your VNet
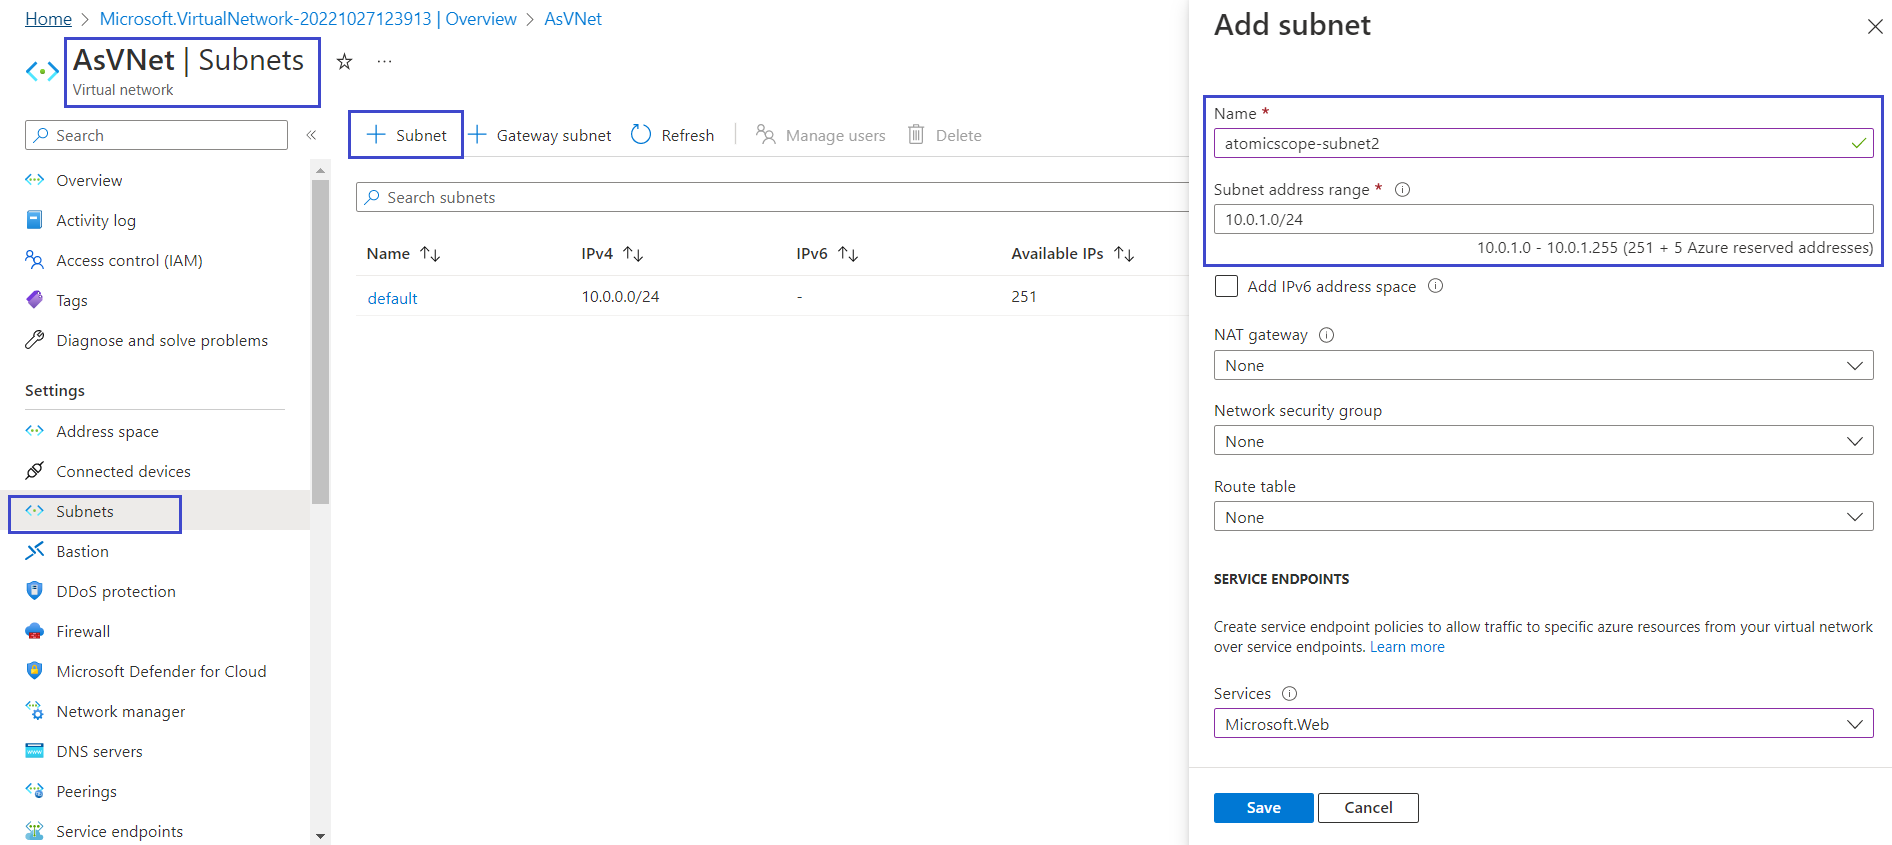
- Go to your resource group
- Select your Integration VNet
- In your Integration VNet, in the menu on the left, select Subnets
- Click create Subnet
- In the Add Subnet window,
- Enter the Subnet name
- Enter the new subnet address range or leave the default generated subnet address range if no changes are required
- Select the Network security group from the Network security group dropdown if you have any
- Select Services in Service Endpoints if required
- Delegate the subnet to a service in Subnet Delegation if required
- Click Save to create the Subnet
Now this subnet is created under your Integration VNet & this Atomic Scope subnet can communicate with other subnets inside the VNet without any access restriction problem.
Note:
You can also map the Atomic Scope resources to your existing Subnet in VNet, so creating an dedicated Atomic Scope subnet in your VNet is not necessary. But do ensure both your integration apps(logic apps, function apps) are under same VNet.
2. Integrate Atomic Scope function app with VNet
Integrating the Atomic Scope function app with VNet requires a few options to be changed, so follow the below mentioned steps chronologically,
Step 1: Migrate the Atomic Scope function app service plan to a Premium plan
Currently, the Atomic Scope function app runs in a consumption plan. But for VNet integration, the function app should run in a premium app service plan. So we've to change our App Service plan to Premium App service plan for that Atomic Scope function app.
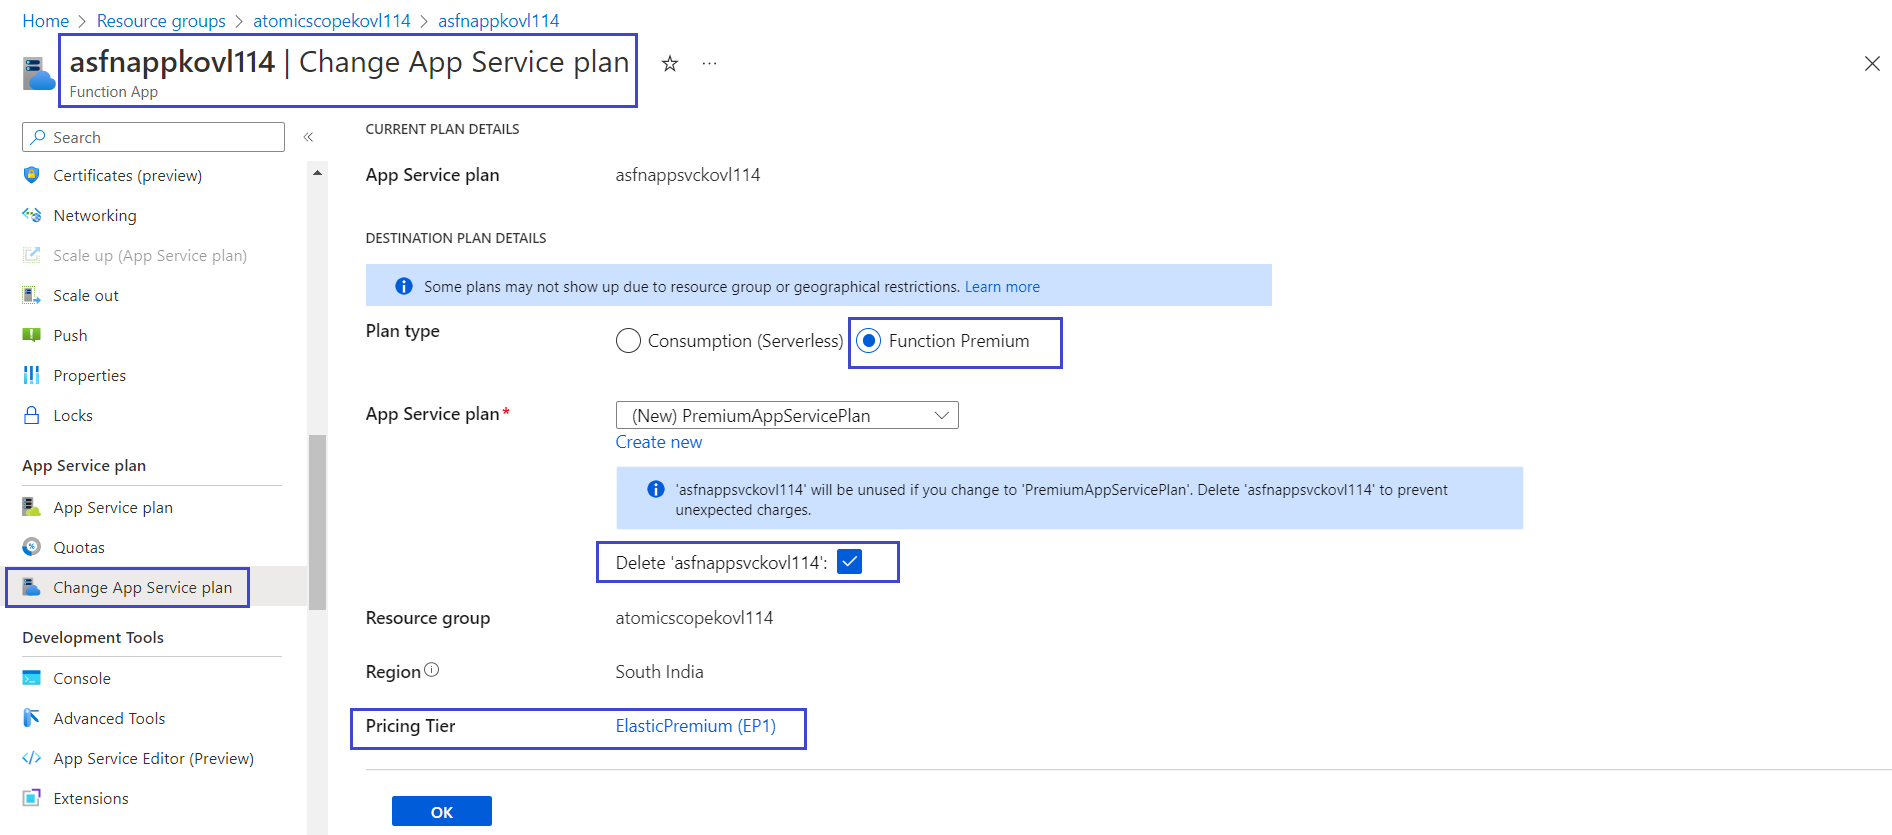
- In the Azure portal, go to the Atomic Scope resource group
- Select the Atomic Scope function app
- In the Atomic Scope function app, in the menu on the left, select Change App Service plan
- In the Change App Service plan window, select any Function Premium plan type and edit App service plan name (if required)
- Select Delete existing app service plan
- Click Ok to create the Premium App service plan
- Now the created Premium App service plan will be mapped with the Atomic Scope function app and will delete the existing Consumption service plan.
Step 2: Create a private endpoint for the Atomic Scope Function app
Now create the private endpoint to lock down the Atomic Scope function app. This private endpoint will connect the Atomic Scope function app privately and securely to your virtual network by using a private IP address.
In the Atomic Scope function app, in the menu on the left, select Networking
Under Private Endpoint Connections, select Configure your private endpoint connections
Select Add
In the pane that opens, use the following private endpoint settings
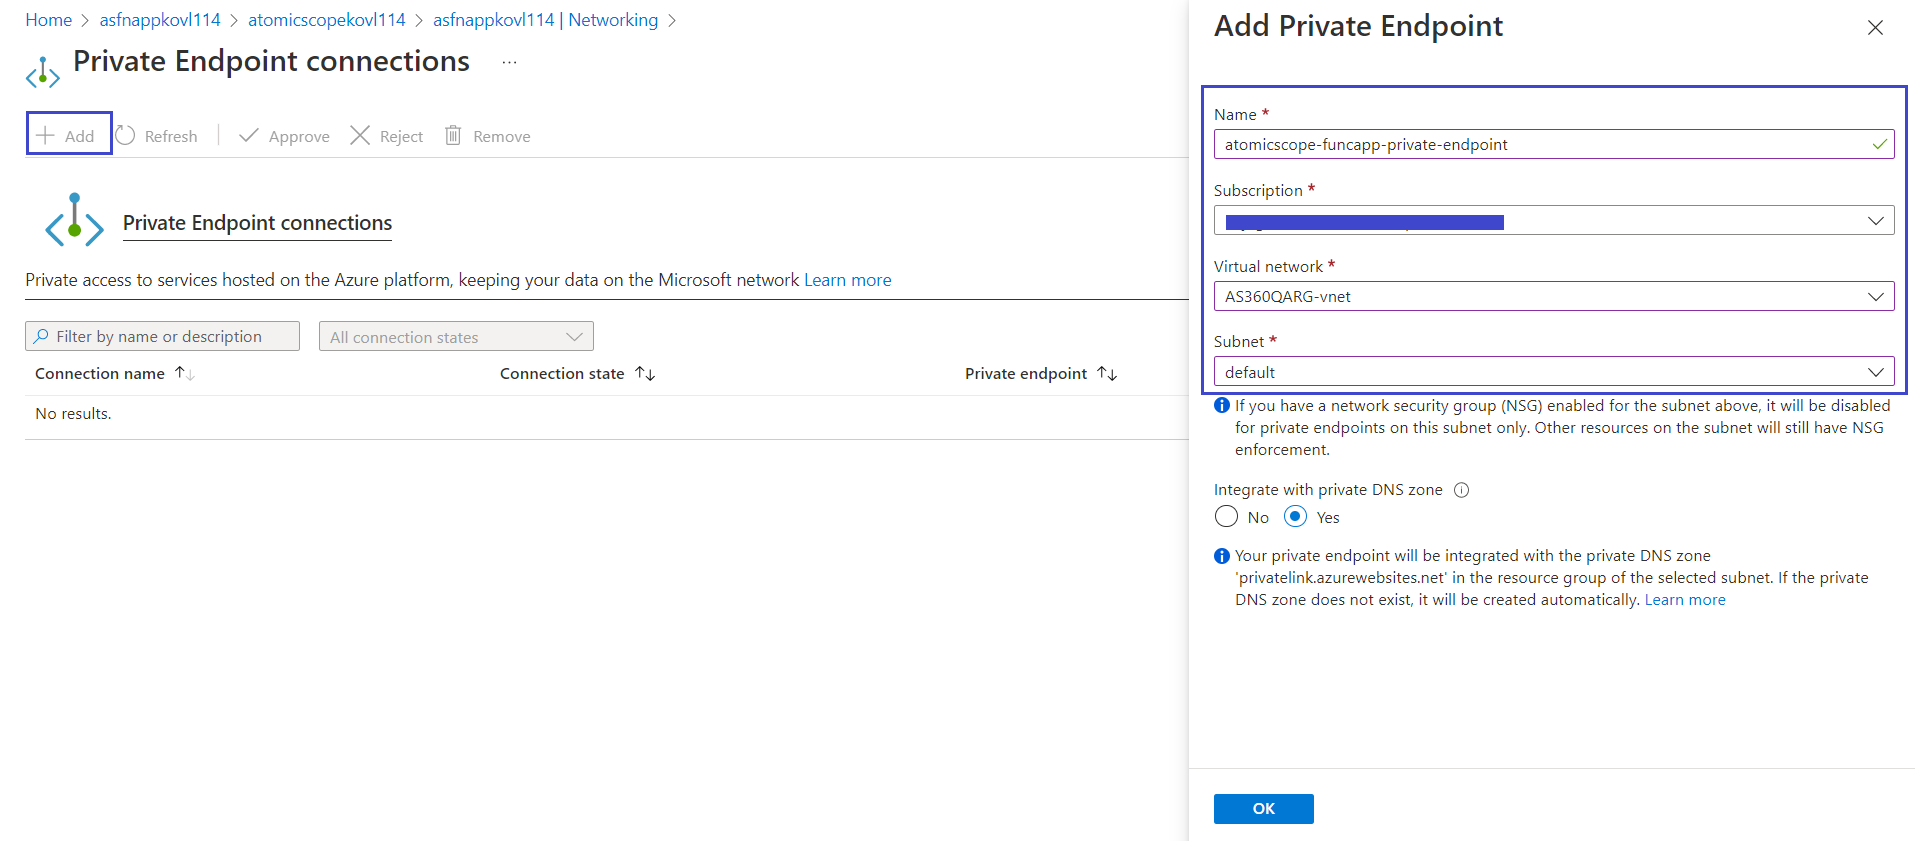
- Select OK to add the private endpoint
Step 3: Function app VNet Integration
- Go to the Atomic Scope resource group
- Select the Atomic Scope function app
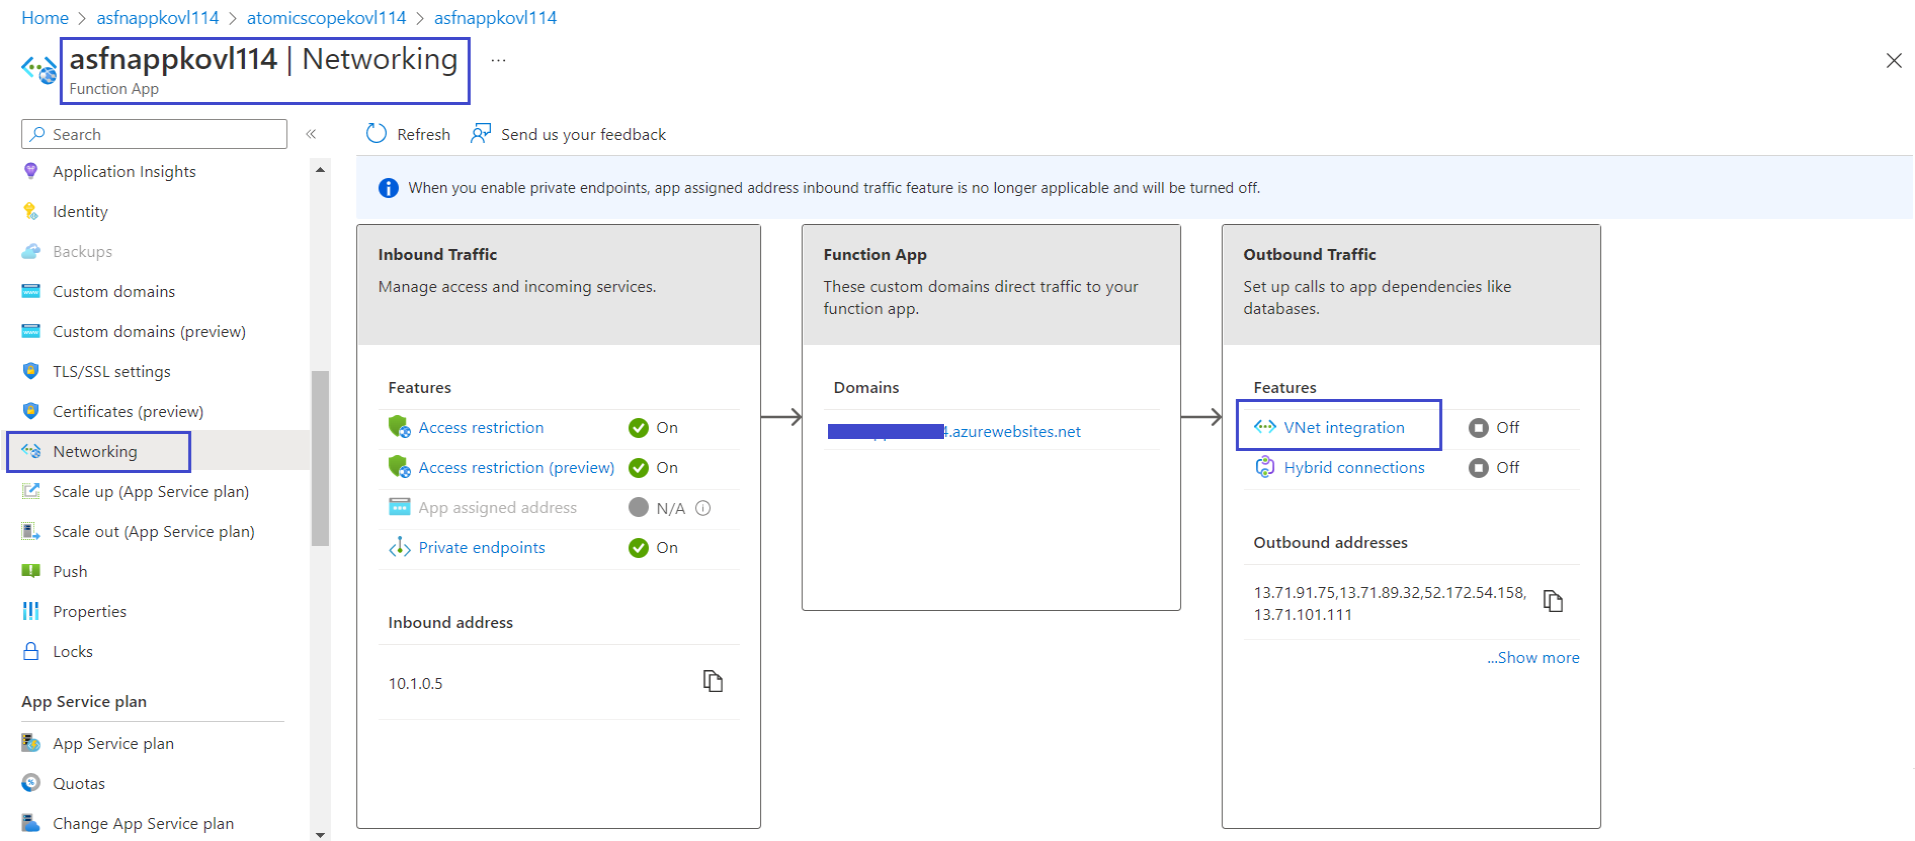
- In the Atomic Scope function app, in the menu on the left, select Networking
- Click VNet Integration
- In VNet Integration window, Select Add VNet
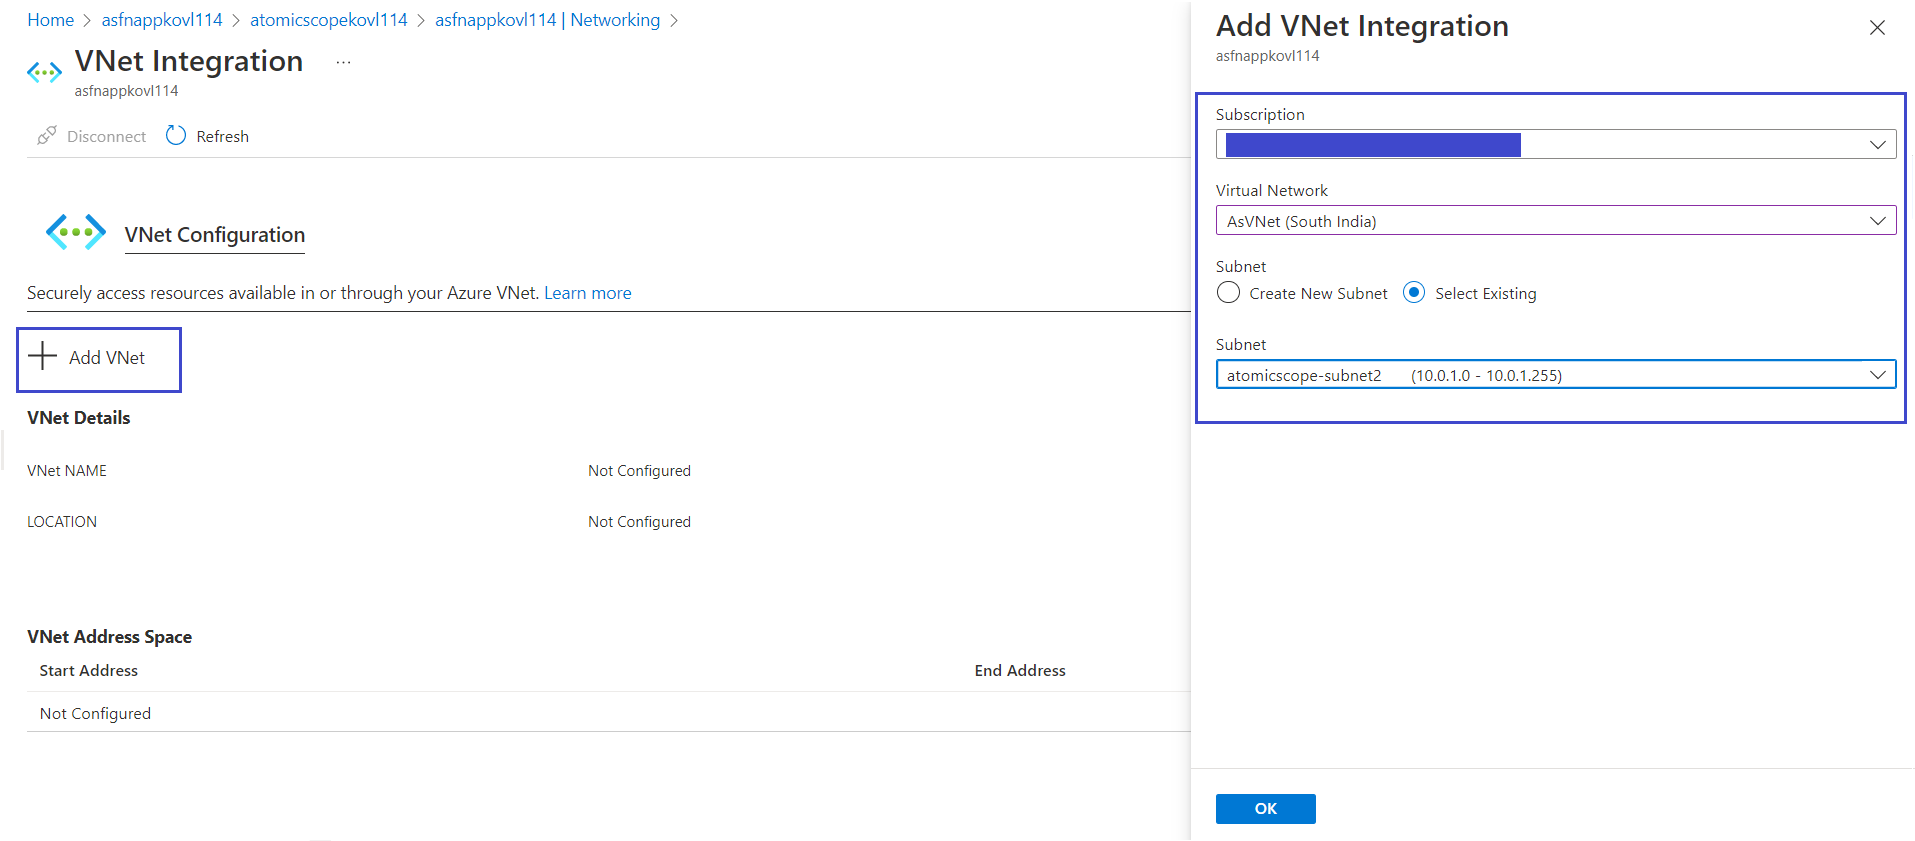
- In Add VNet Integration window, under Virtual Network, select your IntegrationVNet.
- Select the Atomic Scope subnet you created earlier or your existing subnet for subnet option
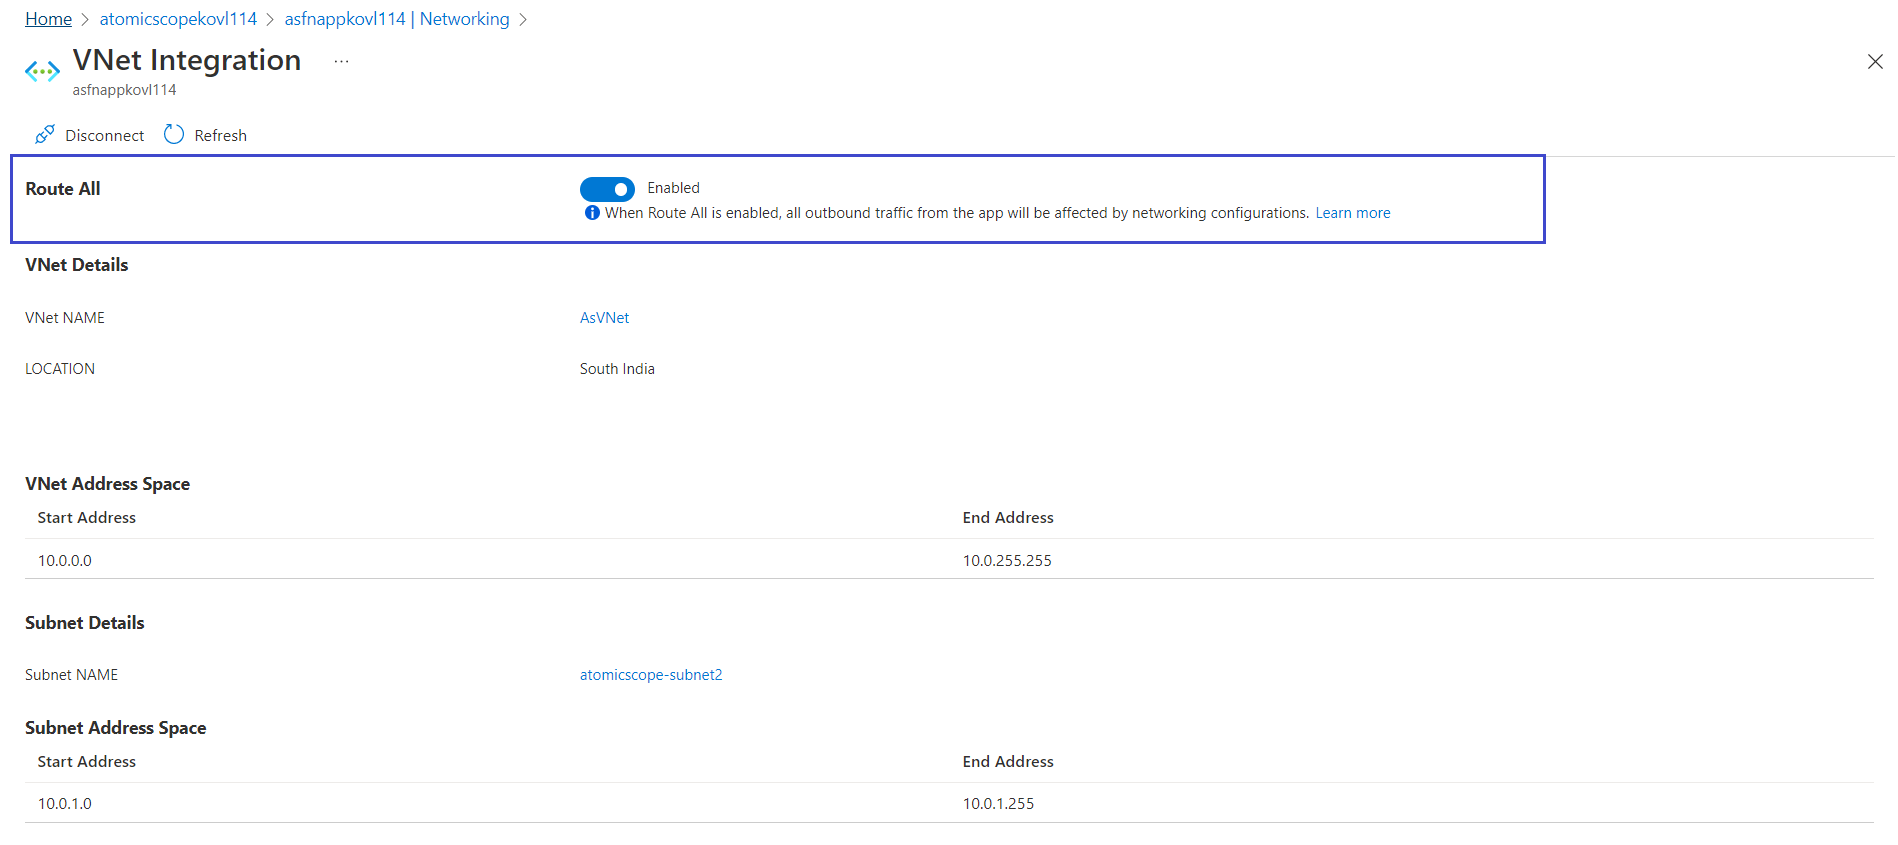
- Select OK. The Atomic Scope function app is now integrated with your virtual network
If the virtual network and function app are in different subscriptions, you need to first provide Contributor access to the service principal Microsoft Azure App Service on the virtual network.
Ensure that the Route All configuration setting is set to Enabled.
3. Integrate Atomic Scope Service Bus Namespace with VNet
Currently the Atomic Scope uses the Standard Service Bus Namespace, but to integrate with a VNet you need to migrate our Standard Service Bus to the Premium plan.
Step 1: Migrate the Atomic Scope Standard ServiceBus to Premium tier
Follow the below steps to migrate to a Premium plan,
- Go to the Atomic Scope resource group
- Select the Atomic Scope Service Bus
- In the Atomic Scope Service Bus, in the menu on the left, select Migrate to Premium.
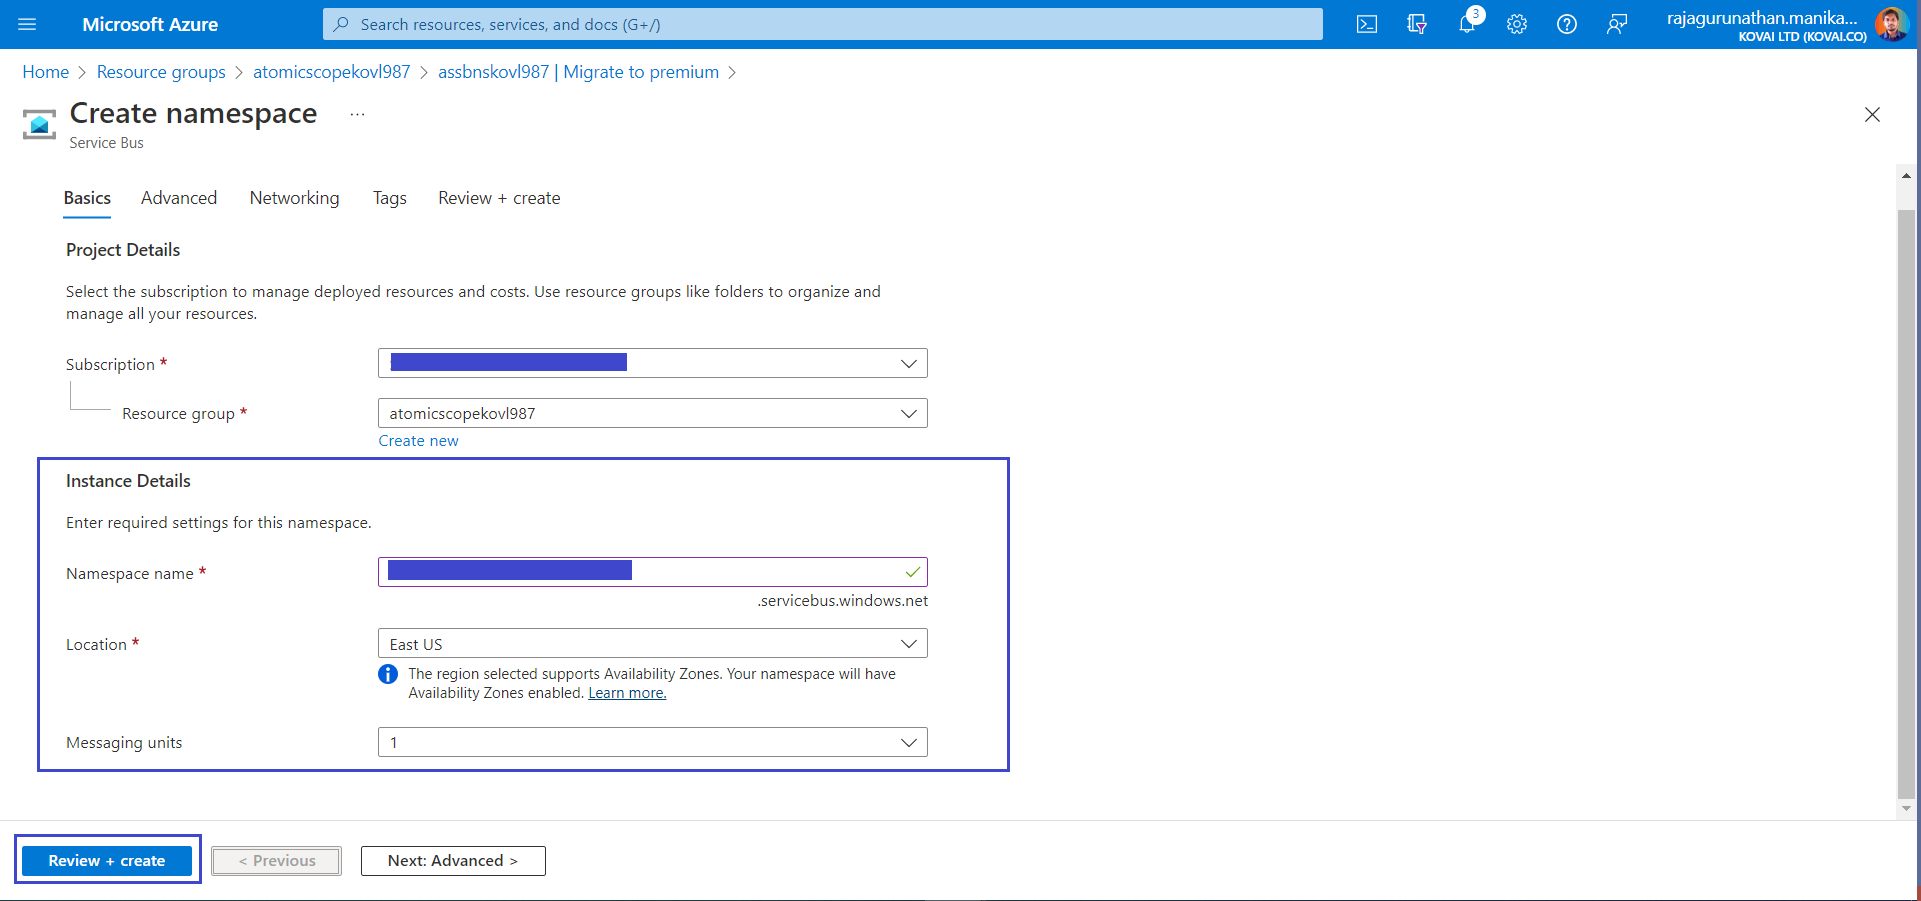
- In Migrate to Premium window, either select Create a new Premium Namespace or Existing Namespace
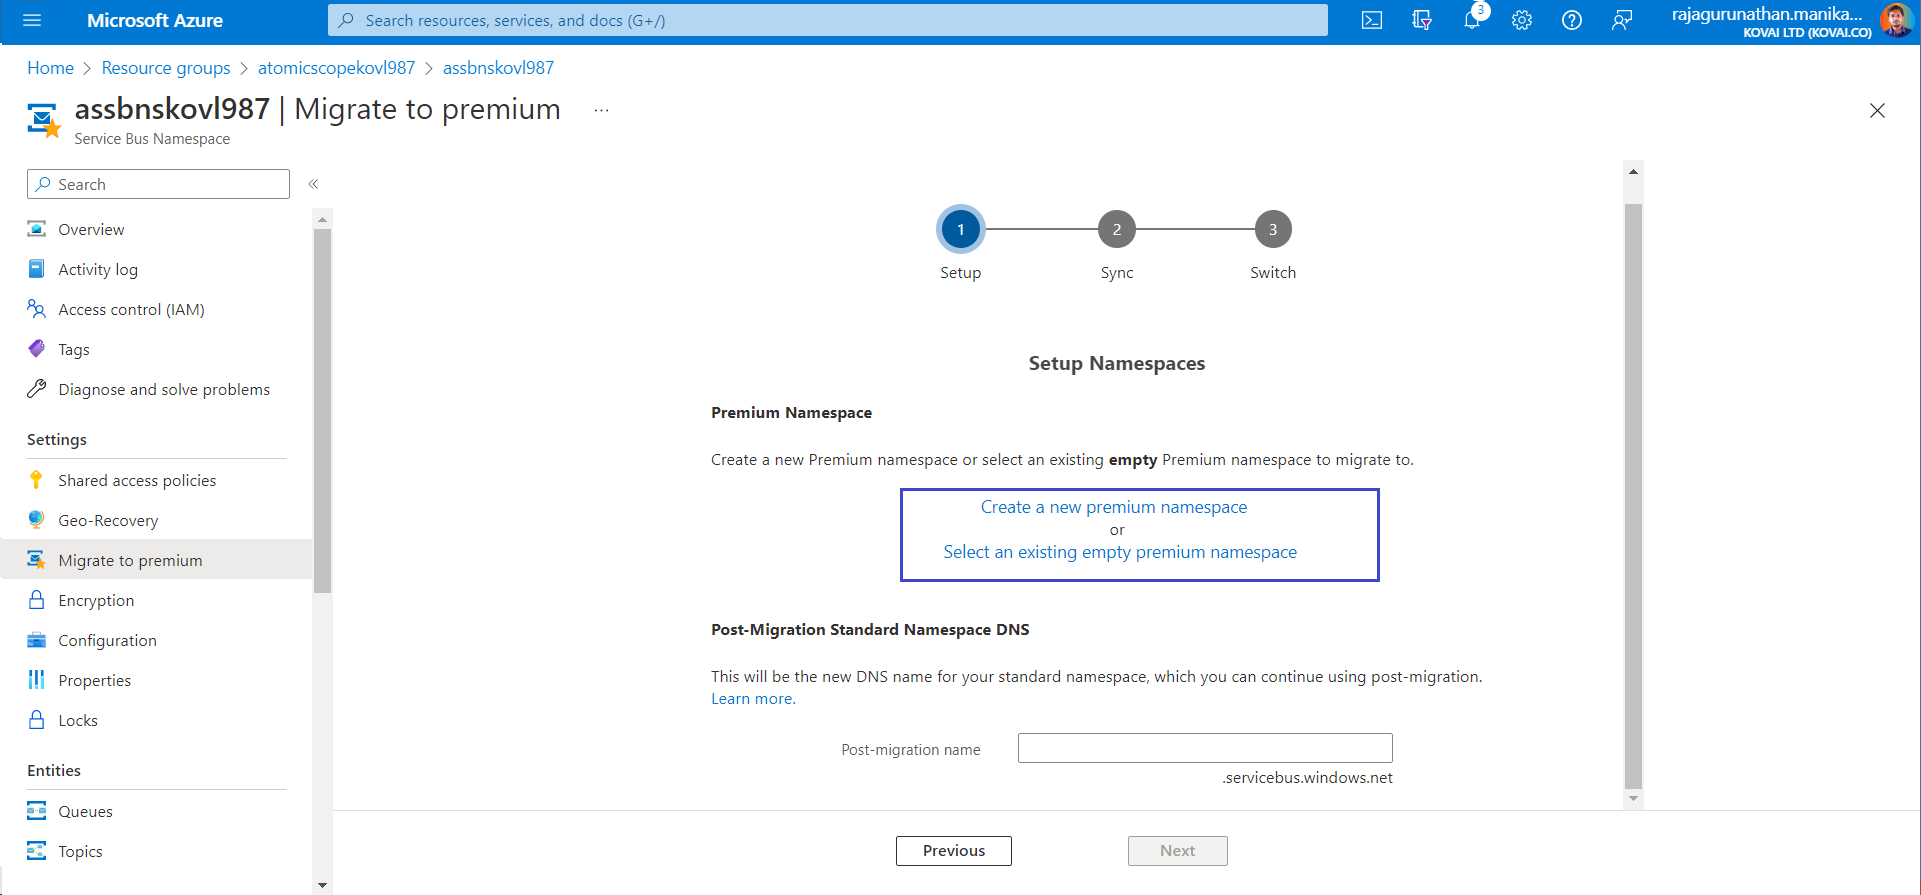
- On clicking the above mentioned options, it open Namespace window, Select same subscription, resource group & add ServiceBus Namespace name and Click Review & Create. Now its ready for Migration. Wait for the deployment to complete to continue the below steps.

- Now add PostMigration name in Migrate to Premium window & Click Next. Now setup is done.

- In Sync step, Click Start Sync to move existing ServiceBus Entities to Migrated ServiceBus Namespace. Once its done click Next to Complete the Migration.
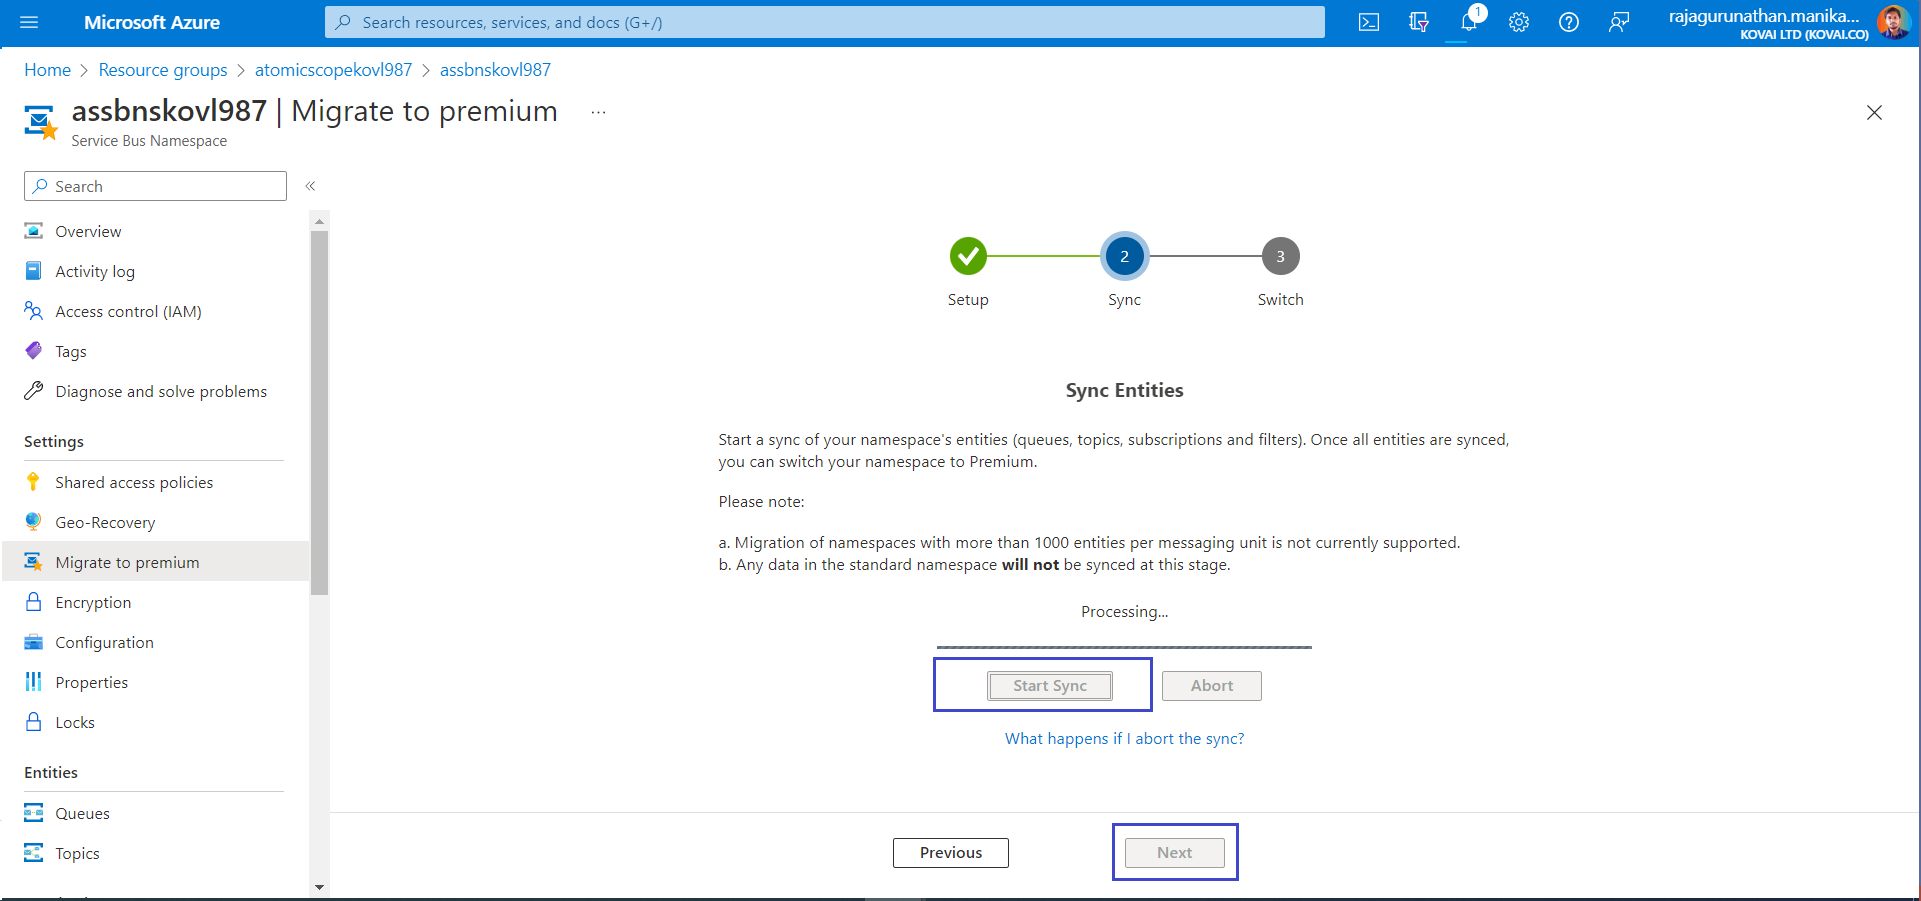
- In Switch step, Click Complete Migration, so the ServiceBus Namespace can complete the Migration & deployment.
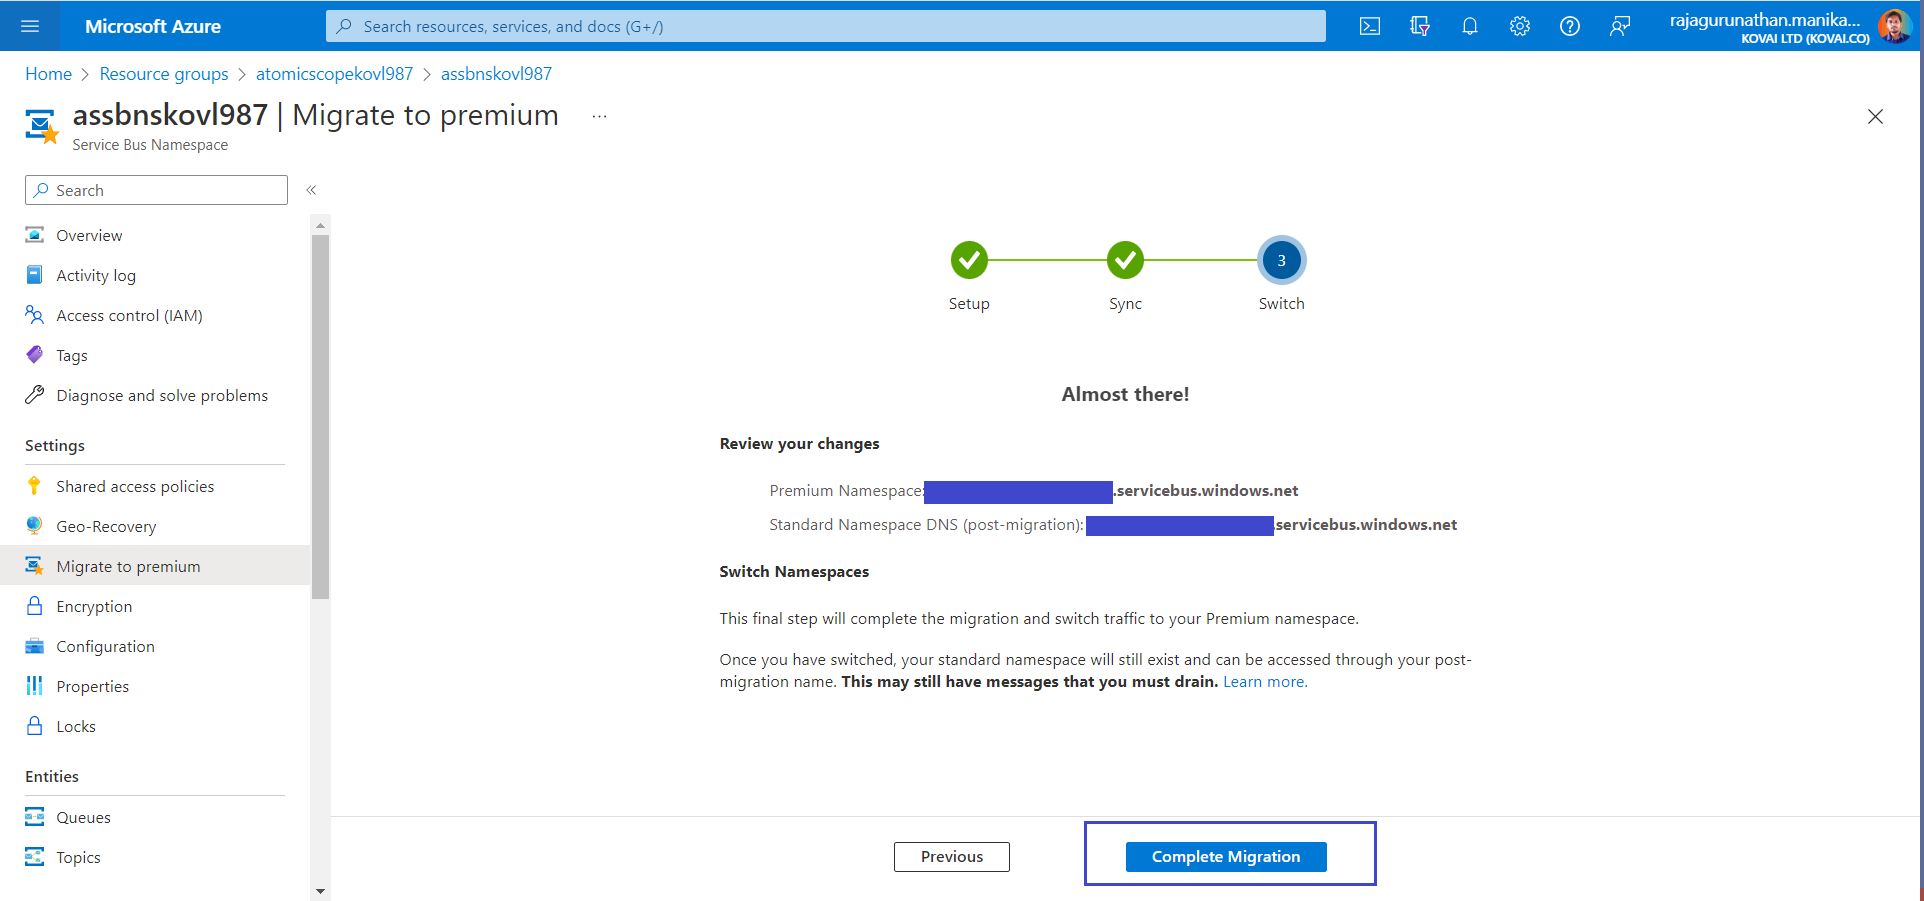
- Now AtmoicScope ServiceBus Namespace is completely Migrated to Premium tier.
- Next step is to Create a private endpoint for the ServiceBus Namespace.
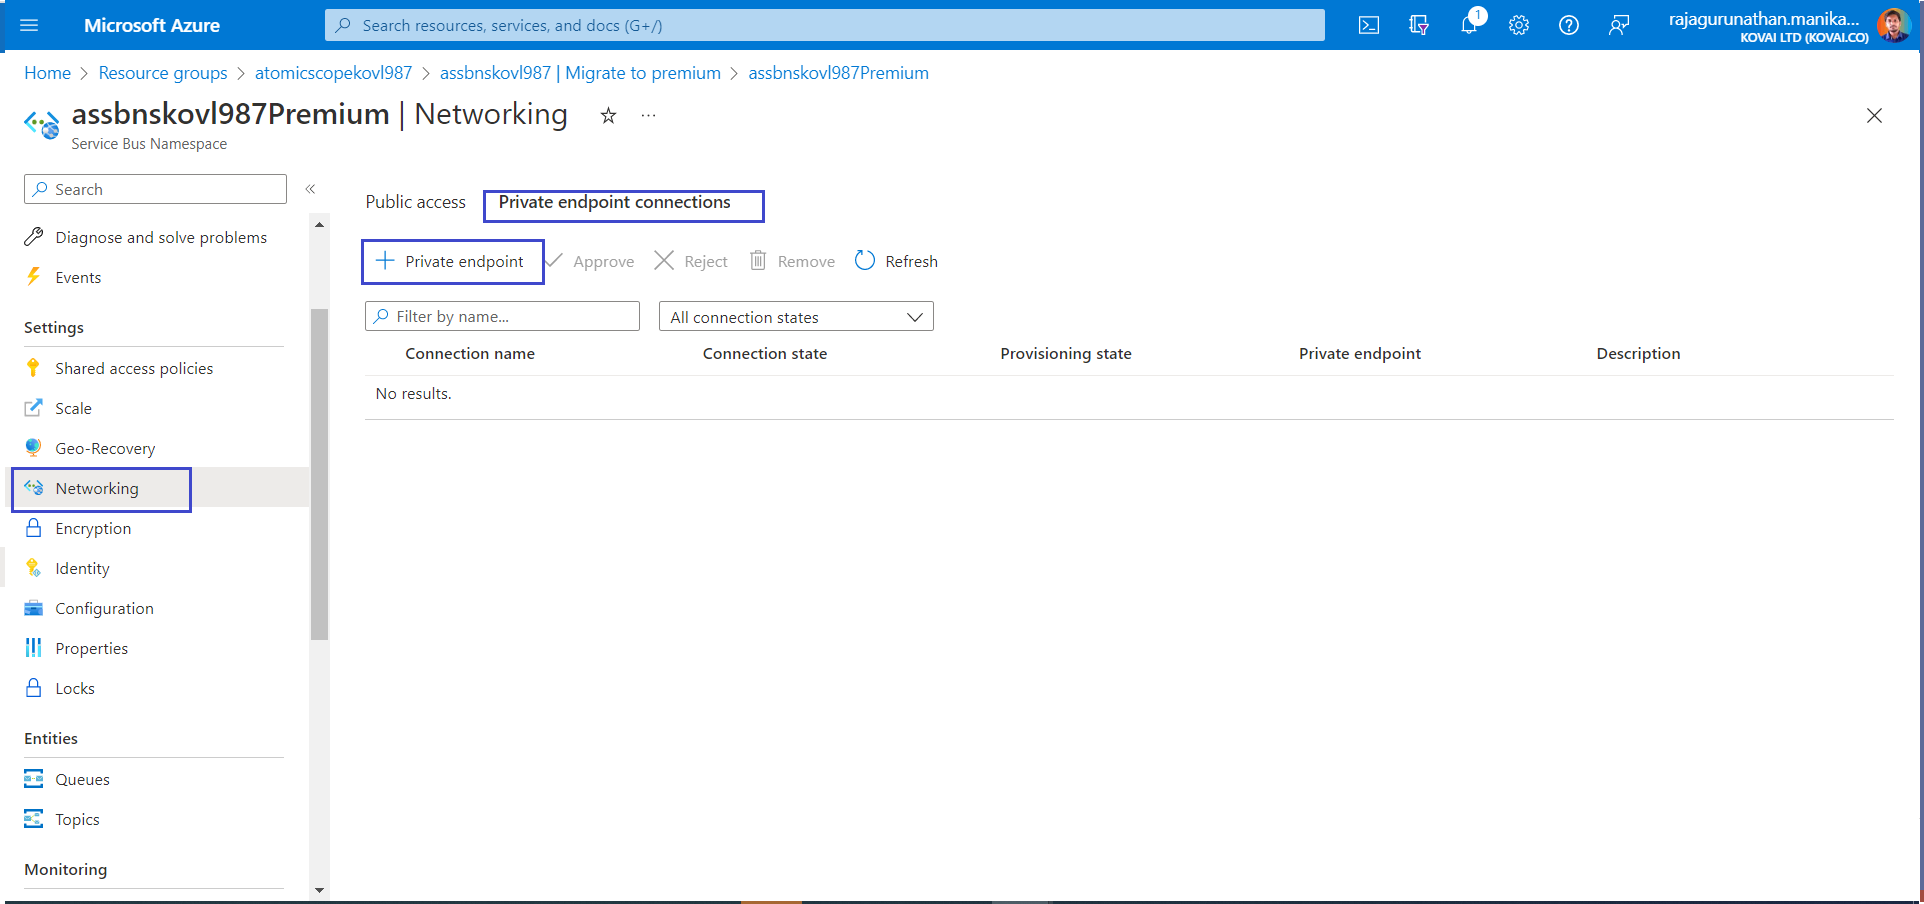
Step 2: Create Private Endpoints for ServiceBus Namespace
In Atomic Scope Service Bus, in the menu on the left, select Networking.
On the Private endpoint connections tab, select Private endpoint.
- On the Basics tab, use the private endpoint settings shown in the following table.
| Setting | Suggested value | Description |
|---|---|---|
| Subscription | Your subscription | The subscription under which Atomic Scope resources are created. |
| Resource group | AtmoicScope Resource group | The Atomic Scope resource group deployed from Atomic Scope |
| Name | atomicscope-servicebus-namespace-endpoint | The name of the private endpoint for servicebus namespace |
| Region | CentralUS | The region where Atomic Scope storage account created |
- On the Resource tab, use the private endpoint settings shown in the following table.
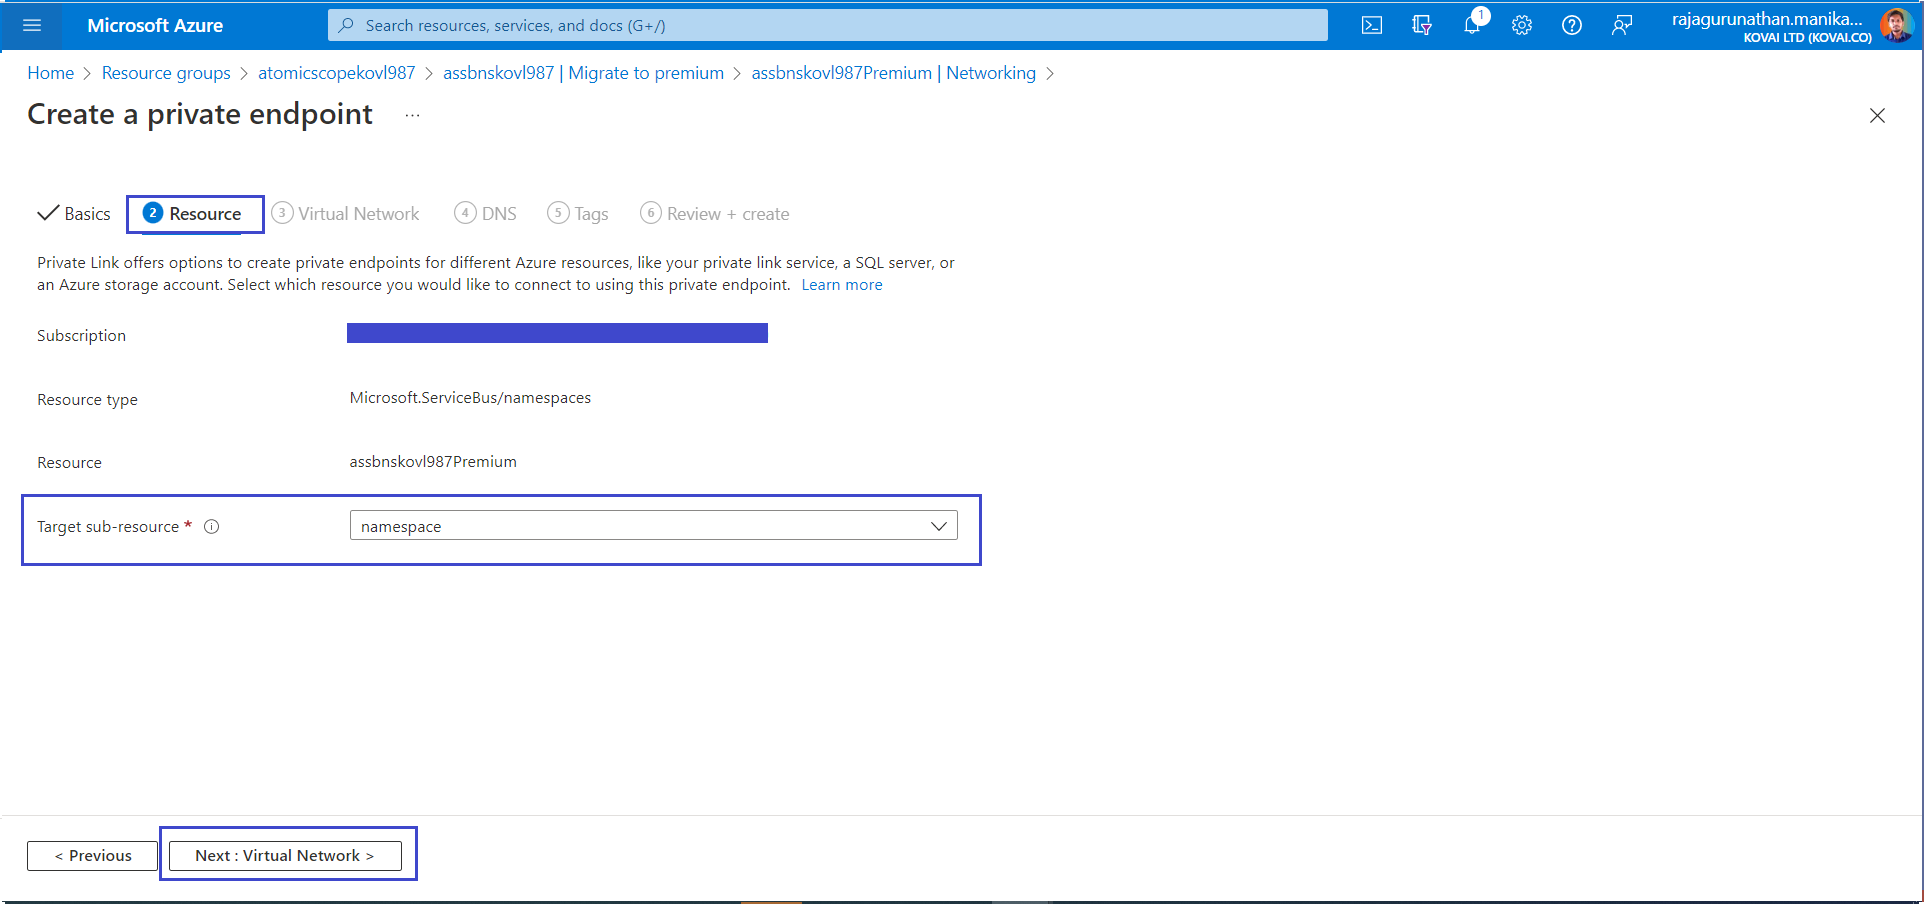
| Setting | Suggested value | Description |
|---|---|---|
| Subscription | Your subscription | The subscription under which Atomic Scope resources are created. |
| Resource type | Microsoft.ServiceBus/namespaces | The resource type for the Service Bus. |
| Resource | atomicScopeServicebusPremium | The Atomic Scope Service Bus which deployed from Atomic Scope |
| Target subresource | namespace | The private endpoint that will be used for the namespace from the Service Bus. |
- On the Virtual Netwrok tab, Select your Integration VNet and for the Subnet setting, choose default.
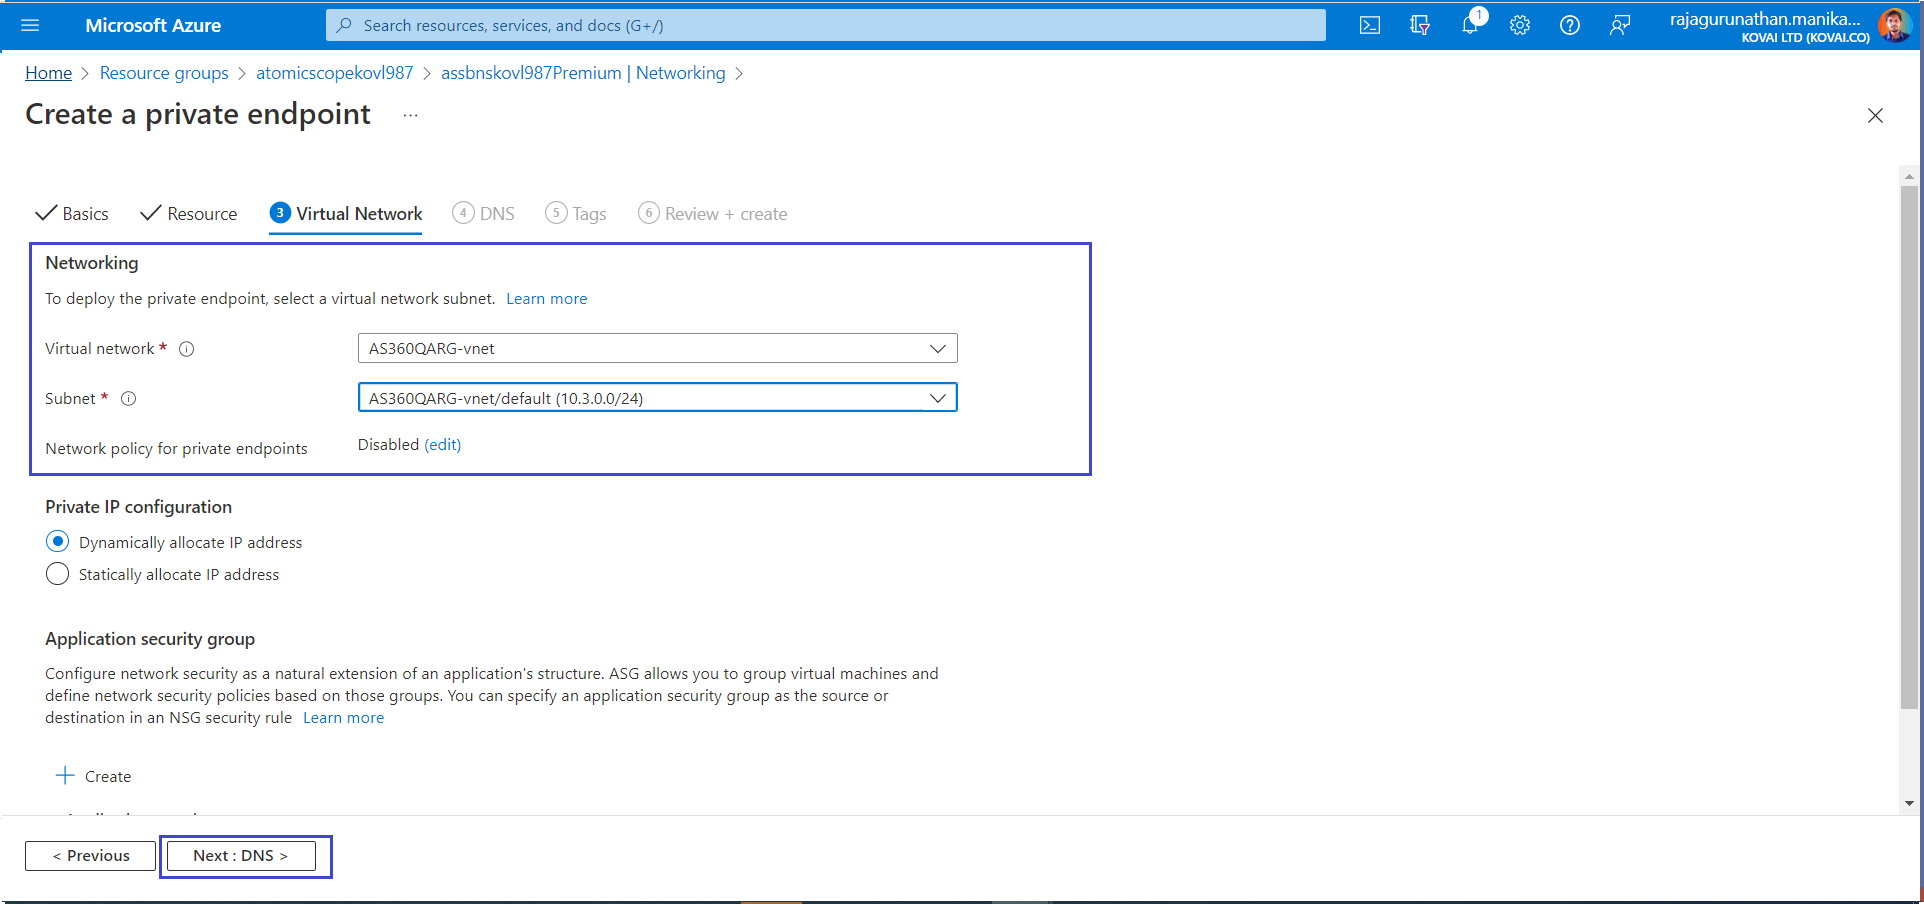
- Select Review + create. After validation finishes, select Create.
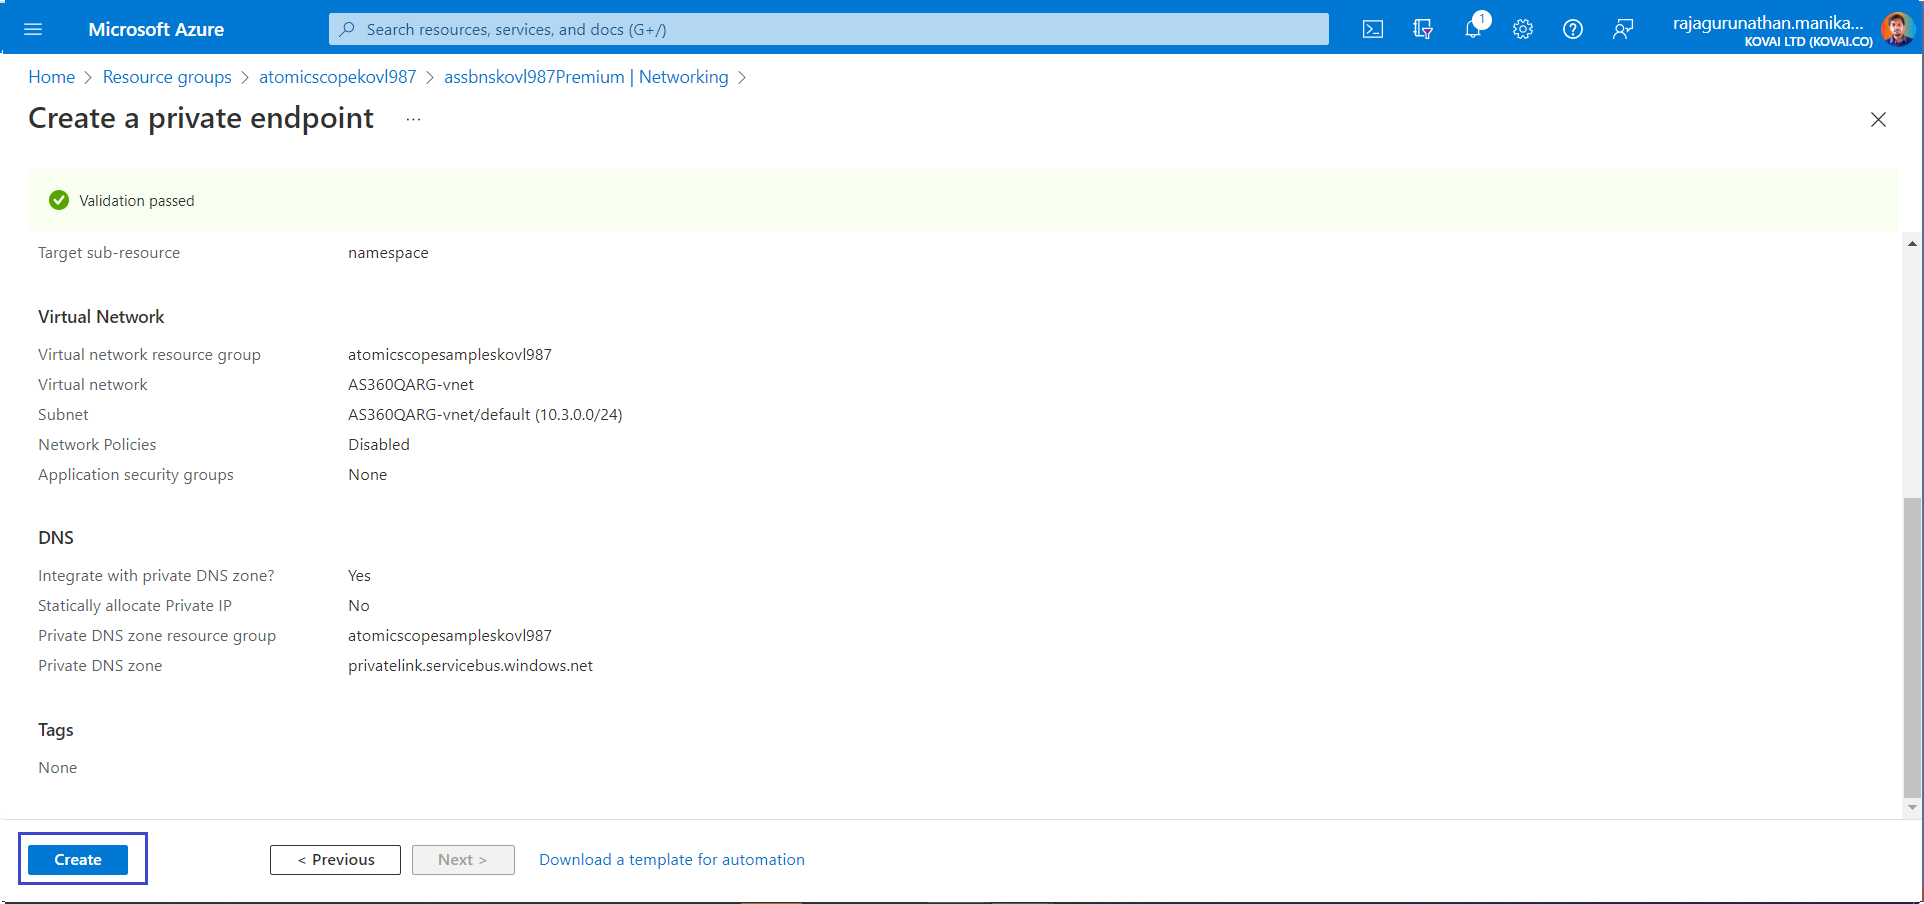
- Now the private endpoint for ServiceBus is created and its ready for VNet Integration.
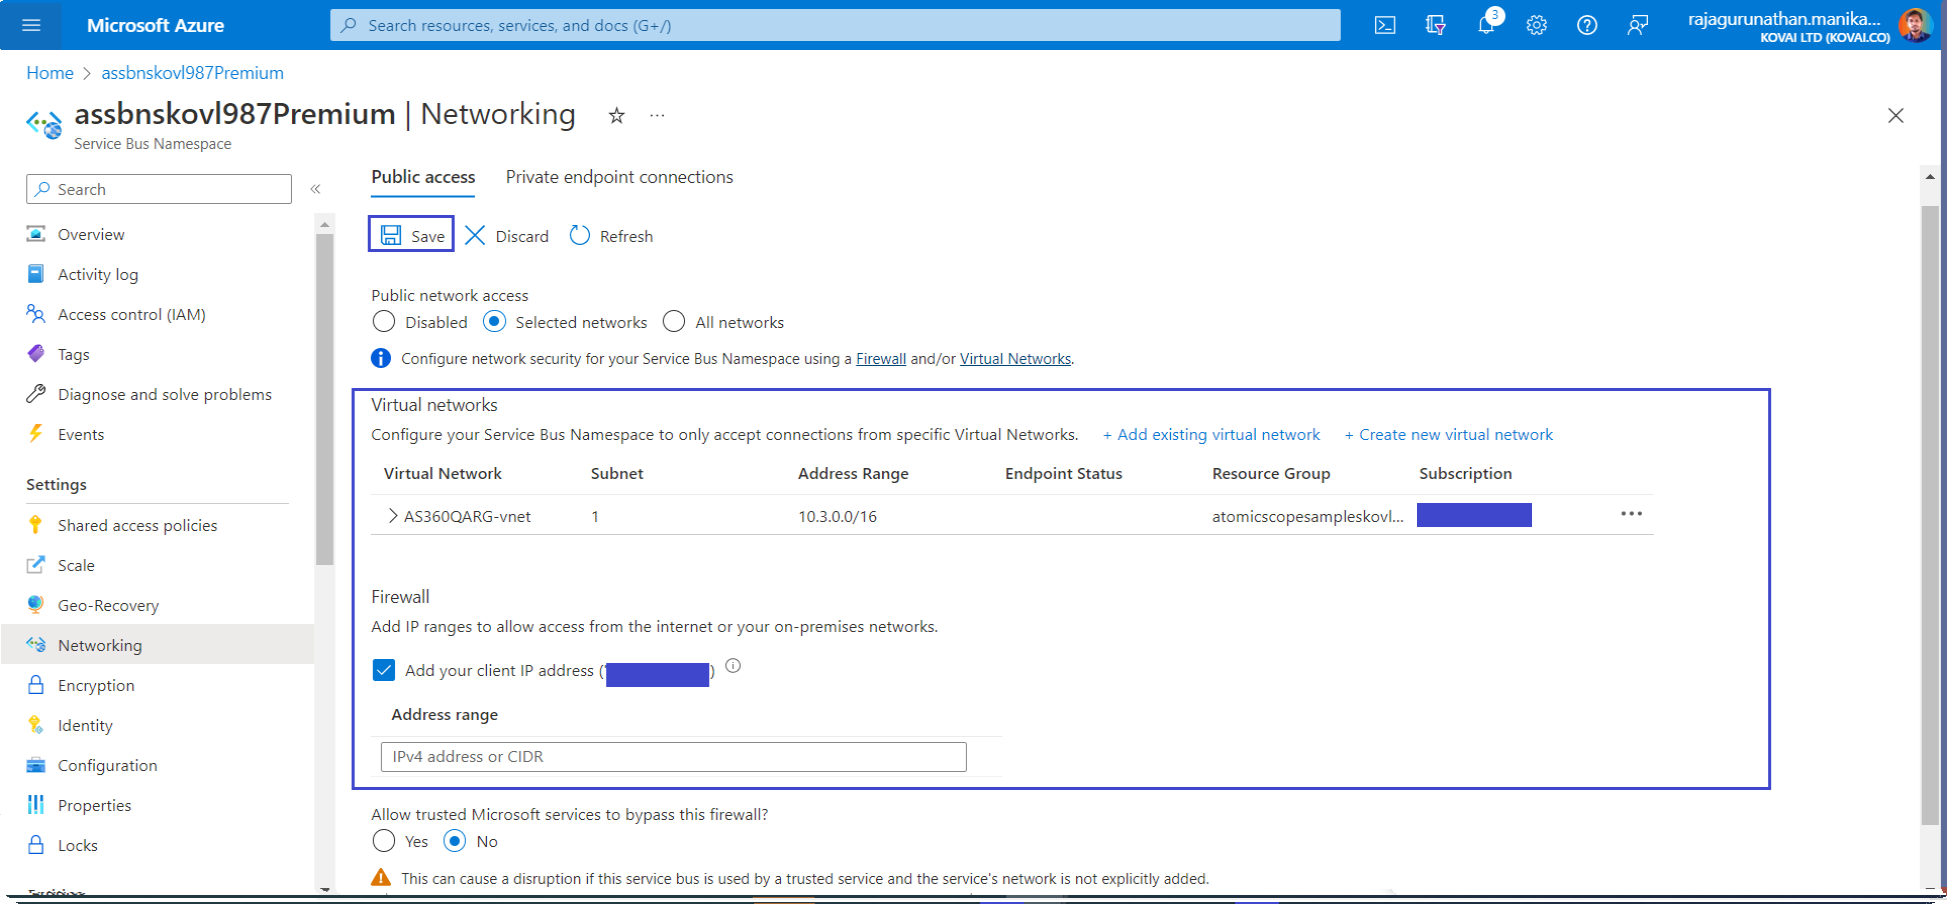
Step 3: ServiceBus Namespace VNet Integration
After the private endpoint is created, return to the Firewall and virtual networks section of your Service Bus namespace.
Ensure Selected networks is selected.
Select + Add existing virtual network to add the recently created virtual network.
On the Add networks tab, use the network settings from the following table:
| Setting | Suggested value | Description |
|---|---|---|
| Subscription | Your subscription | The subscription under which Atomic Scope resources are created. |
| Virtual networks | IntegrationVNet | The name of your Integration virtual network |
| Subnets | atomicscope-subnet | The name of the subnet to which Atomic Scope resources will connect. |
- Select Add your client IP address to give your current client IP access to the namespace.
- Select Enable to enable the service endpoint.
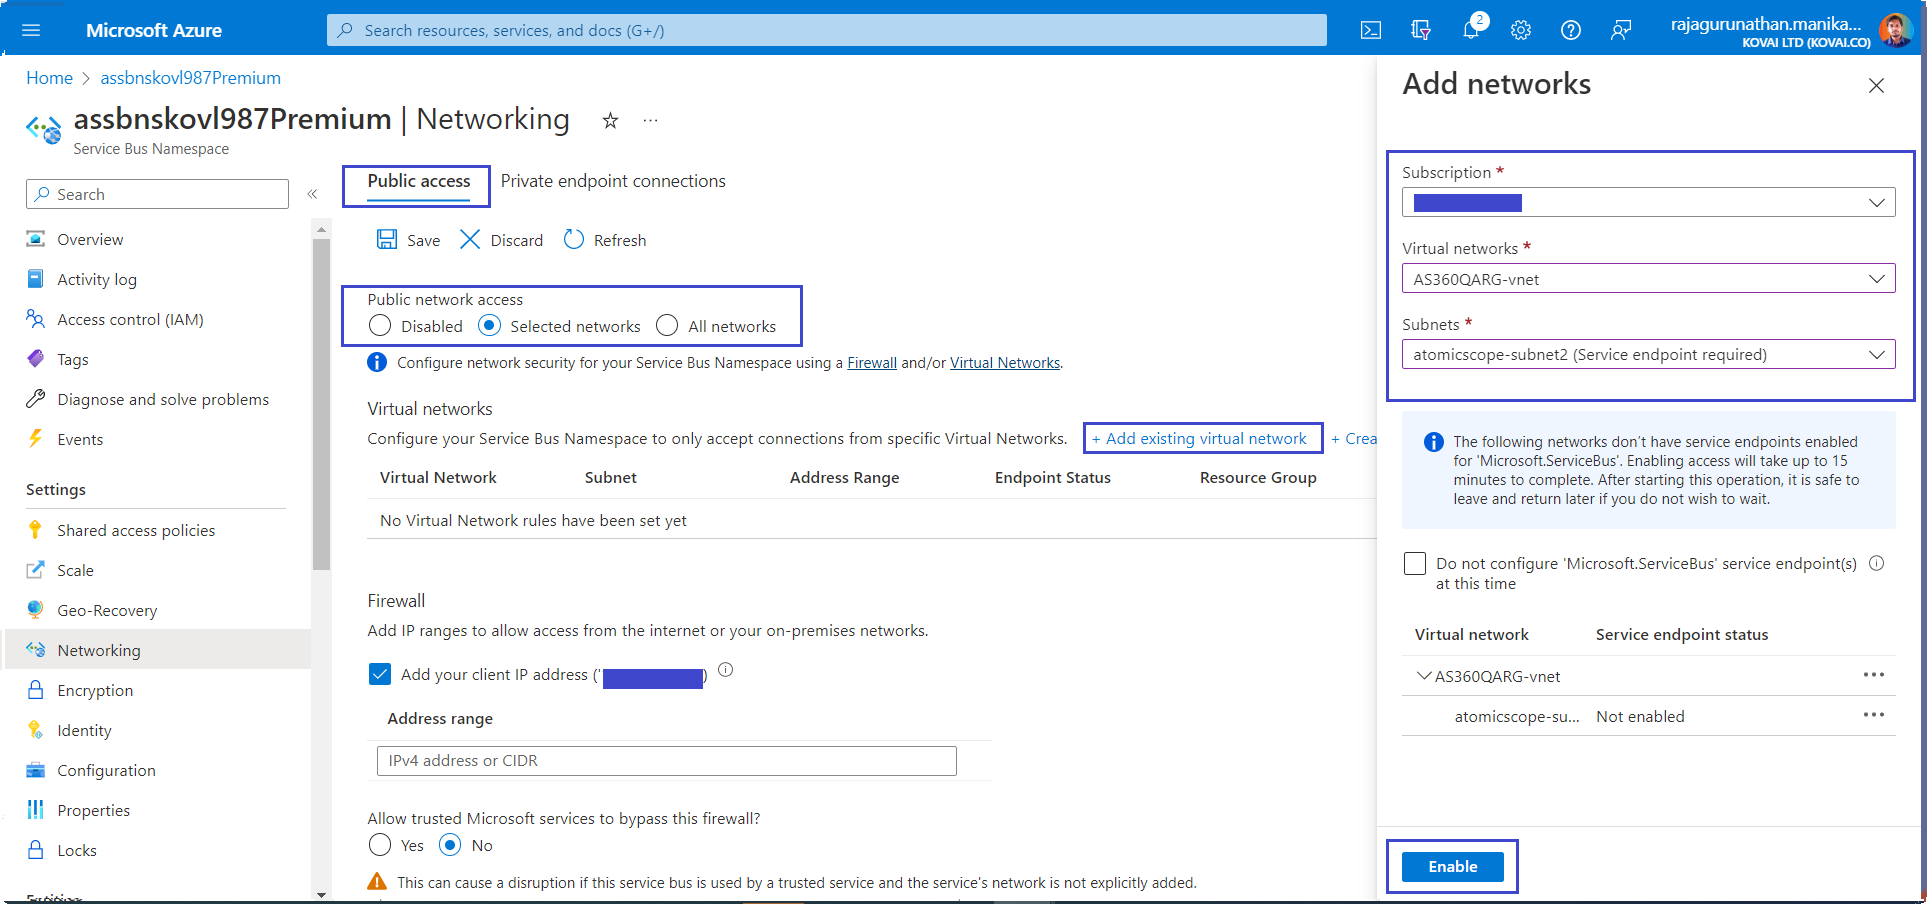
- Select Add to add the selected virtual network and subnet to the firewall rules for the Service Bus.
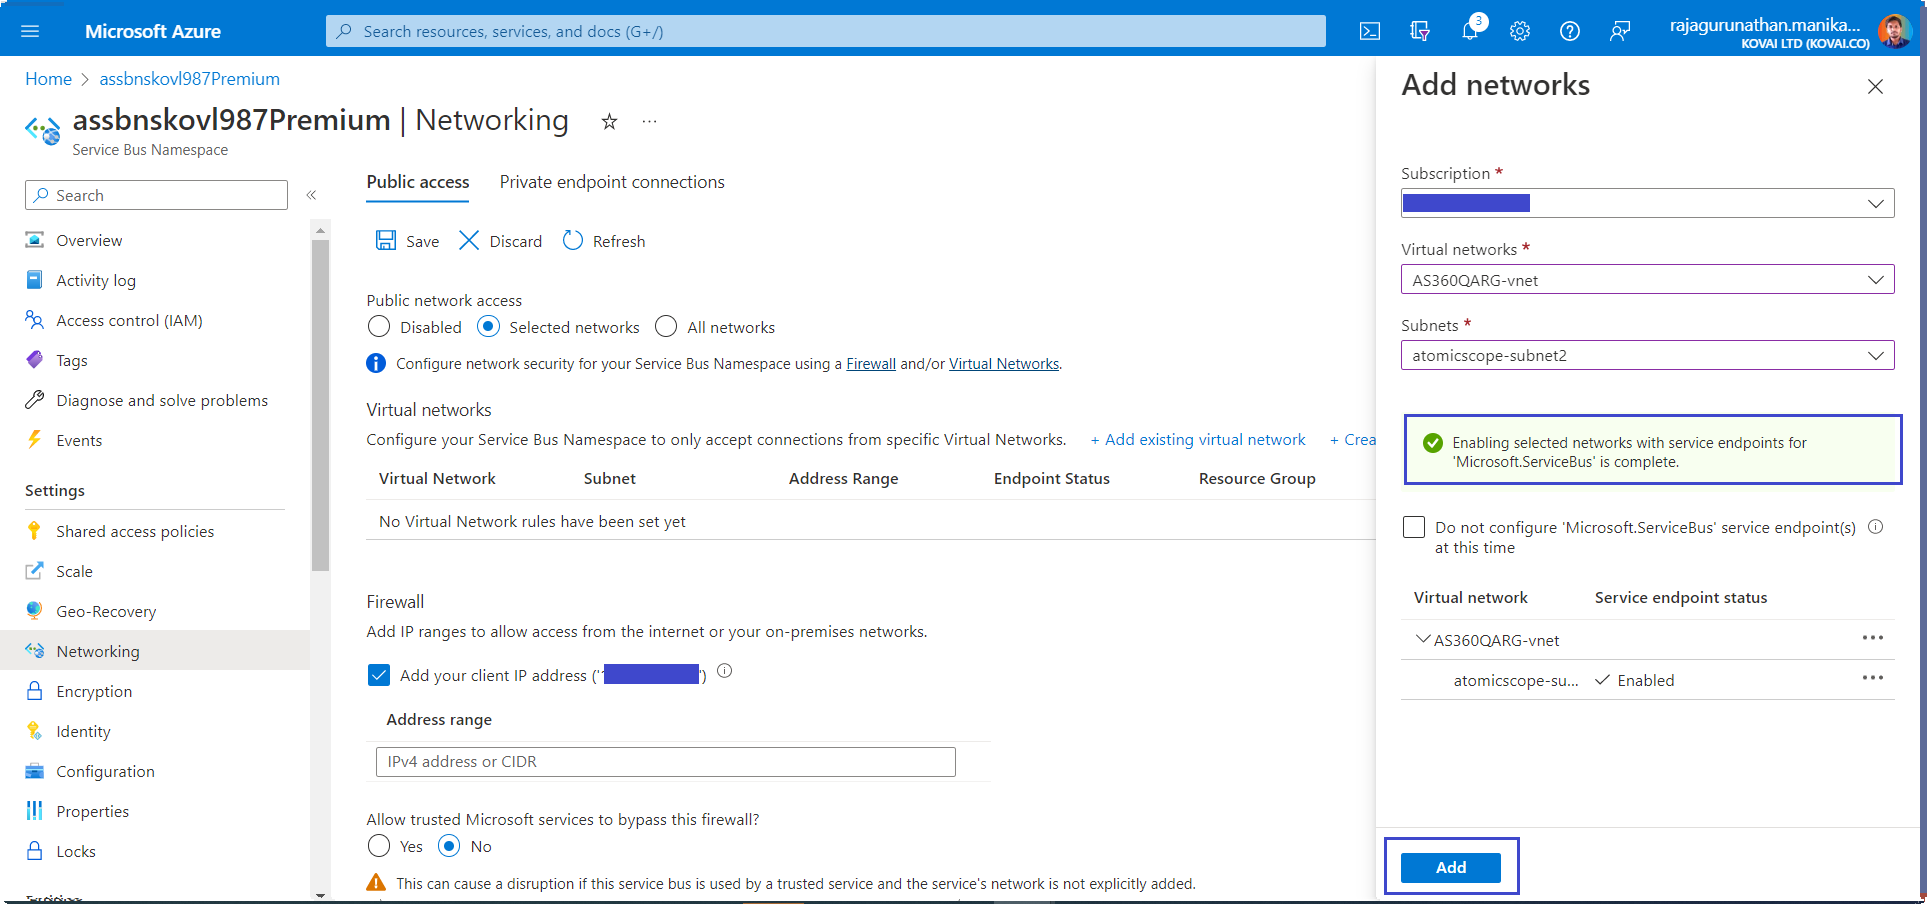
- Select Save to save the updated firewall rules.
- Resources in the virtual network can now communicate with the Service Bus using the private endpoint.
4. Integrate Atomic Scope Storage Account with VNet
Step 1: Change Atomic Scope StorageAccount account Kind to v2
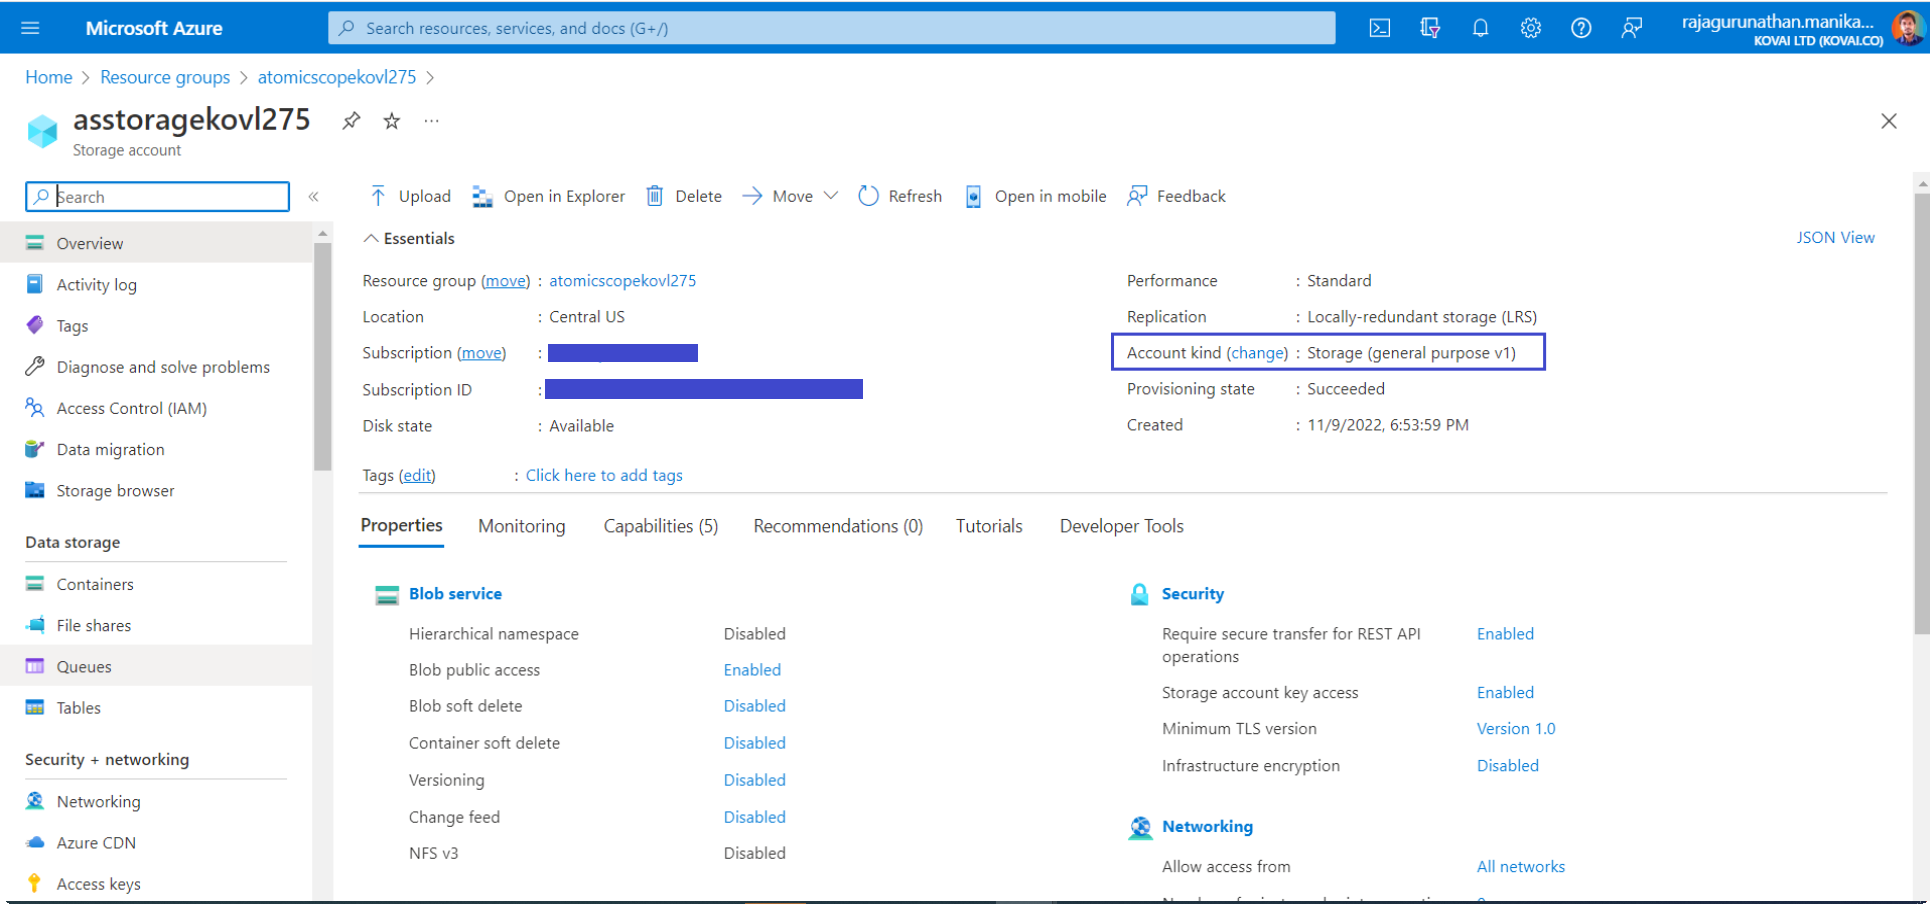
Currently while deploying Atomic Scope Azure tracking resource from Atomic Scope, it creates v1 storage account. But v1 storage account doesn't have Private endpoint options to integrate VNet.
So we need to move that storage account to v2 kind.
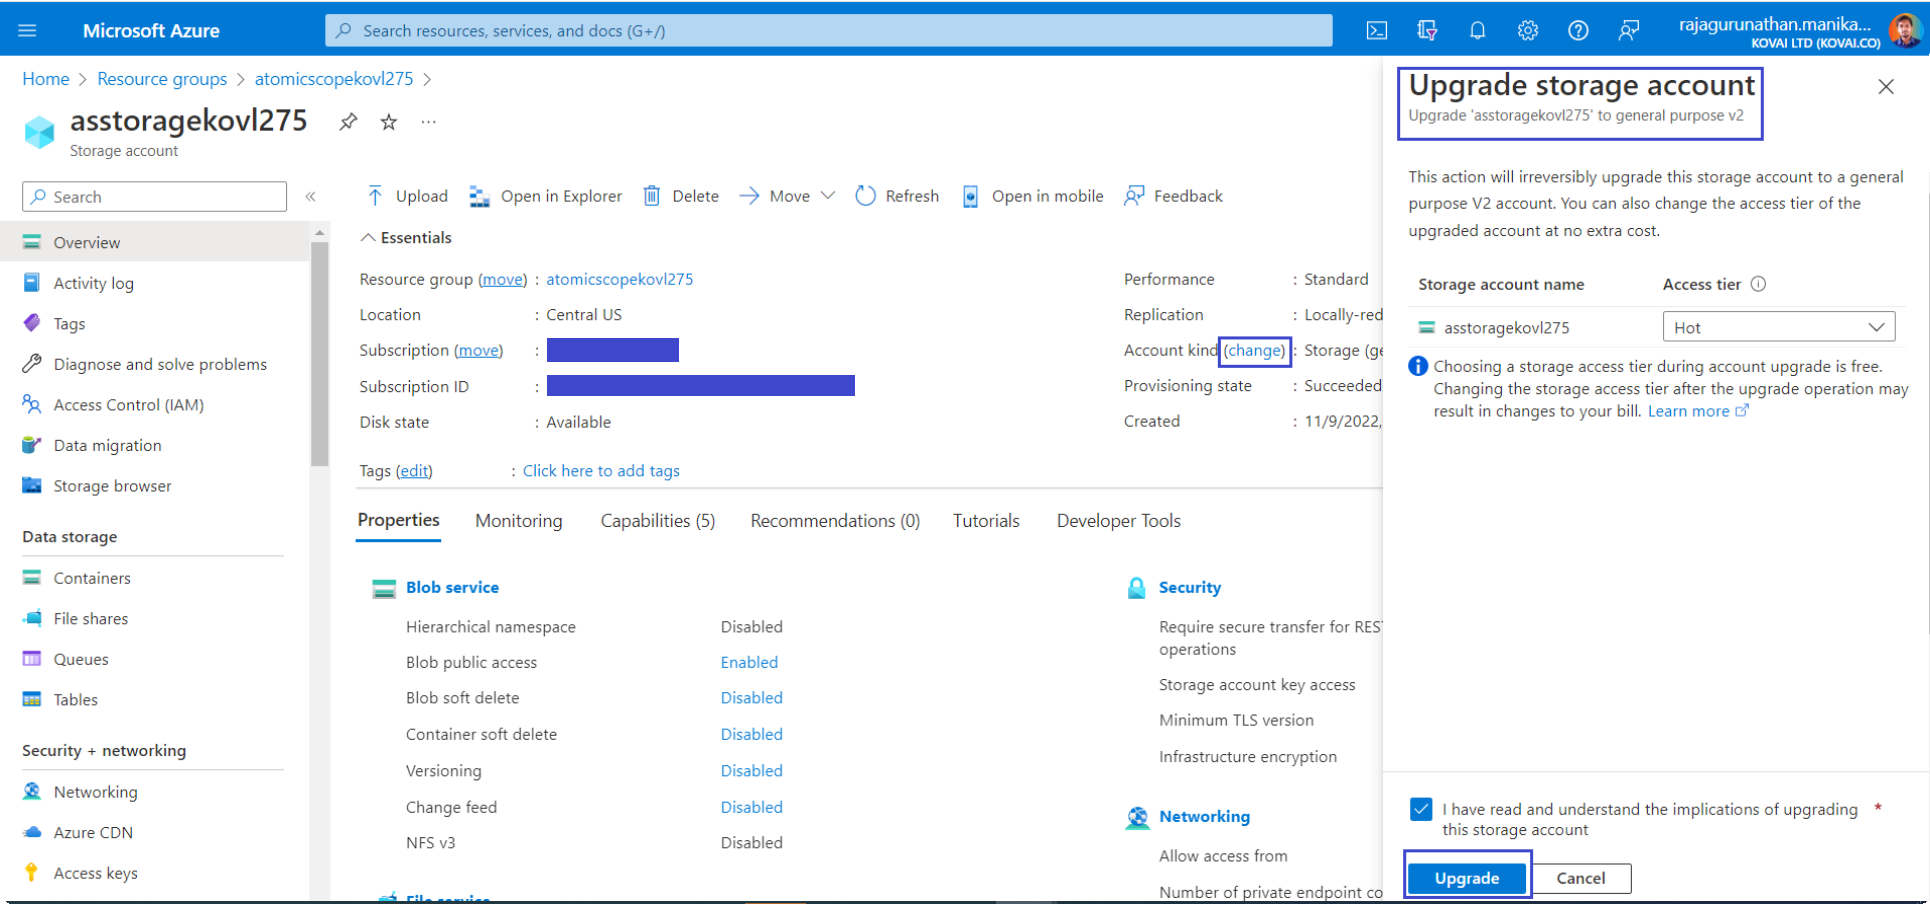
Click change option and Upgrade the storage account to v2 kind.
Step 2: Create Private Endpoints for StorageAccount
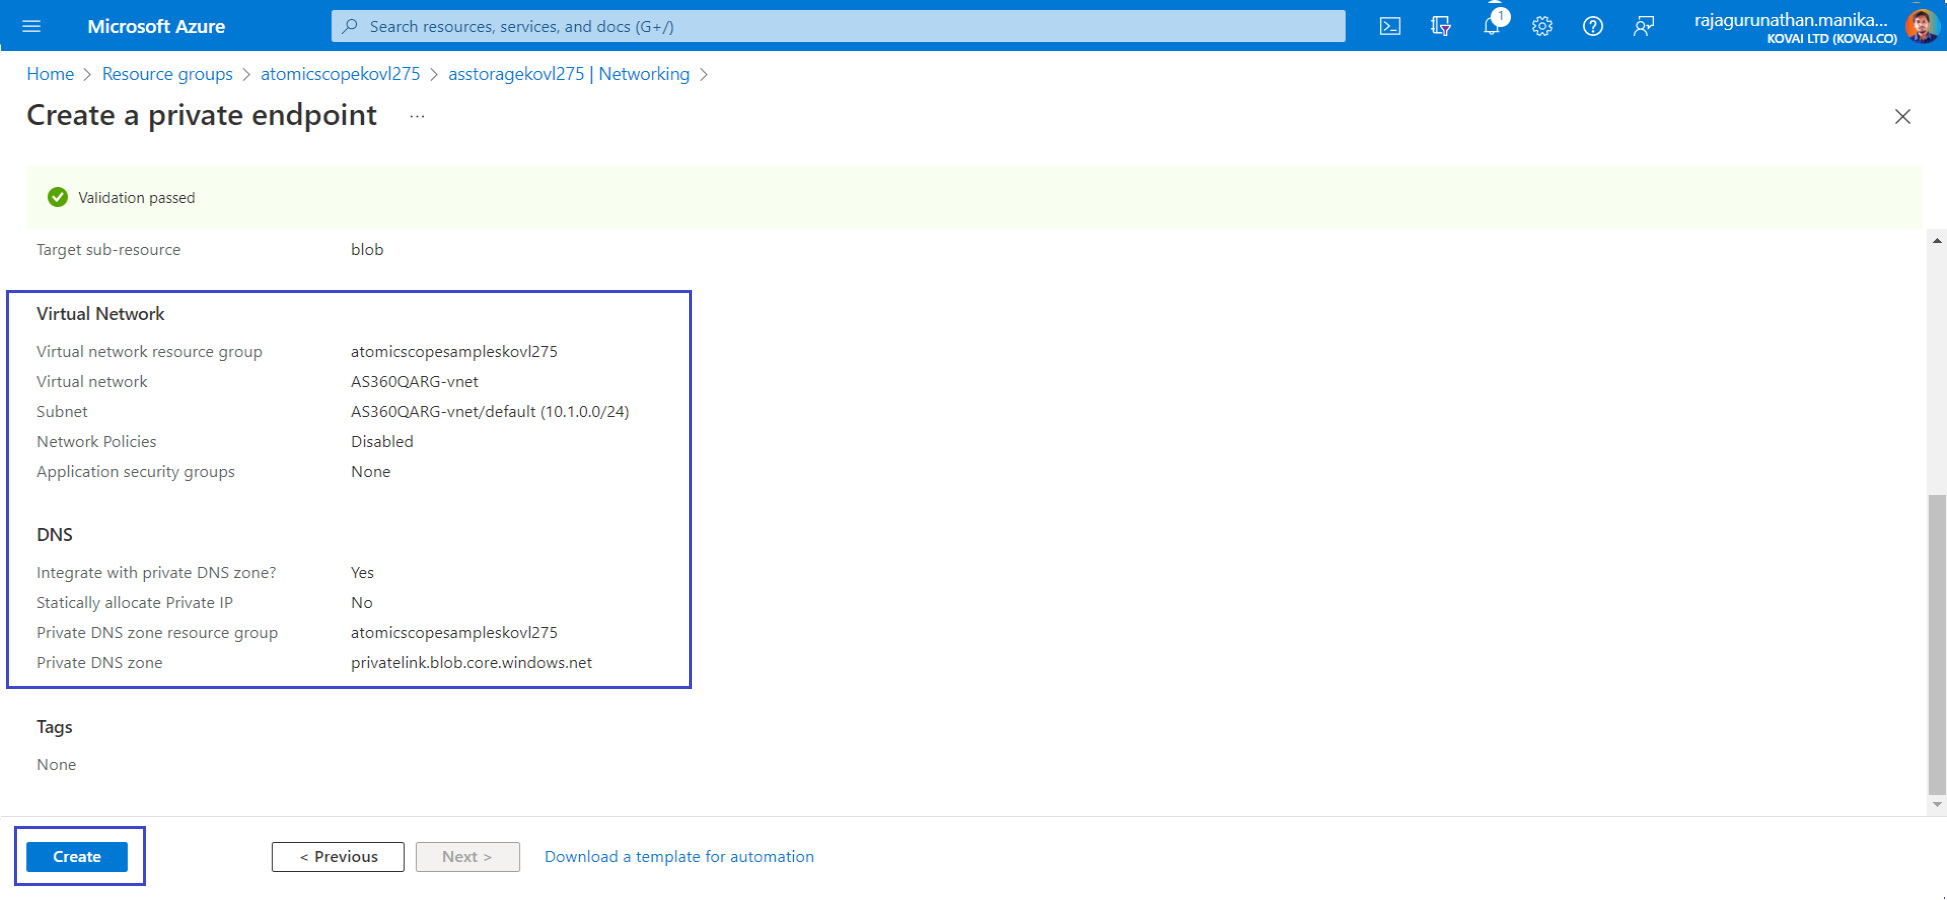
Create the private endpoints for Azure Files Storage, Azure Blob Storage and Azure Table Storage by using your storage account.
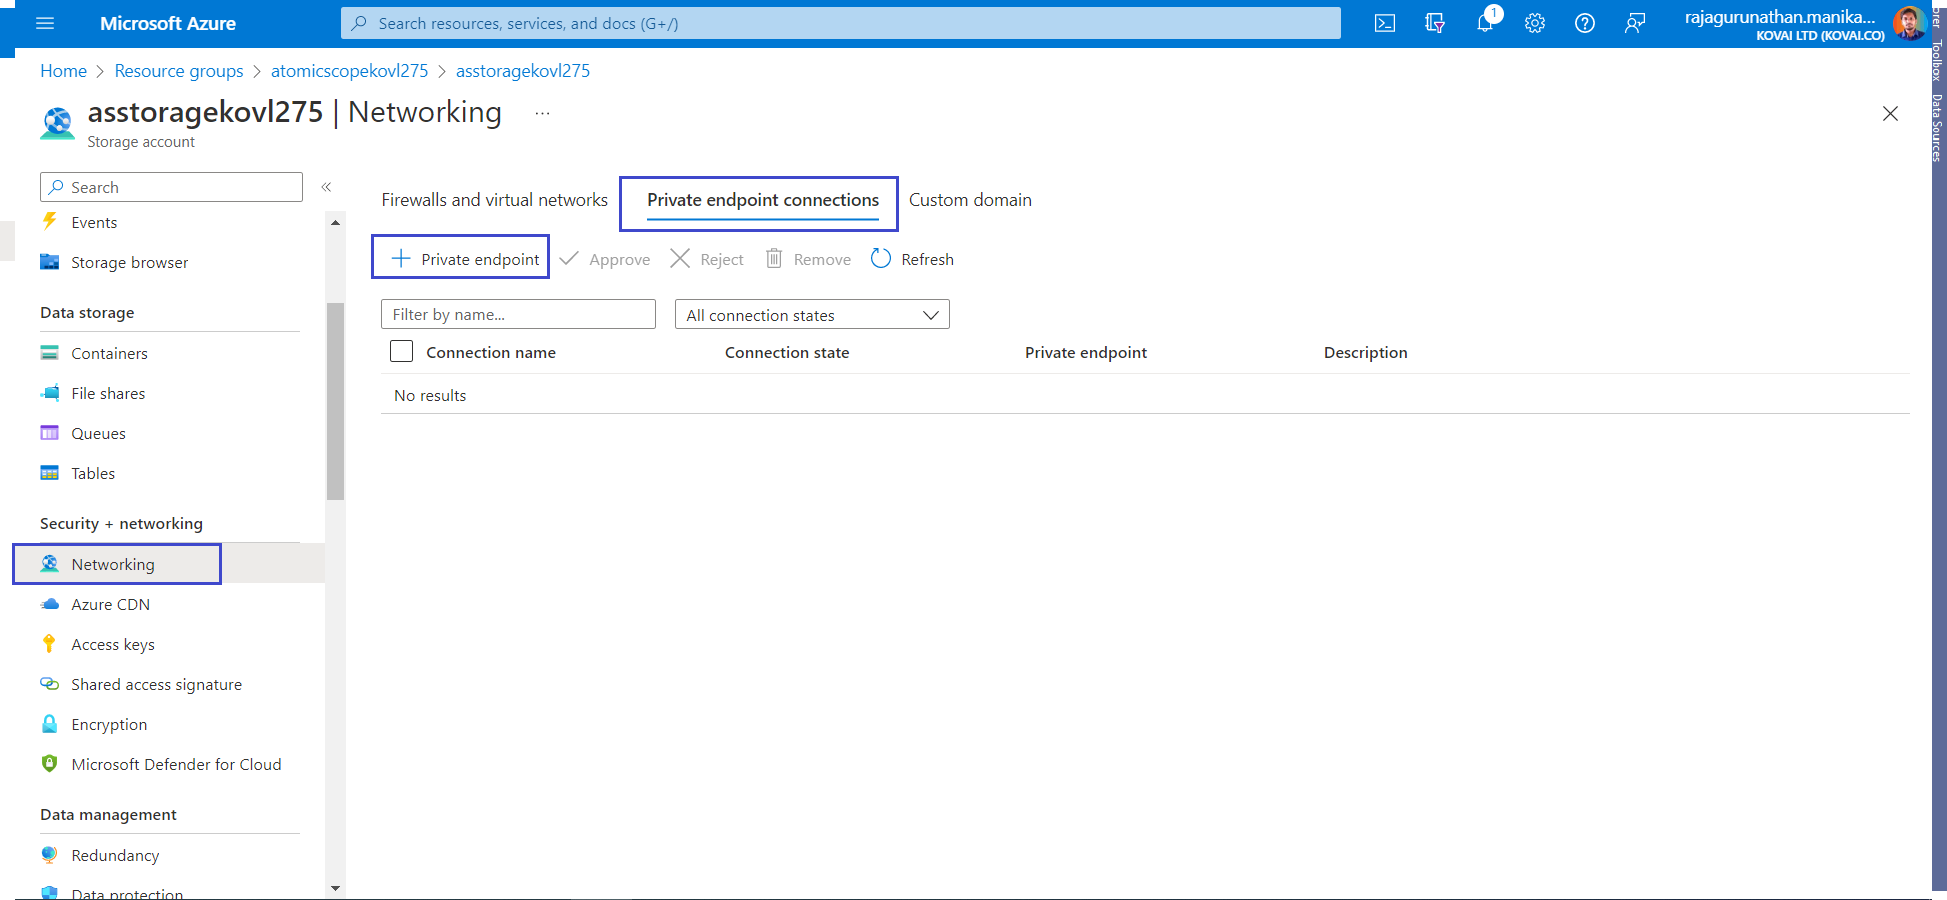
In Atomic Scope storage account, in the menu on the left, select Networking.
On the Private endpoint connections tab, select Private endpoint.
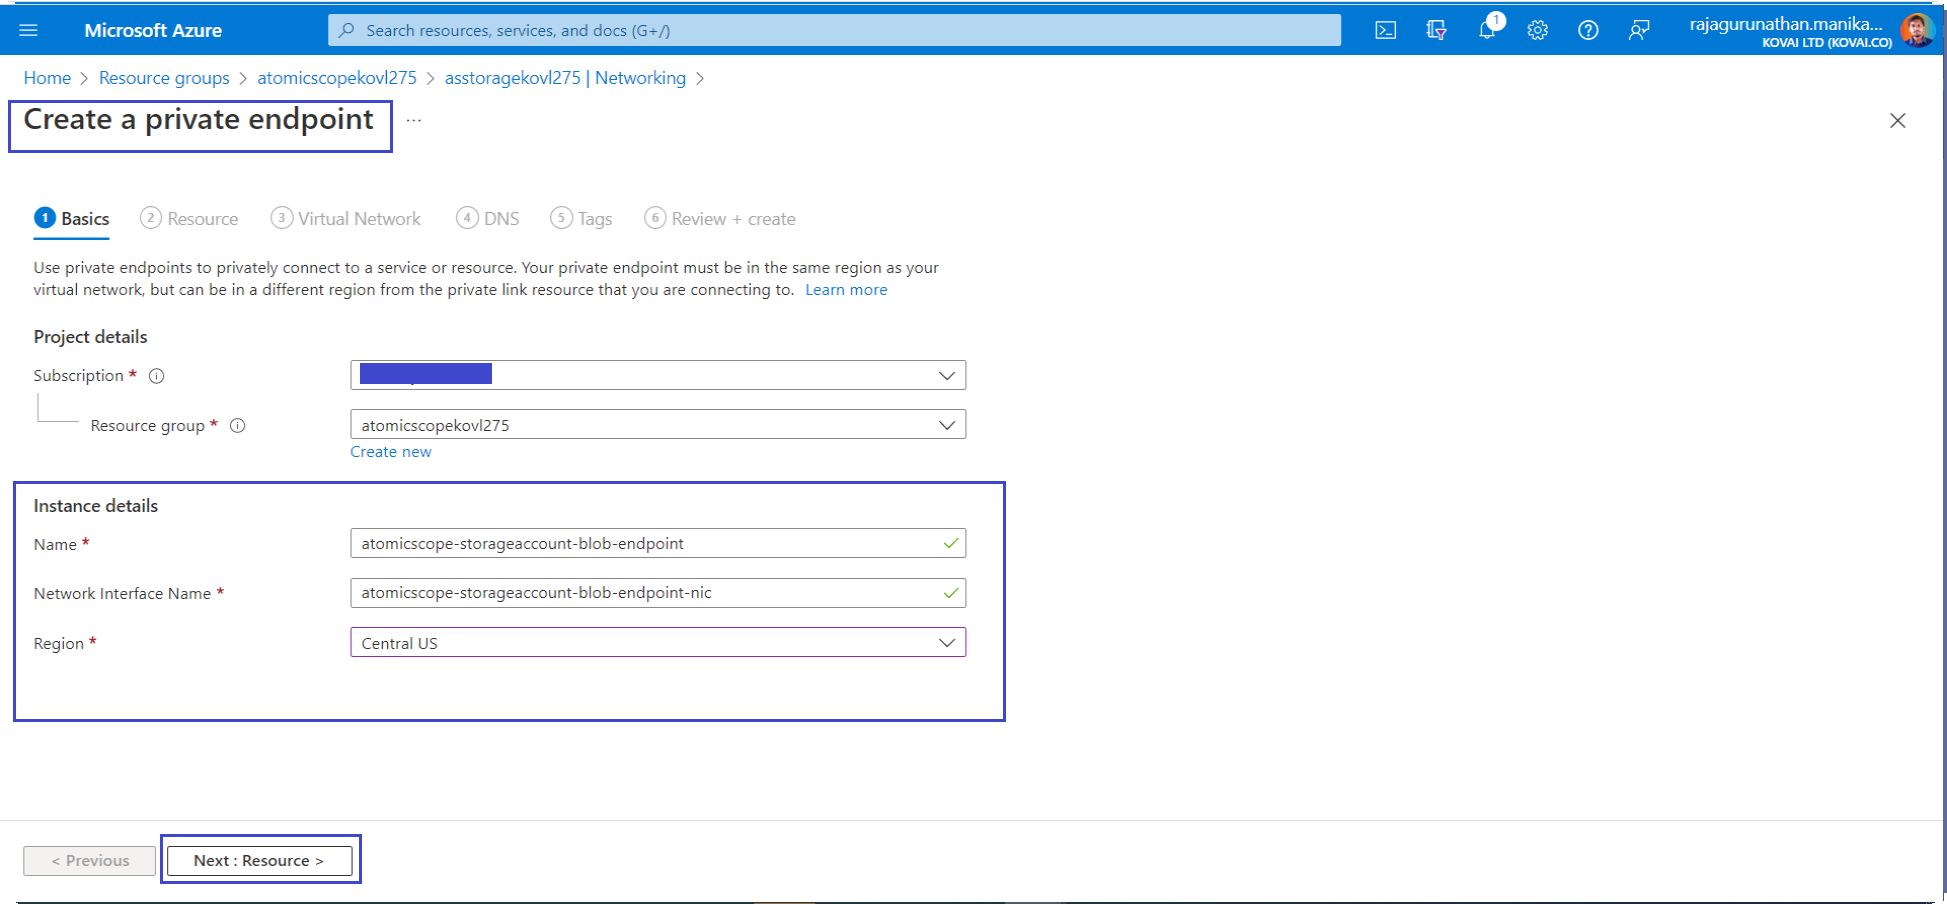
- On the Basics tab, use the private endpoint settings shown in the following table.
| Setting | Suggested value | Description |
|---|---|---|
| Subscription | Your subscription | The subscription under which Atomic Scope resources are created |
| Resource group | Atomic Scope Resource Group | The Atomic Scope resource group |
| Name | atomicscope-blob-endpoint | The name of the private endpoint for blobs from Atomic Scope storage account |
| Region | CentralUS | Choose the region where Atomic Scope storage account created |
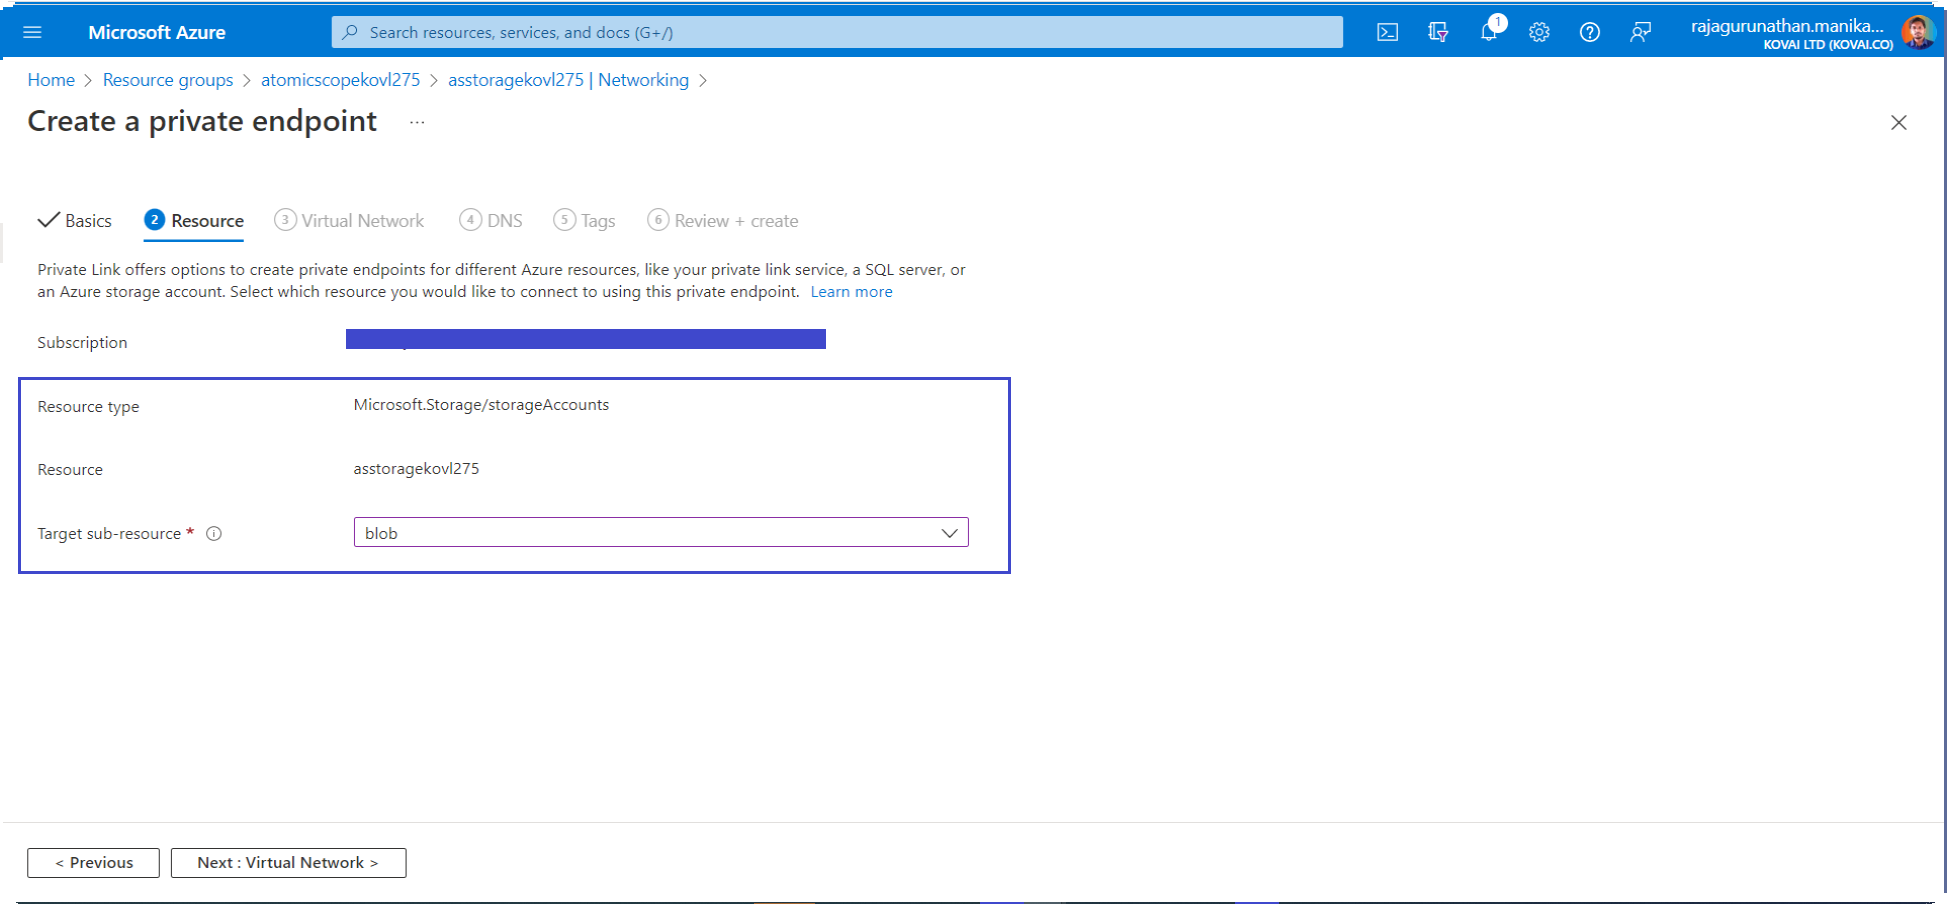
- On the Resource tab, use the private endpoint settings shown in the following table.
| Setting | Suggested value | Description |
|---|---|---|
| Subscription | Your subscription | The subscription under which Atomic Scope resources are created |
| Resource type | Microsoft.Storage/storageAccounts | The resource type for storage accounts. |
| Resource | Atomic Scope Storage Account | The Atomic Scope storage account |
| Target sub-resource | blob | The private endpoint that will be used for blobs from the storage account. |
- On the Virtual Networks tab,Select you IntegrationVNet and for the Subnet setting, choose default.
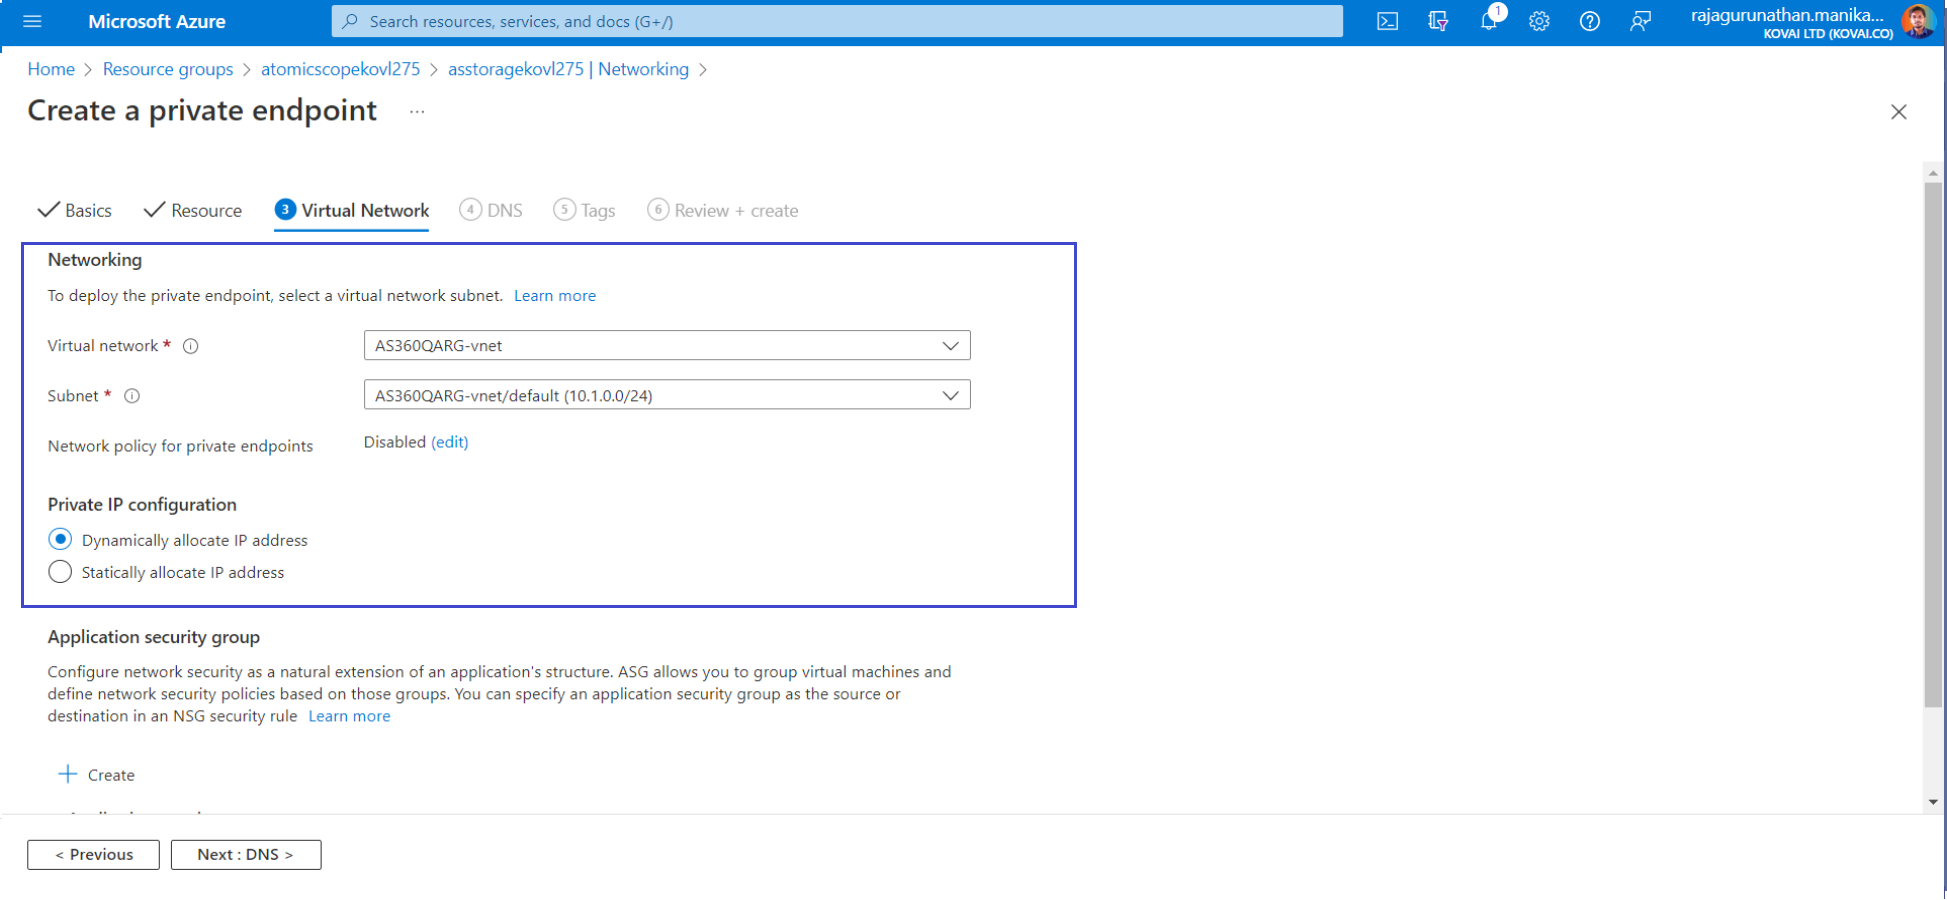
- Move to next tabs, Select Review + create. After validation finishes, select Create. Resources in the virtual network can now communicate with storage files.
Create another private endpoint for files.
On the Resources tab, use the settings shown in the following table. For all other settings, use the same values you used to create the private endpoint for blobs.
| Setting | Suggested value | Description |
|---|---|---|
| Subscription | Your subscription | The subscription under which Atomic Scope resources are created |
| Resource type | Microsoft.Storage/storageAccounts | The resource type for storage accounts |
| Name | atomicscope-file-endpoint | The name of the private endpoint for files from Atomic Scope storage account. |
| Resource | Atomic Scope StorageAccount | The Atomic Scope storage account |
| Target sub-resource | file | The private endpoint that will be used for files from the storage account |
Create another private endpoint for tables.
On the Resources tab, use the settings shown in the following table. For all other settings, use the same values you used to create the private endpoint for blobs.
| Setting | Suggested value | Description |
|---|---|---|
| Subscription | Your subscription | The subscription under which Atomic Scope resources are created |
| Resource type | Microsoft.Storage/storageAccounts | The resource type for storage accounts. |
| Name | atomicscope-table-endpoint | The name of the private endpoint for tables from Atomic Scope storage account. |
| Resource | Atomic Scope Storage Account | The Atomic Scope storage account |
| Target sub-resource | table | The private endpoint that will be used for tables from the storage account. |
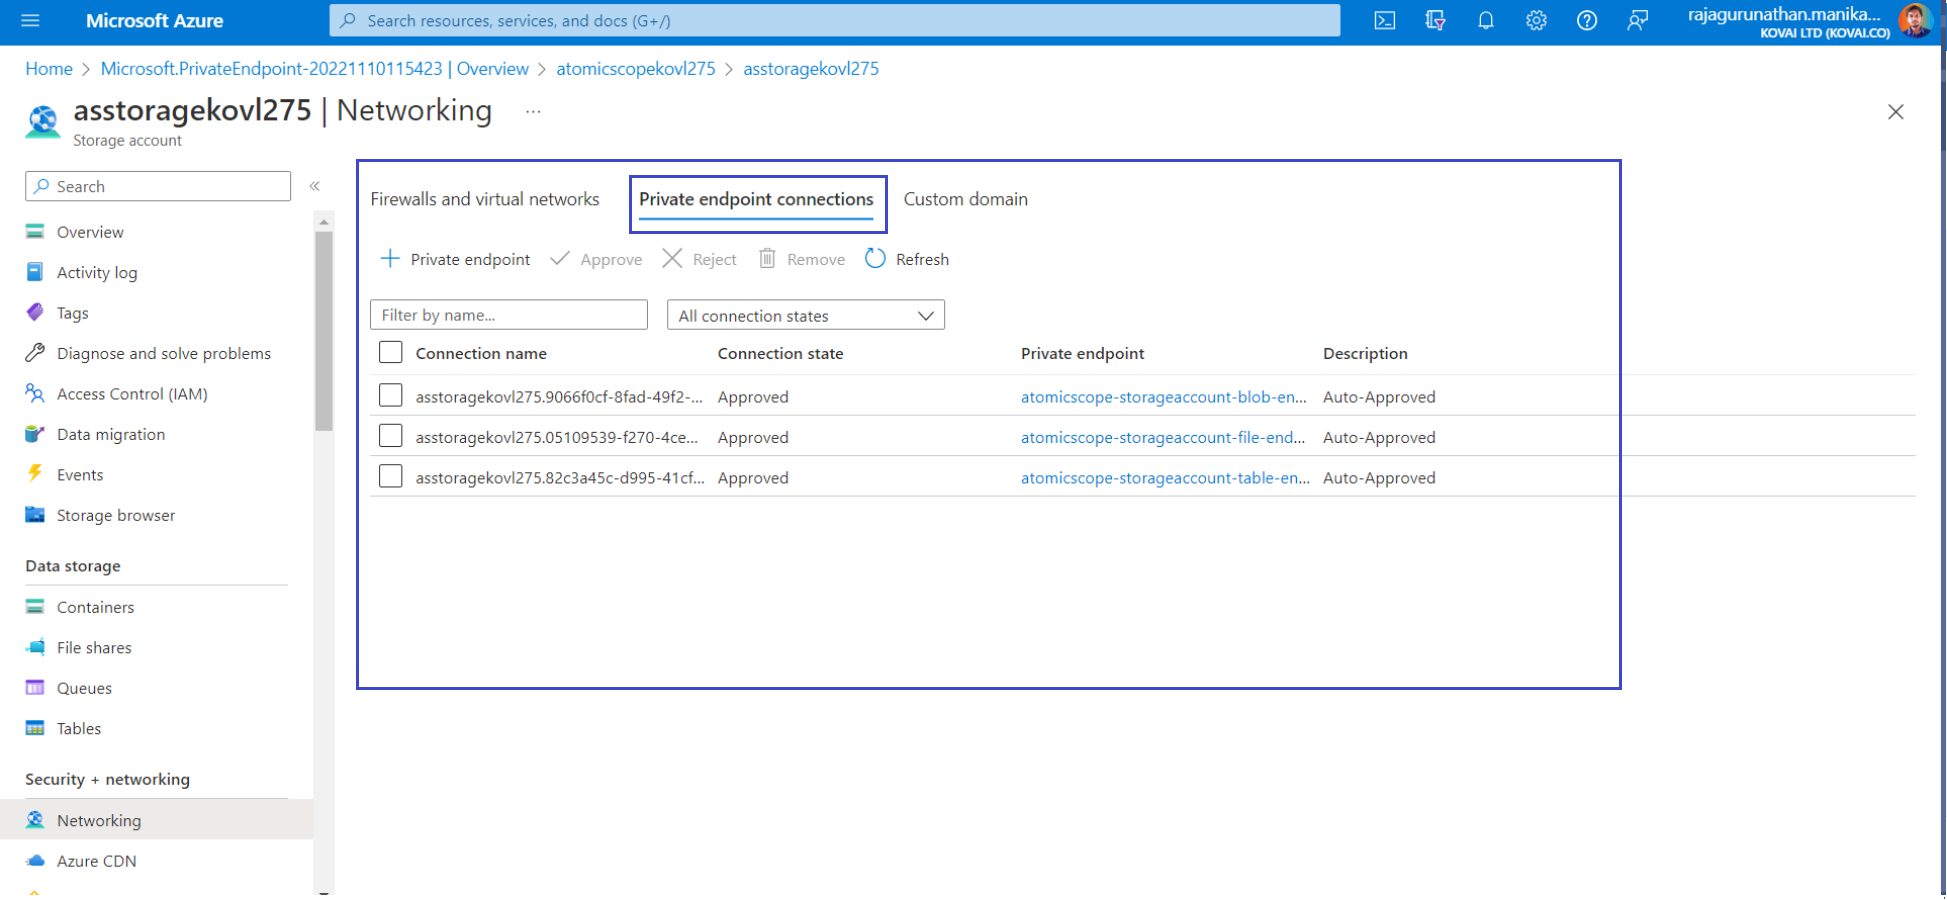
- Now all the private endpoints are created for required storage types like blob, files & tables.
Step 3: Storage Account VNet Integration
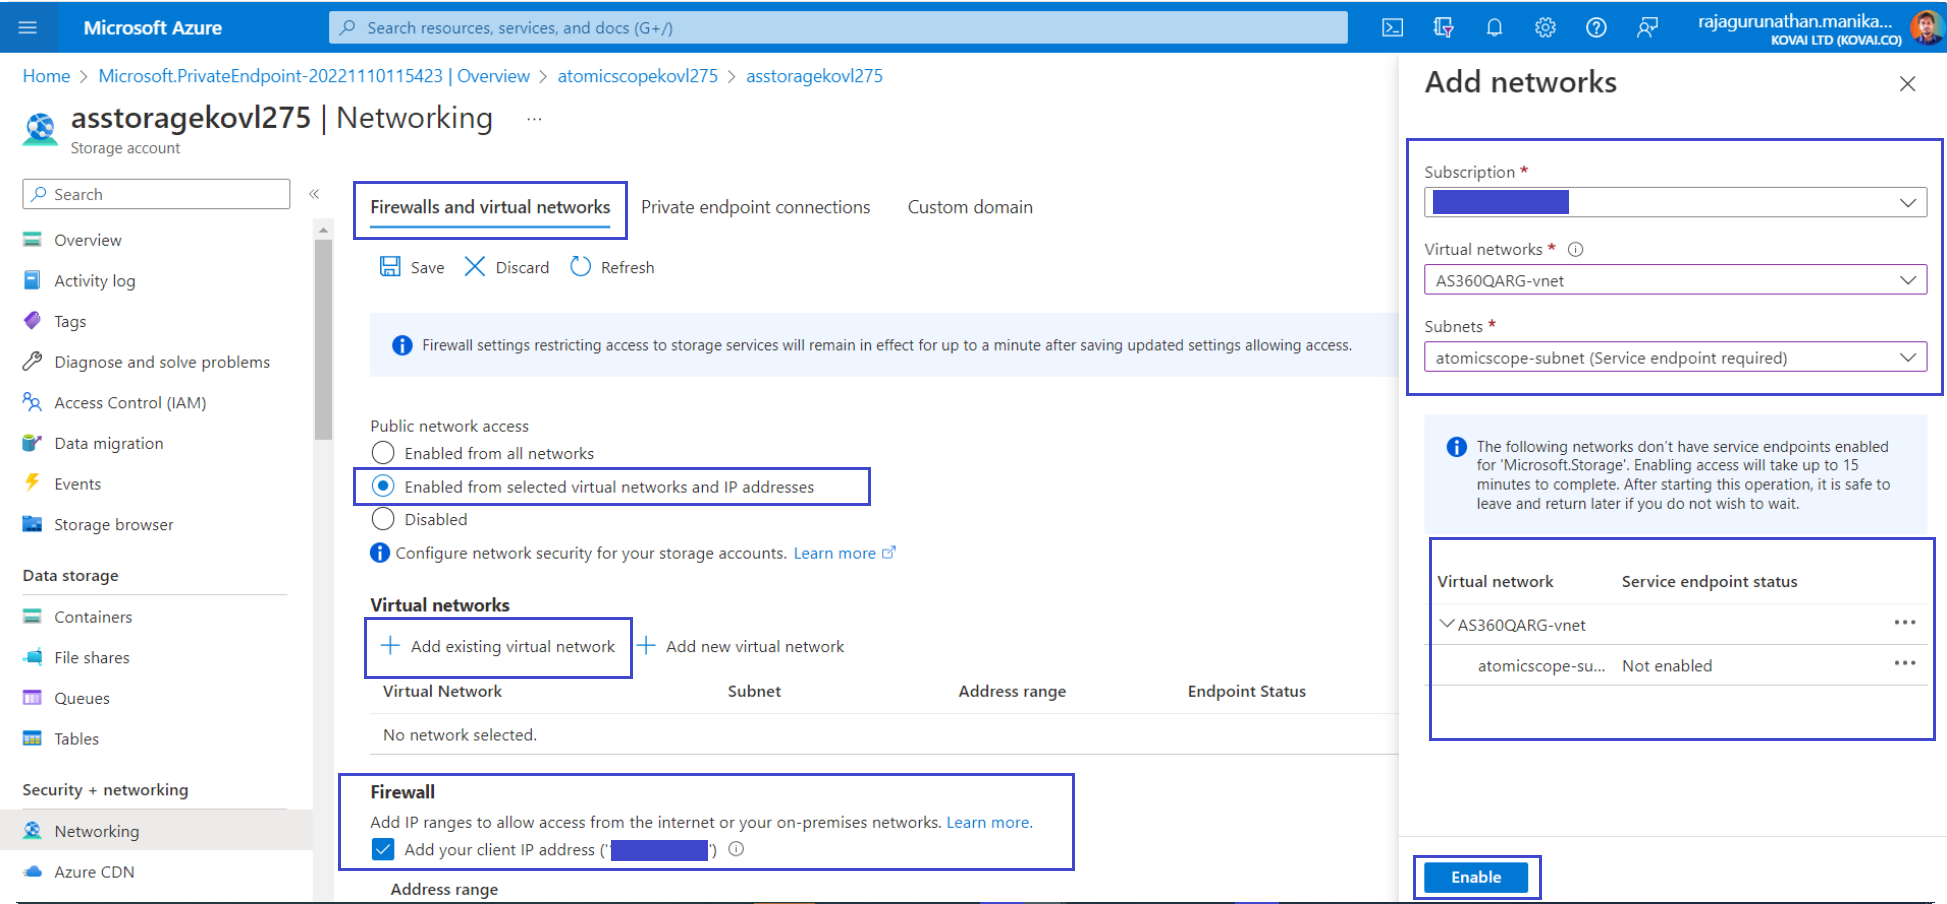
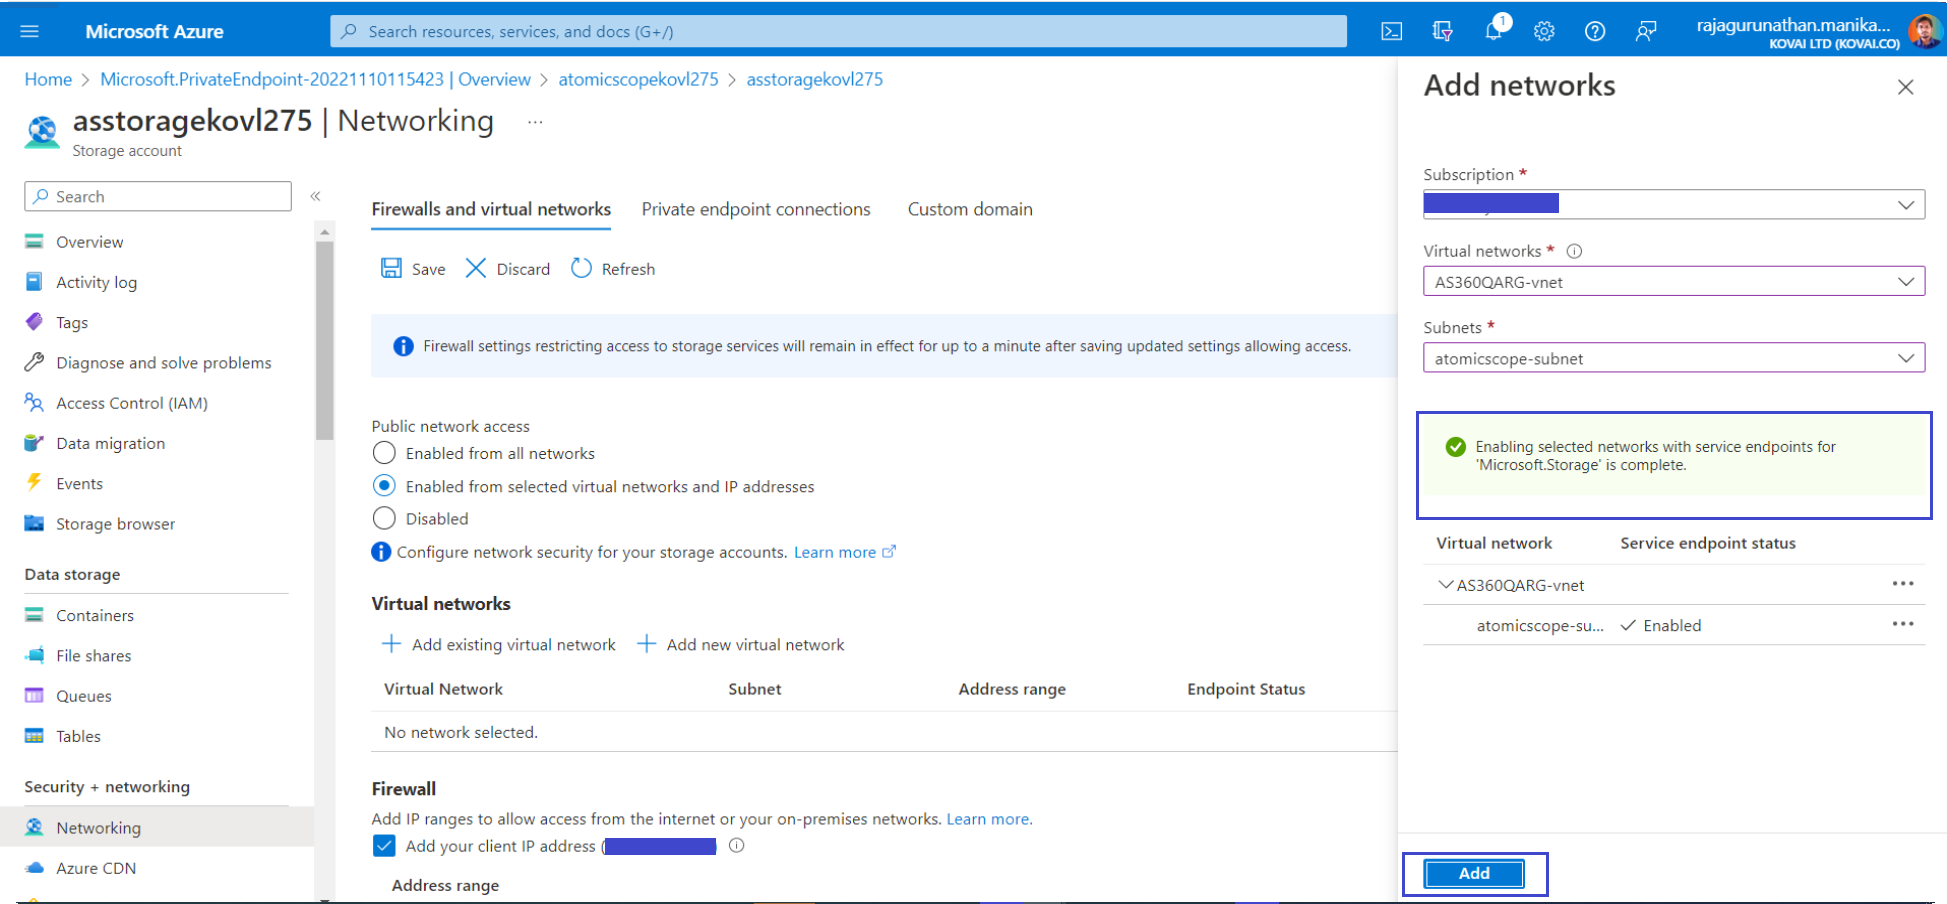
After the private endpoints are created, return to the Firewall and virtual networks section of Storage Account.
Ensure Selected networks is selected.
Select + Add existing virtual network to add the recently created virtual network.
On the Add networks tab, use the network settings from the following table:
| Setting | Suggested value | Description |
|---|---|---|
| Subscription | Your subscription | The subscription under which Atomic Scope resources are created. |
| Virtual networks | IntegrationVNet | The name of your Integration virtual network |
| Subnets | atomicscope-subnet | The name of the subnet to which Atomic Scope resources will connect. |
Select Add your client IP address to give your current client IP access to the storage account.
Select Enable to enable the service endpoint.
- Select Add to add the selected virtual network and subnet to the firewall rules for the Storage Account.
- Select Save to save the updated firewall rules.
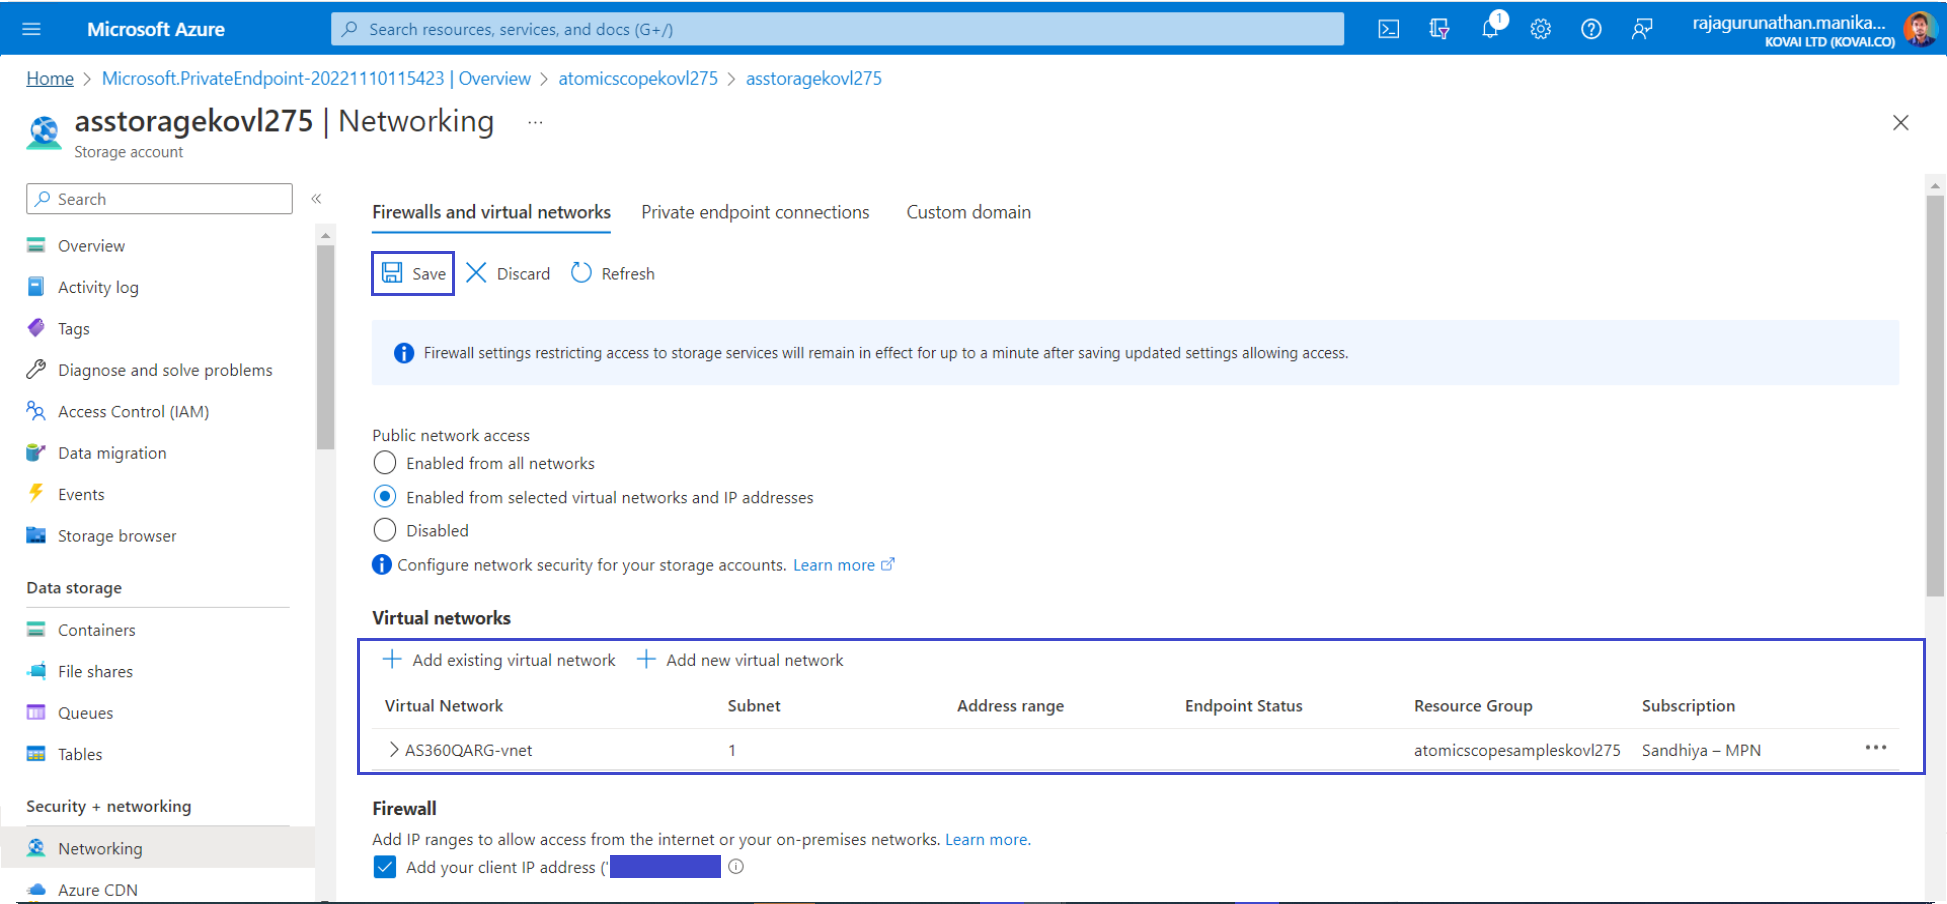
- Resources in the virtual network can now communicate with the storage account using the private endpoint.
5. Integrate Atomic KeyVault with VNet
Step 1: Create Private Endpoints for KeyVault
- In Atomic Scope KeyVault, in the menu on the left, select Networking.
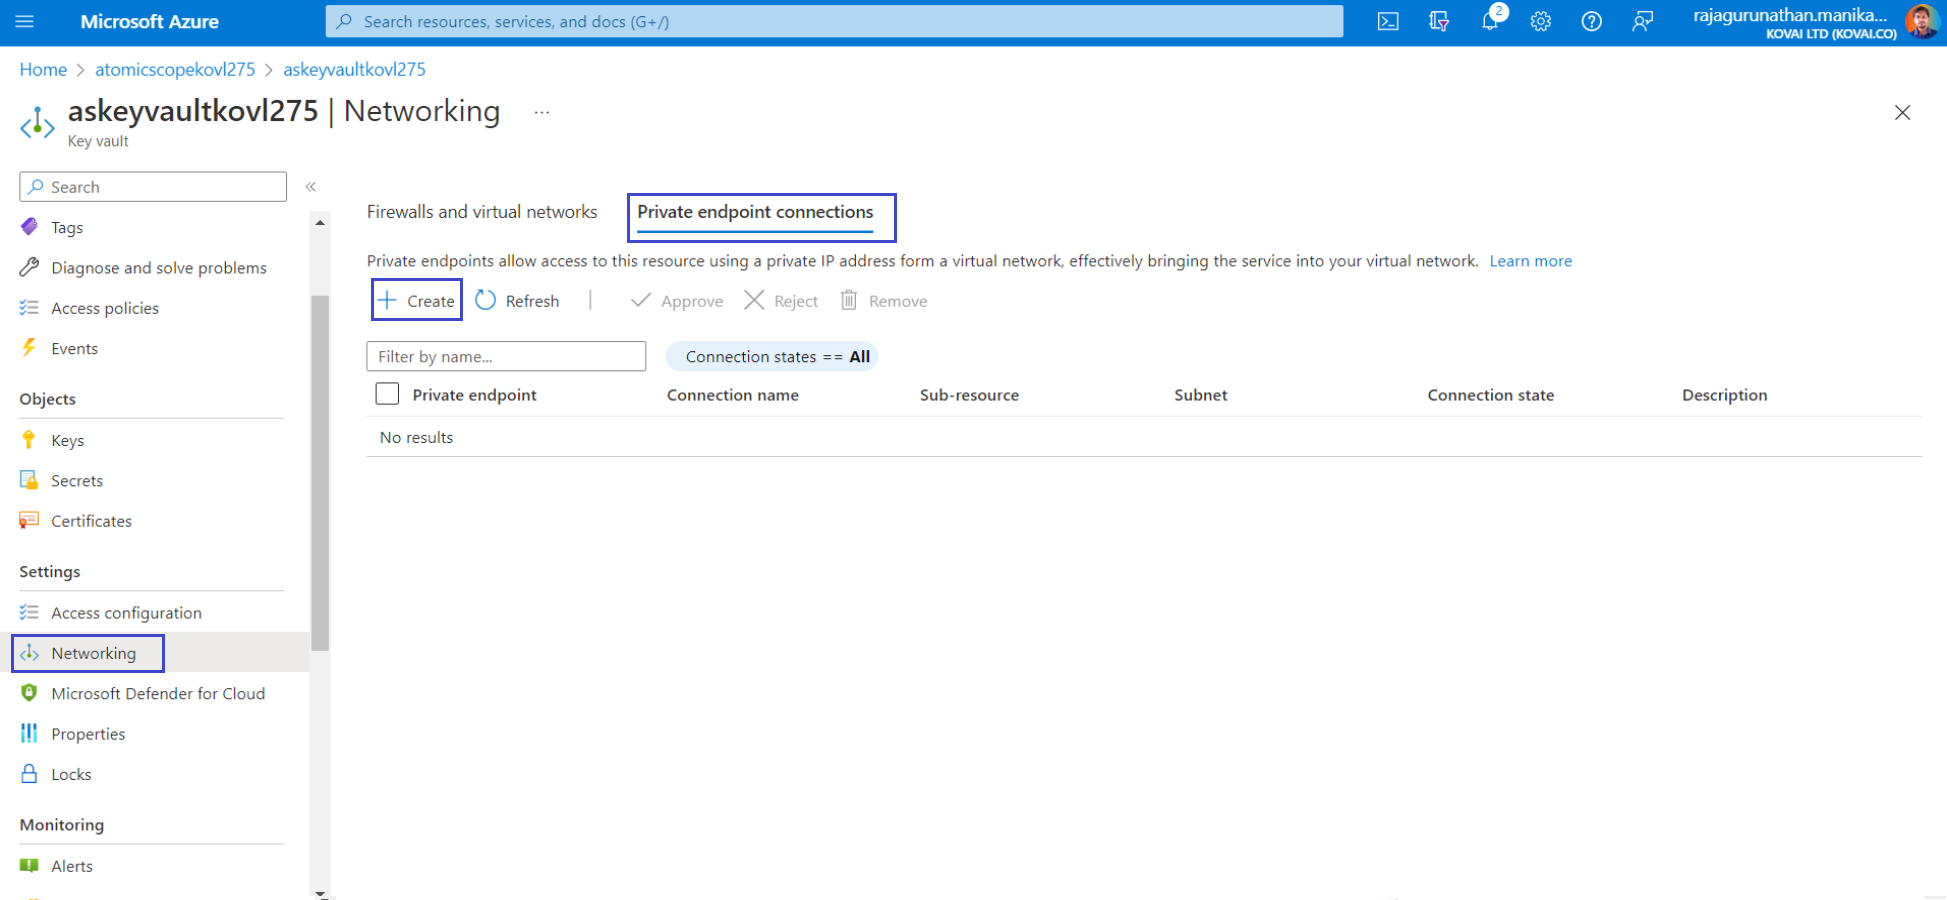
On the Private endpoint connections tab, select Private endpoint.
On the Basics tab, use the private endpoint settings shown in the following table.

| Setting | Suggested value | Description |
|---|---|---|
| Subscription | Your subscription | The subscription under which Atomic Scope resources are created. |
| Resource group | Atomic Scope ResourceGroup | The Atomic Scope resource group |
| Name | atomicscope-keyvault-endpoint | The name of the private endpoint for KeyVault from Atomic Scope storage account. |
| Region | CentralUS | The region where AtomicScope storage account created |
- On the Resource tab, use the private endpoint settings shown in the following table.
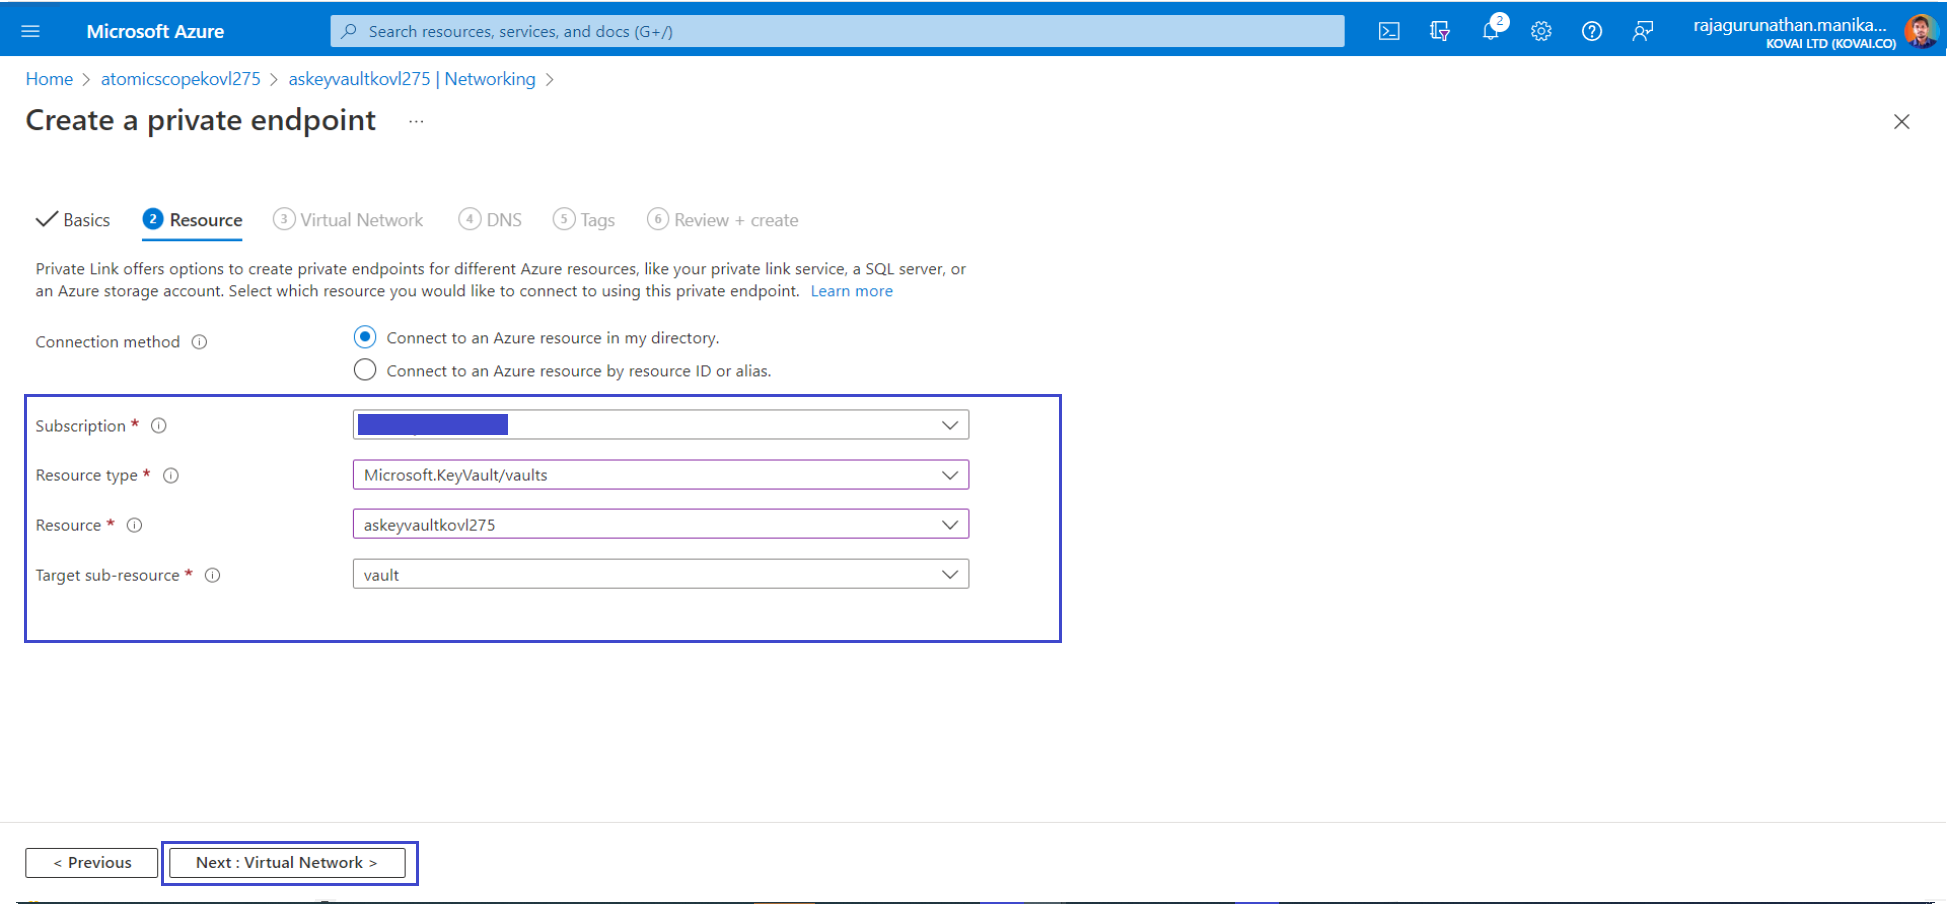
| Setting | Suggested value | Description |
|---|---|---|
| Subscription | Your subscription | The subscription under which Atomic Scope resources are created. |
| Resource type | Microsoft.KeyVault/vaults | The resource type for the KeyVault. |
| Resource | Atomic Scope KeyVault | The Atomic Scope KeyVault |
| Target subresource | vault | The private endpoint that will be used for the vault |
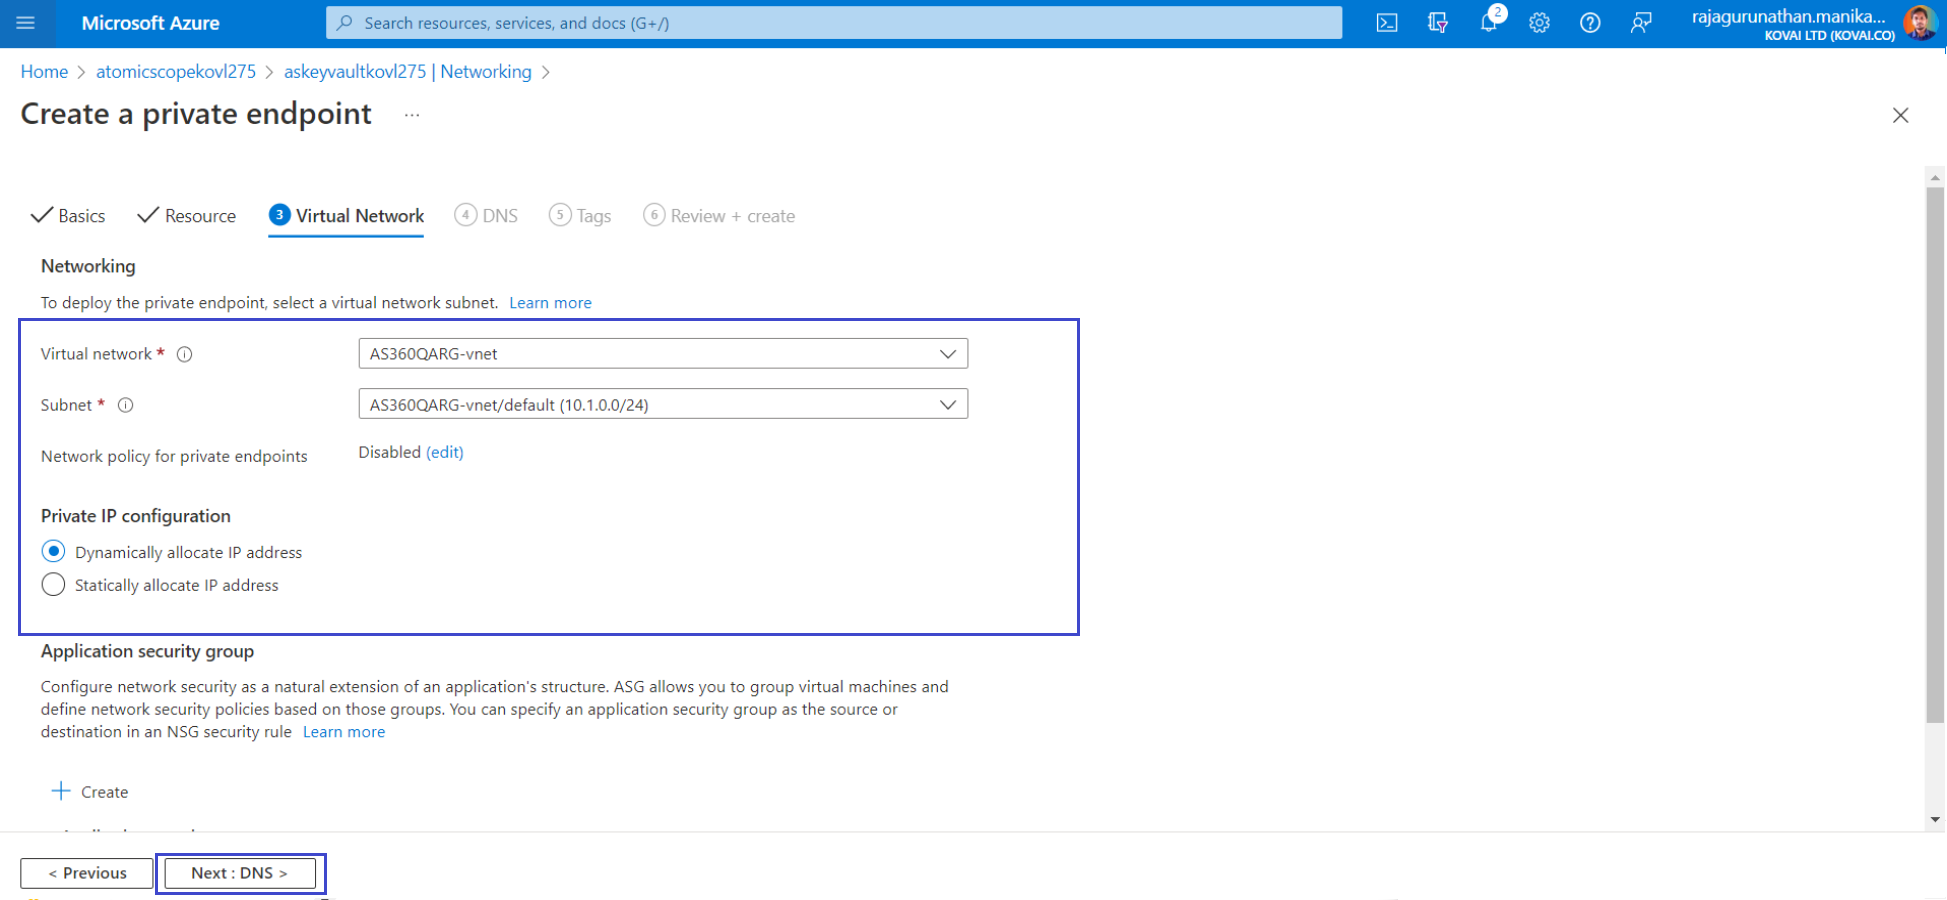
- On the Virtual Network tab, Select your IntegrationVNet and for the Subnet setting, choose default.
- Select Review + create. After validation finishes, select Create.
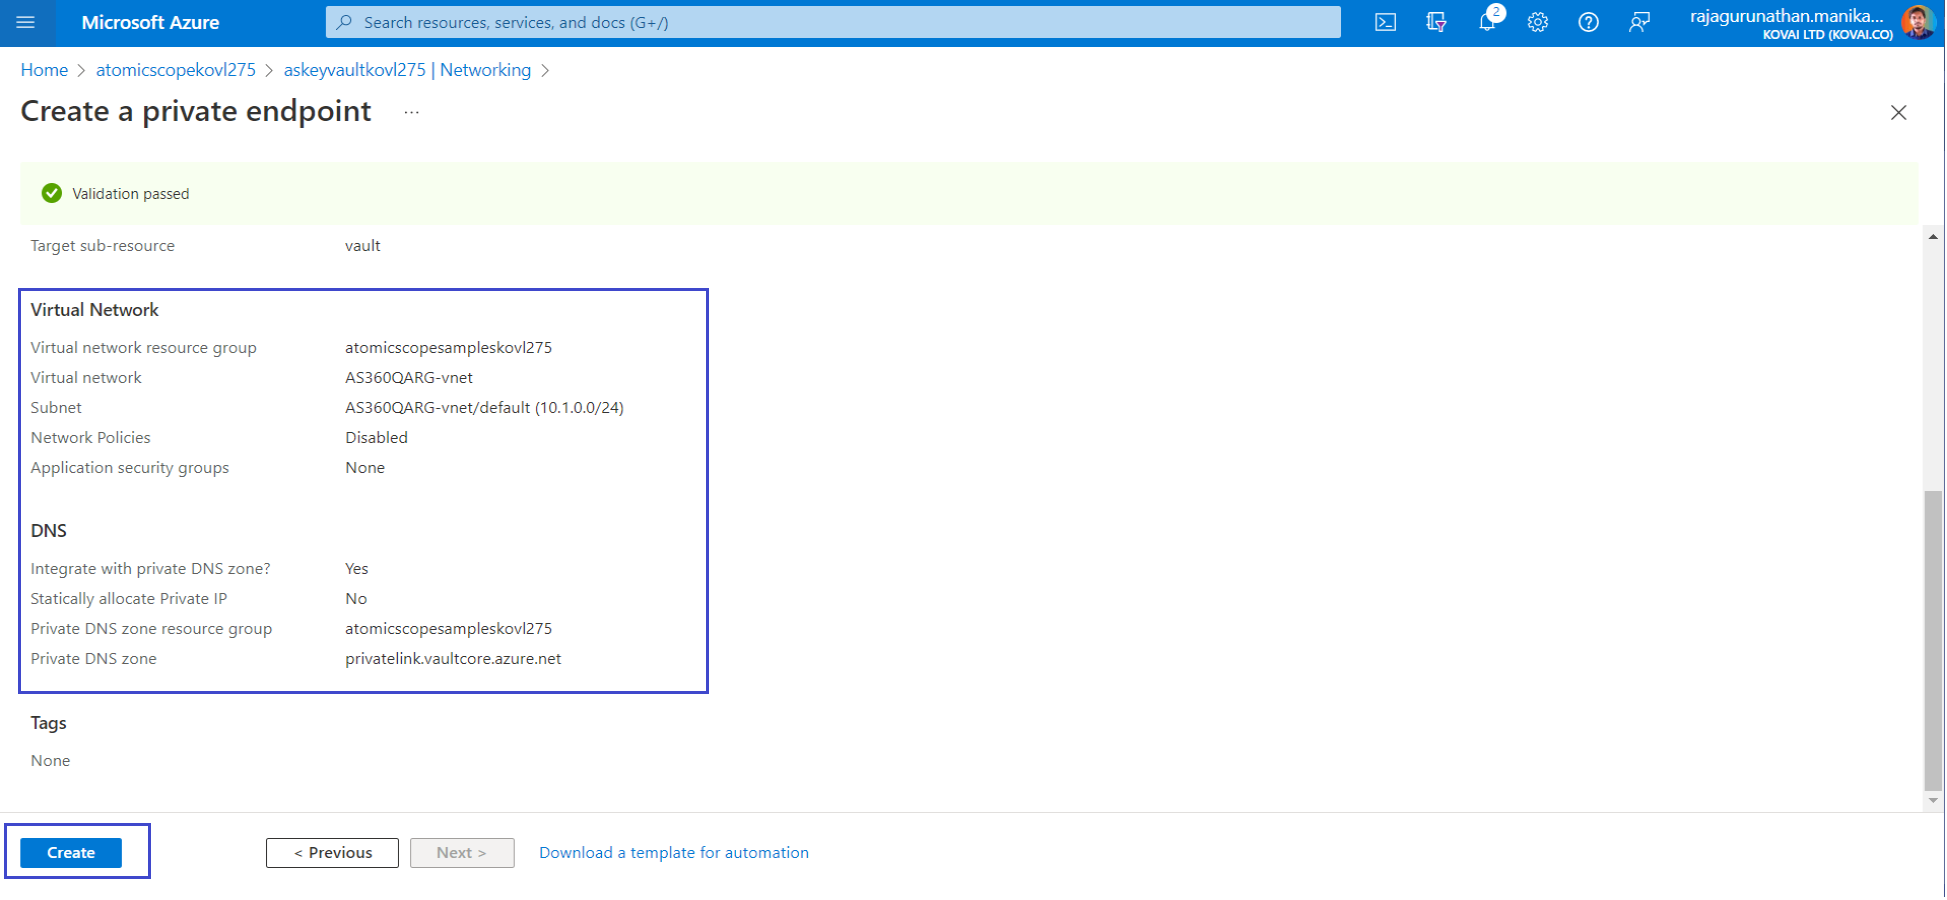
- Now the private endpoint is created and its ready for VNet Integration.
Step 2: KeyVault VNet Integration
After the private endpoint is created, return to the Firewall and virtual networks section of Atomic Scope KeyVault.
Ensure Selected networks is selected.
Select + Add existing virtual network to add the recently created virtual network.
On the Add networks tab, use the network settings from the following table:
| Setting | Suggested value | Description |
|---|---|---|
| Subscription | Your subscription | The subscription under which Atomic Scope resources are created. |
| Virtual networks | IntegrationVNet | The name of your Integration virtual network |
| Subnets | atomicscope-subnet | The name of the subnet to which your Atomic Scope resources will connect. |
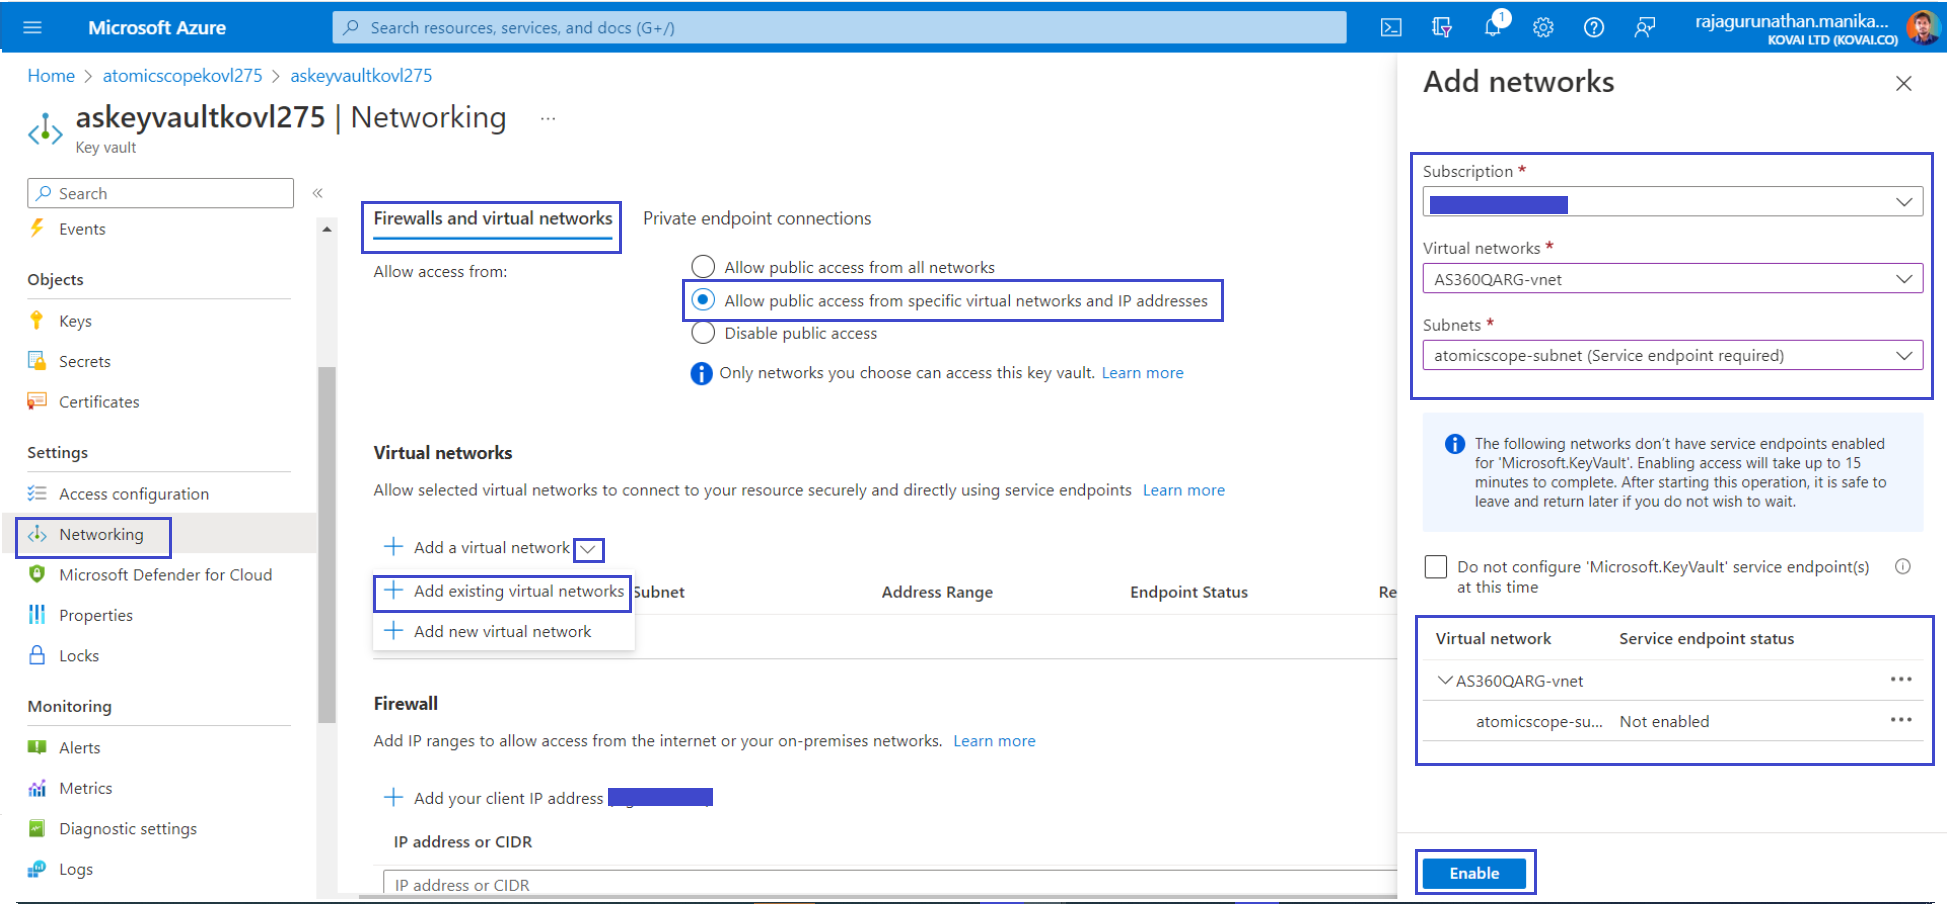
- Select Add to add the selected virtual network and subnet to the firewall rules for the KeyVault.
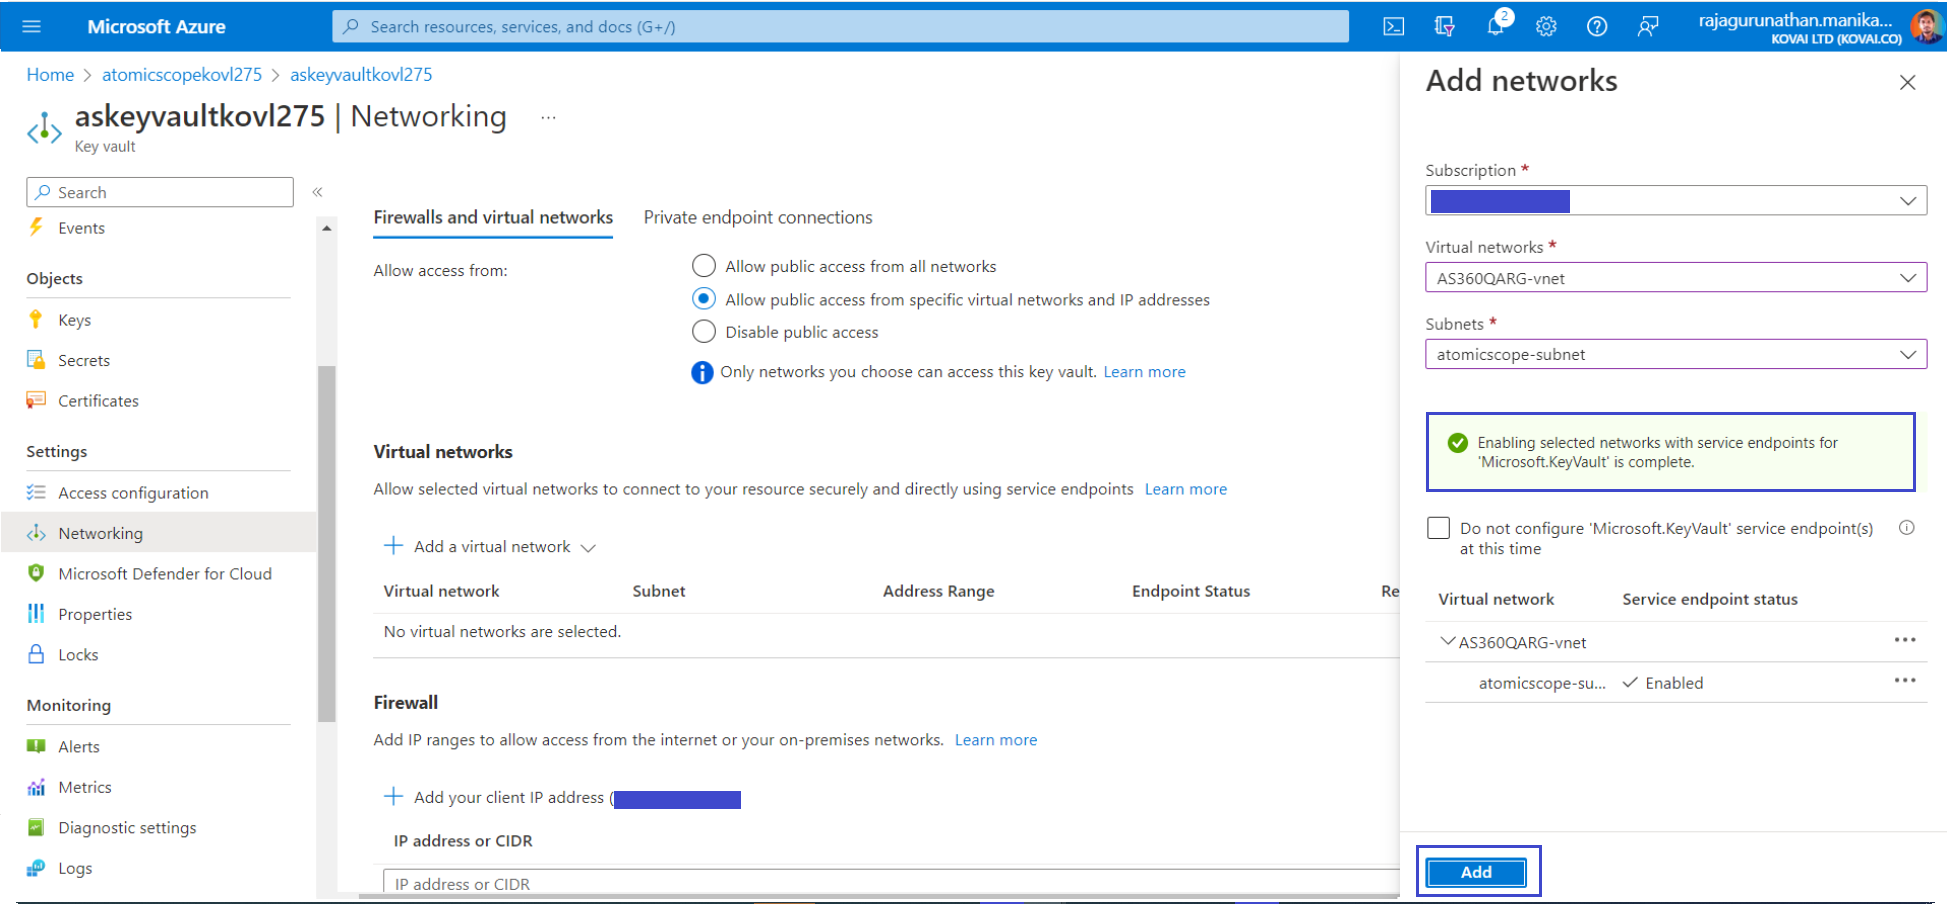
- Select Apply Changes to save the updated firewall rules.
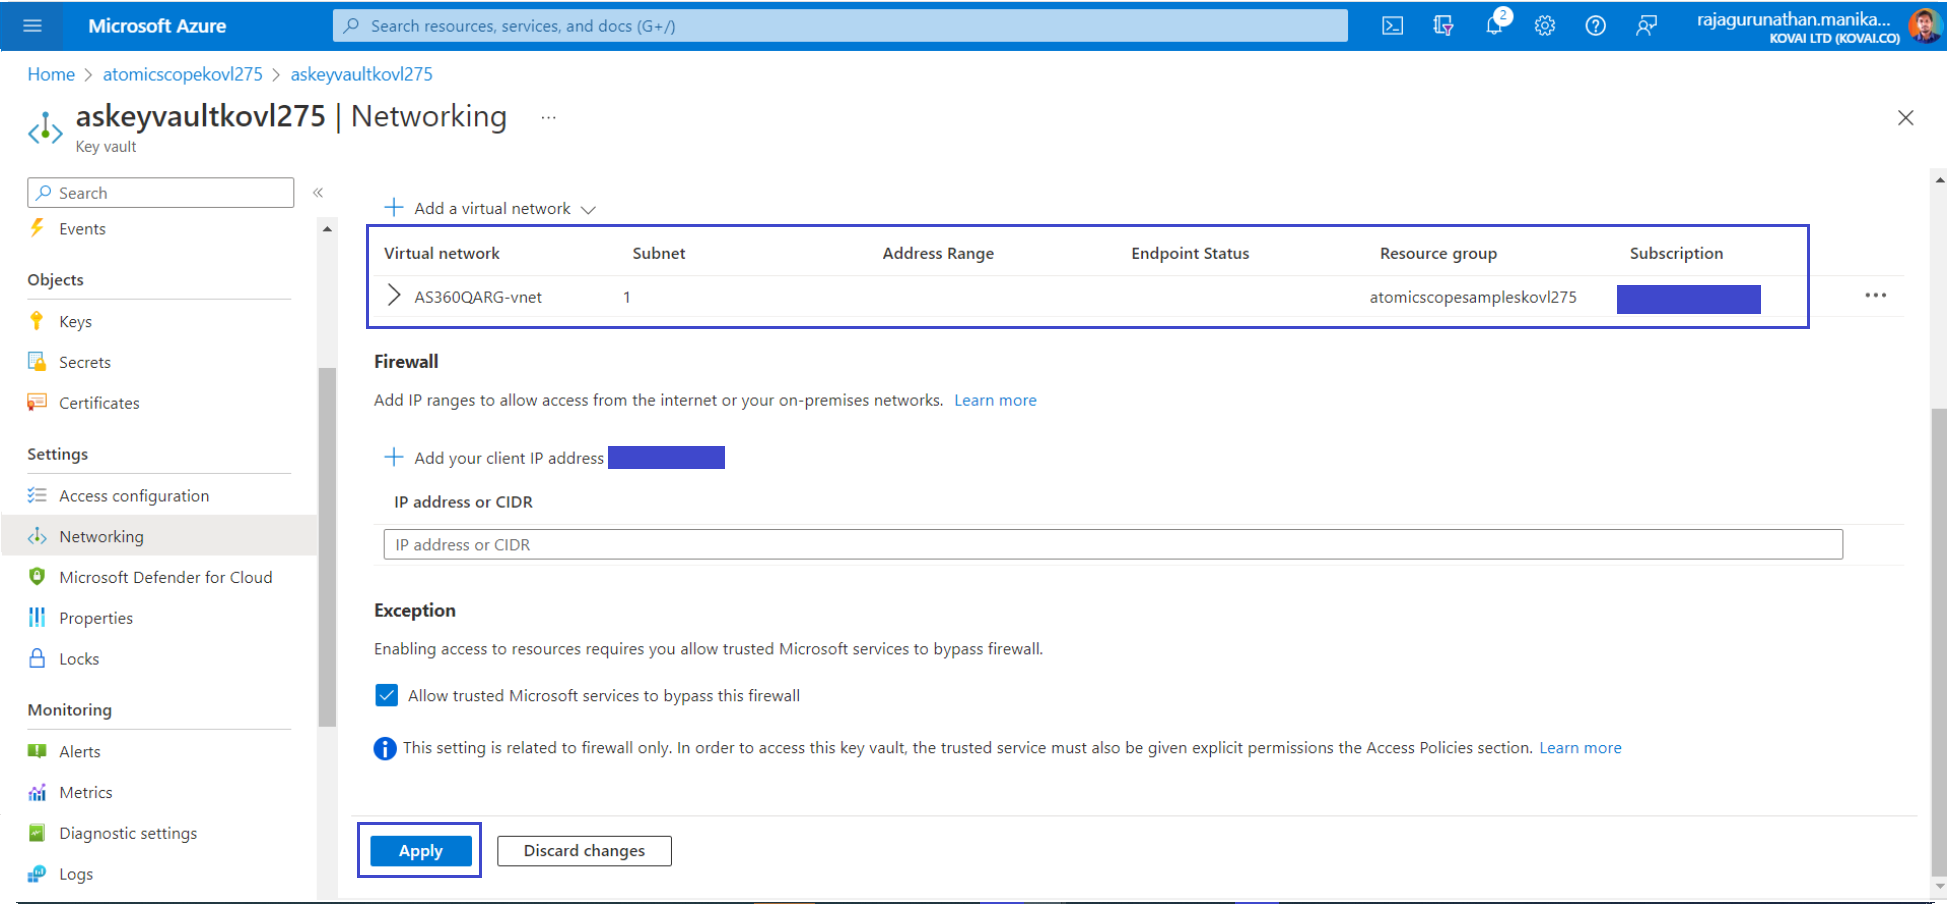
Resources in the virtual network can now communicate with the KeyVault using the private endpoint.
Now all the Atomic Scope resources has private endpoints and are integrated with Atomic Scope subnet in your IntegrationVNet.
Test the secured Atomic Scope function app
Lets check the Atomic Scope's private access state by accessing Atomic Scope function app,
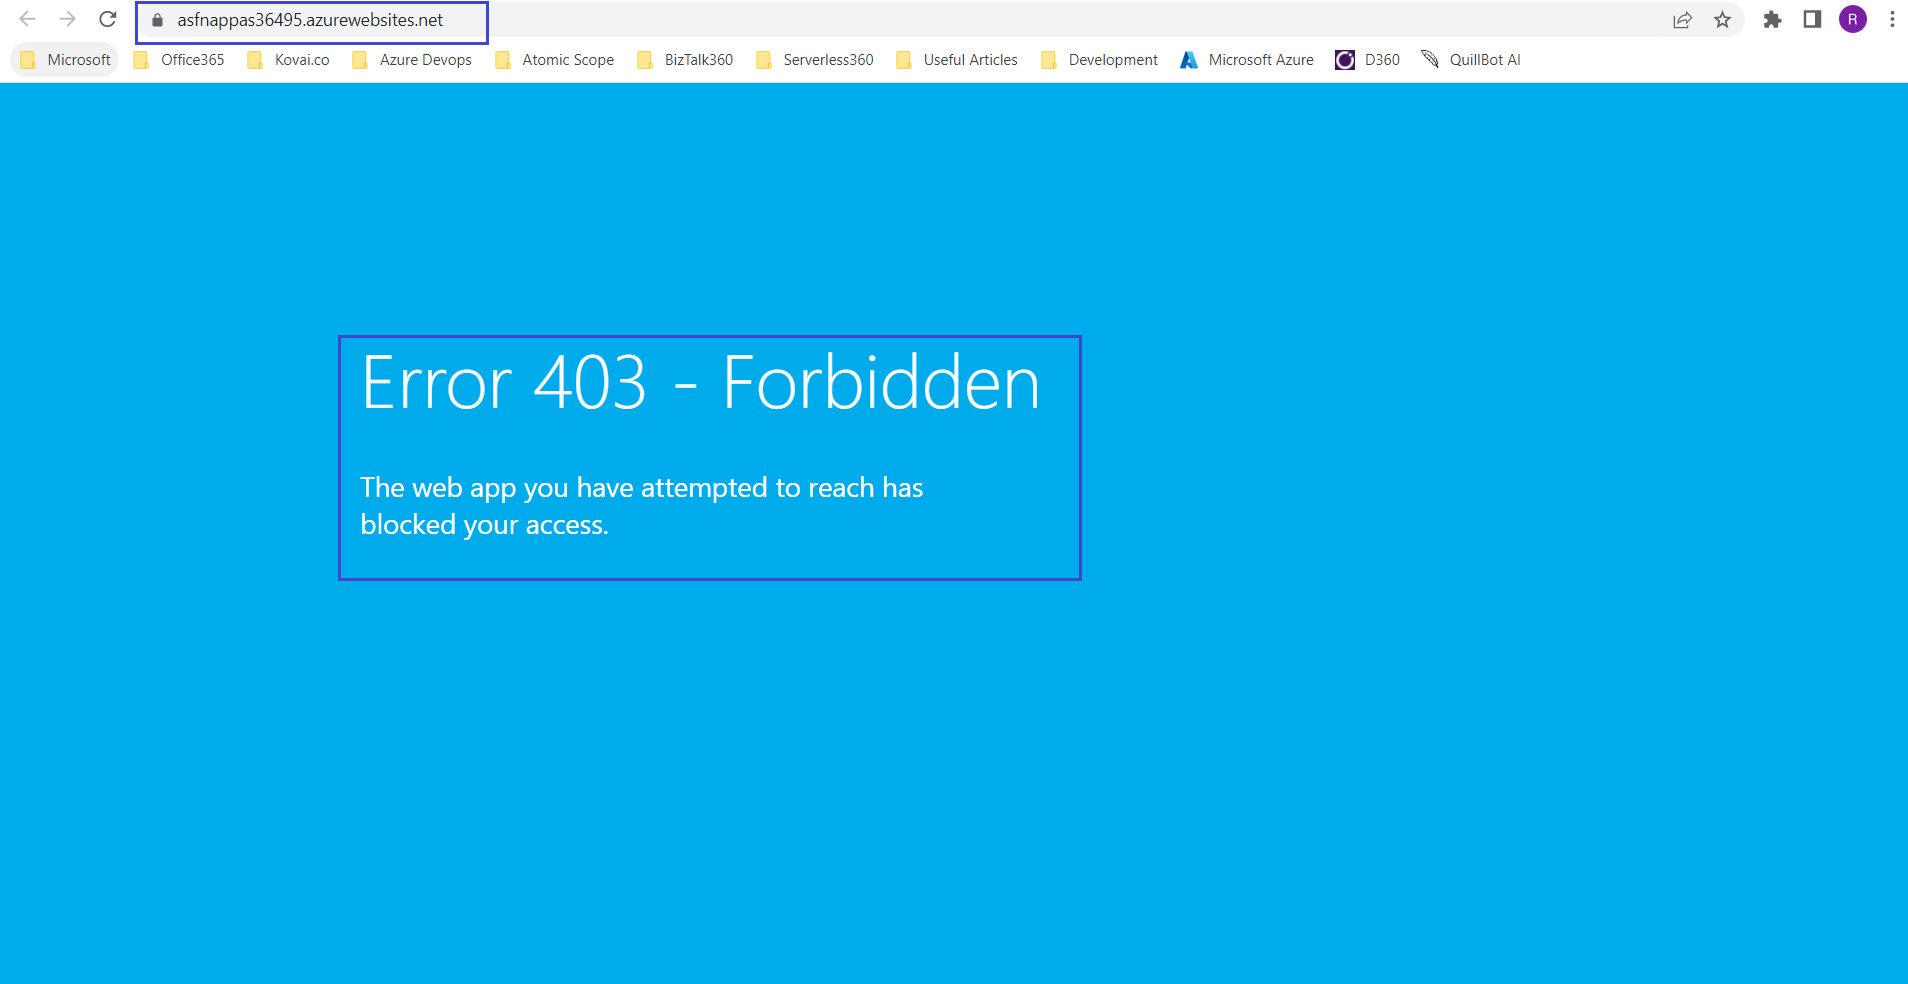
- Try running the Atomic Scope's function app URL from a public scope. This should restrict the function app access and should show a forbidden message with error code 403.
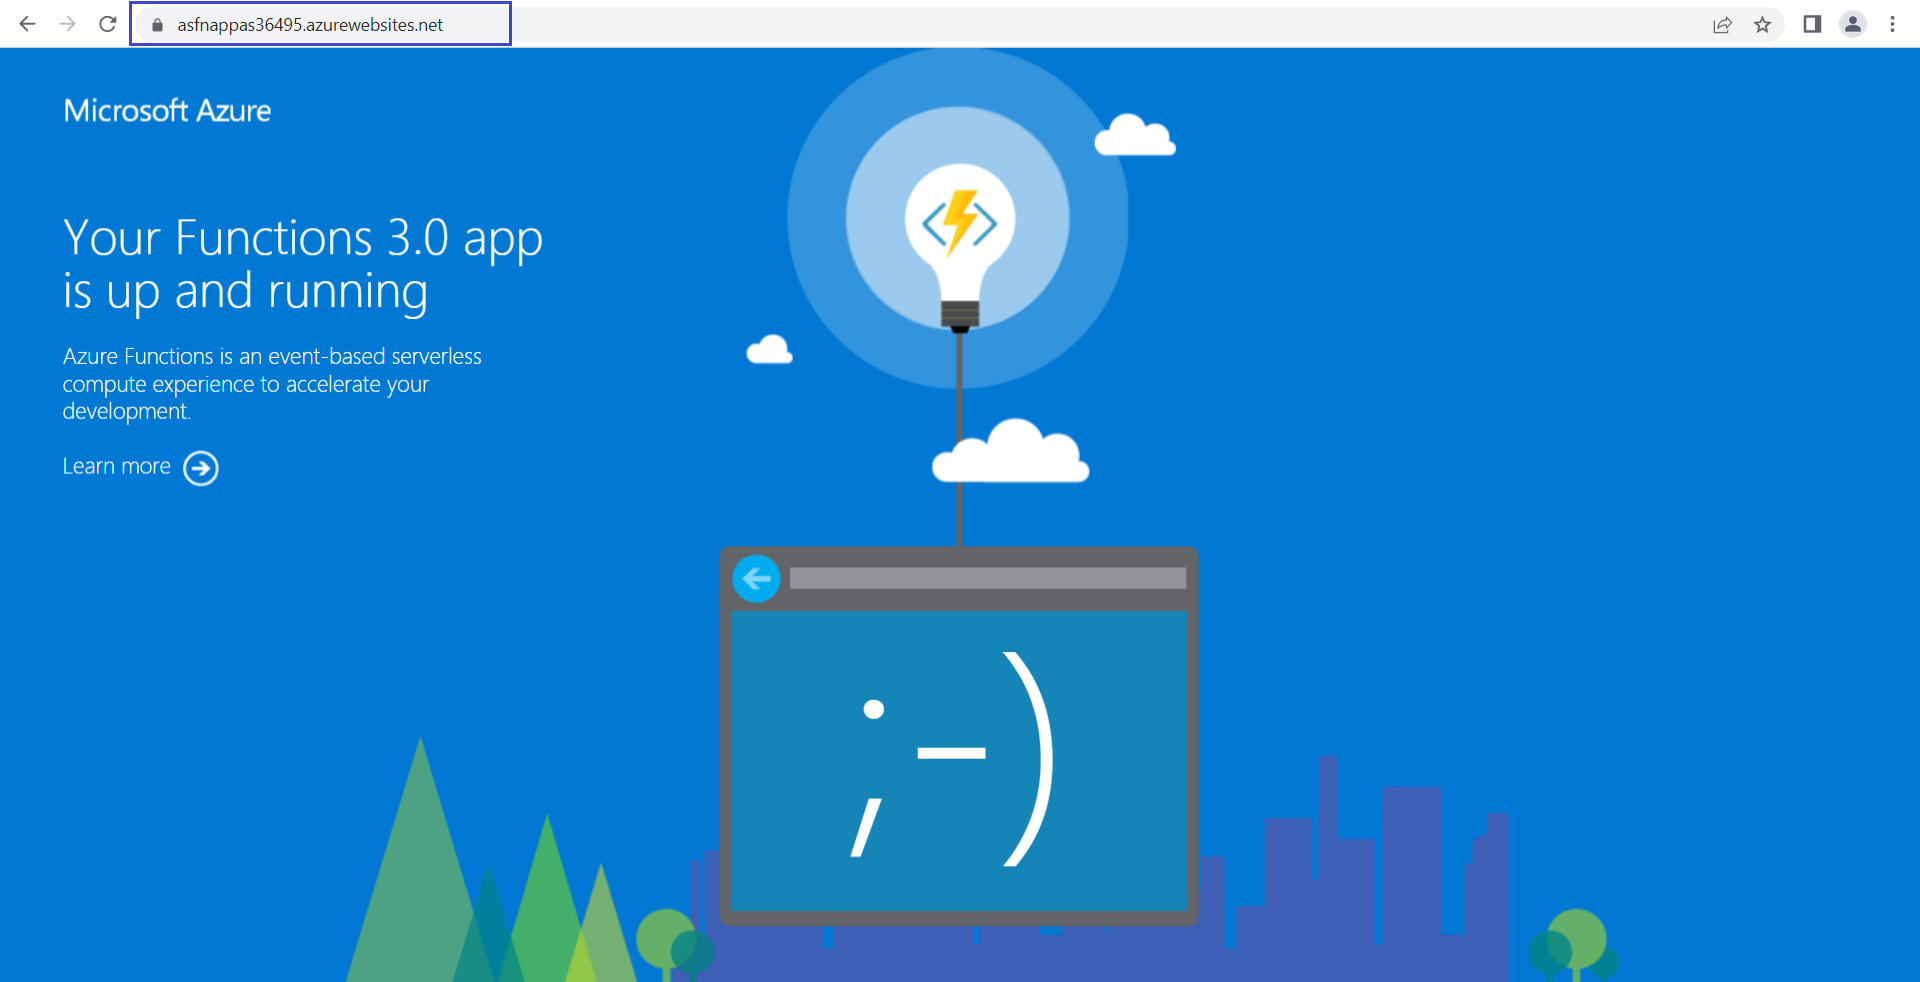
- Now try running the Atomic Scope's function app URL from the VNet scope (from any VNet's VM). This should show that the function app is running. So the Atomic Scope function app is now protected and functioning under the VNet. This is now accessible under VNet only.
Note:
The Atomic Scope installation components should be installed inside the VNet's machine for seamless functioning of Atomic Scope. Installing Atomic Scope out of the VNet scope leads to Azure resource communication problems and throws forbidden errors.
Reference: Integrate Azure Functions with an Azure virtual network by using private endpoints
Was this article helpful?