Logic Apps Connectors
- 22 Aug 2023
- 4 Minutes to read
- Print
- DarkLight
- Download PDF
Logic Apps Connectors
- Updated on 22 Aug 2023
- 4 Minutes to read
- Print
- DarkLight
- Download PDF
Article summary
Did you find this summary helpful?
Thank you for your feedback!
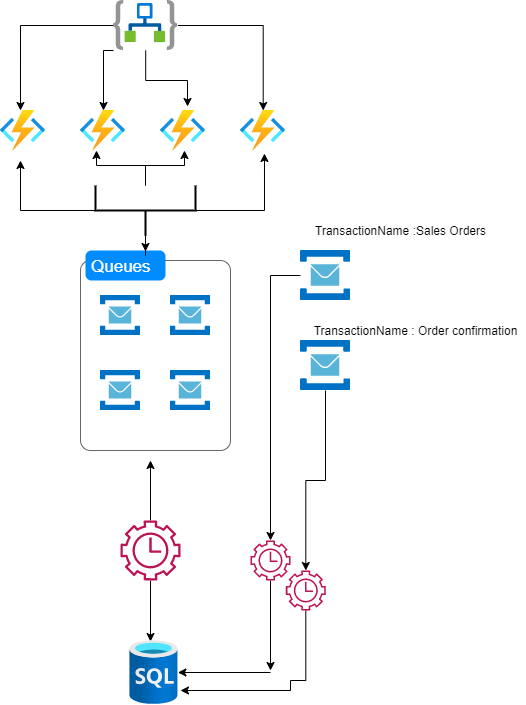
As per the design of the Atomic Scope, Logic Apps makes use of Custom Connectors created on top of Azure Functions to log activity events. The Azure Functions will store the activity logs to an Service Bus. All these events will be retrieved by the Atomic Scope Consumer service which is running on-premises and logs the activities into the database.
Use a single connector to perform both Start+Update events together. This will reduce the number of actions used in a logic app and also reduce the number of events thrown to ServiceBus resulting in slightly reduced cost and increased performance. Basics & FAQ
In this article, we explain how to leverage the Atomic Scope Connectors in your Logic Apps.
Note: Before you configure Logic Apps to leverage Atomic Scope Custom Connectors for tracking purposes, you must deploy the Atomic Scope Azure artifacts.
Mandatory Parameters
- BusinessProcess - User provided name for business process
- BusinessTransaction - User provided name for business transaction
- CurrentStage - User provided name for current stage
- MessageBody - The body of the message. It can be any JSON object from the Logic App flow. Typically, it would be the body passed to the HTTP trigger or entry point of a Logic App
- MessageHeader - Message header passed to HTTP trigger or entry point of a Logic App
- All the above parameters are mandatory for all the connectors.
Azure Functions as Custom Connectors
There are 3 Logic Apps Custom Connectors that gets deployed with Atomic Scope Azure Infra deployment. This section below will describe the usage of these connectors.
StartActivity
This connector creates an object capturing the provided parameters and creates an event in the Service Bus with the object data. This connector should be configured as an action after the trigger action invoking the Logic App.
MainActivityId - Optional if MainActivityId is provided, else mandatory. If this Logic App is a continuation of an existing message flow, you need to provide MainActivityId either from previous Logic App or pass the incoming HTTP header which should have the MainActivityId. Regardless, the function will provide this value as the output. It would either return the input value or create a new one.
StageActivityId - This property is required in UpdateActivity and LogExceptionActivity.
UpdateActivity
This connector updates the object created in the StartActivity connector with the parameters provided in the call and creates an event in the Service Bus with the object data. This connector can be invoked as many times in a Logic App as needed, typically whenever there is data of interest that needs to be stored.
Note: If the same field is provided with different values, the previous values will be overwritten.
- MainActivityId - MainActivityId from the StartActivity action output
- StageActivityId - StageActivityId from the StartActivity action output
- BatchId - If the transaction allows batch processing, you must provide an identifier that can be associated with the batch
- CorrelationId - If multiple transactions are involved in a business process, you must provide an identifier that can be used to correlate this transaction with others.
LogExceptionActivity
This connector creates an Exception object by correlating the stage using the StageActivityId from the StartActivity connector, and creates an event in the Service Bus with the object data. This connector can be invoked for any business or system exception that you would want to capture.
- StageActivityId - StageActivityId from the previous action output
- ExceptionMessage - Message that you want to log
- ExceptionCode - Some unique identifier or code that you want to associate with the exception type
Usage Guide
Using StartActivity and UpdateActivity within a single Logic App, follow the steps as shown below to invoke the Atomic Scope Custom Connectors inside a Logic App.
- Choose an action to call StartActivity. Type Atomic in the search box for connectors and actions, and you will see 3 Atomic Scope Custom Connectors listed
- Select StartActivity from the list to add the StartActivity Custom Connector to your Logic App. You will see the Connector as shown below
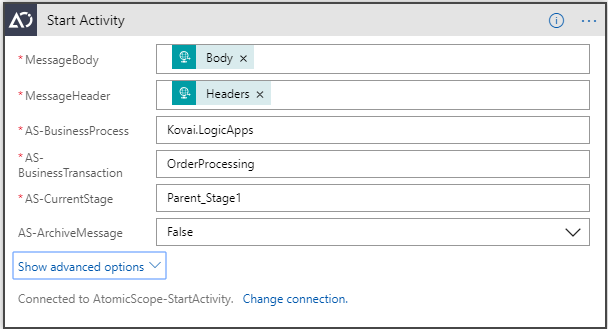
- Enter the required values to configure the connector. Fields marked with * are mandatory.
- The StartActivity connector returns two values: MainActivityId and StageActivityId. These values will be provided as input to UpdateActivity connector.
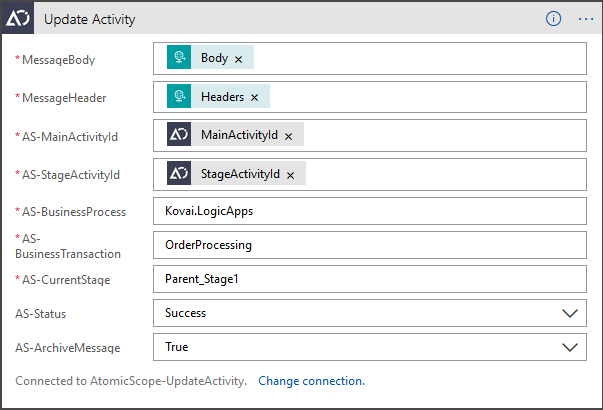
- Repeat Step 1 and instead of selecting the StartActivity, select the UpdateActivity connector.
- Enter the required values as shown in the below screenshot. Pass the message body in the Body parameter.
- The Status field can be set as Success, Failure, in progress or a Custom Value depending upon your stage.
- You may also provide the BusinessProcess, BusinessTransaction and Current Stage name but it is optional if MainActivityId is provided.
Additionally, you can view the Advanced options above to see the other properties that are supported by the connector.
9. Save the Logic App. Next time when you have a message flow through the Logic App, it will track the data and push it to the Service Bus.
Nested Logic Apps
When a business transaction spawns across Logic Apps, we pass the MainActivityId and CurrentStage values to the Logic App call connector. Below is an example of how the headers are passed to the Azure Logic Apps Connector.
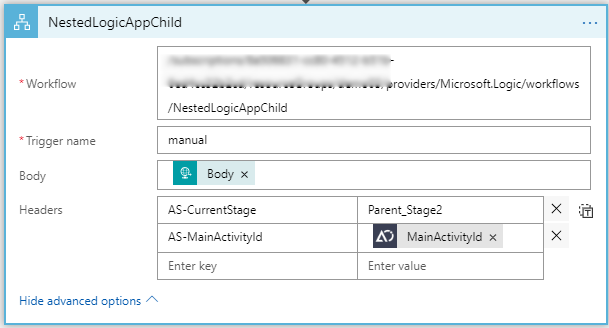
In the child Logic App, you must pass the Body and Header element of the HTTP trigger as shown below. The Atomic Scope Connectors will correlate these Logic Apps as they share the same MainActivityId.
Log Activity
Use a single connector to perform both Start and Update events in one action. This will reduce the number of actions used in a logic app and also reduce the number of events thrown to ServiceBus resulting in slightly reduced cost and increased performance.
For More information, you can refer to Basics & FAQ
Was this article helpful?